13 Ways To Use Cookie Cutters That Don't Involve Making Cookies
If you're a keen home baker, you've likely accumulated an assortment of cookie cutters over the years. Perhaps these have been relegated to the back of a kitchen drawer, pulled out only when, well ... you're making cookies. But if that's the only use these handy tools are getting, you're only scratching the surface. In fact, cookie cutters can be utilized in a whole host of other, non-cookie-related ways, transforming an array of sweet and savory dishes into perfectly-formed masterpieces.
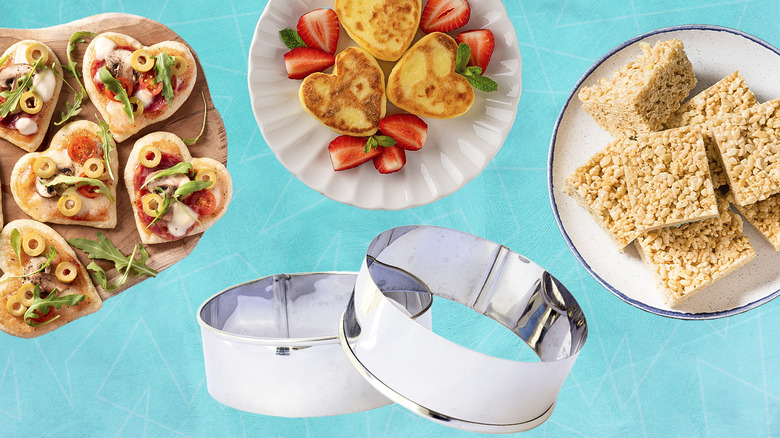
Whether they're round, heart-shaped, or holiday-themed, your favorite cookie cutters are the ultimate tools for injecting some fun and finesse into your food. They can help you make your weekend brunch plate extra special, jazz up a packed lunch, and mold no-bake treats into pleasing shapes. They can even come in handy when prepping homemade stuffed pasta.
If your cookie cutters aren't getting the attention they deserve, it might just be time to give them a new lease of life. Dig out your collection, and start elevating your kitchen creations with these tips for using cookie cutters.
Jazz up your fried eggs
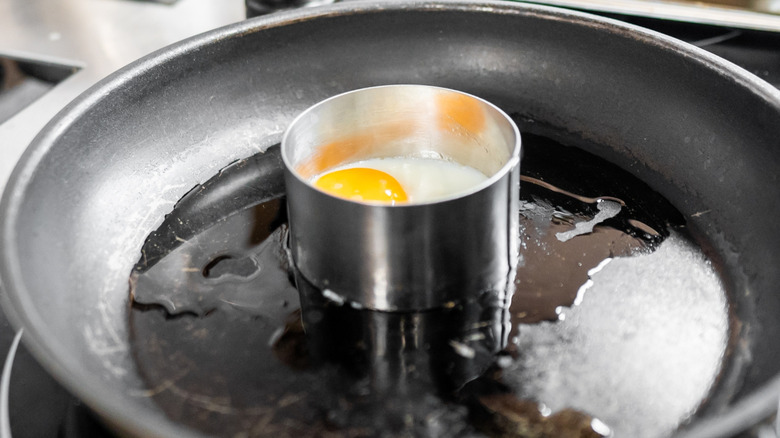
If eggs are your go-to breakfast, there's an easy way to elevate the presentation of these morning staples — and it involves the humble cookie cutter, of course. You can use cutters as a mold during cooking to achieve neat, rounded edges, or give your eggs a whole new shape altogether (star- and heart-shaped eggs look great, for instance). Additionally, you'll want to use metal rather than plastic cutters here to keep things heat-safe.
Start by cracking each egg into a ramekin or small bowl, which will help you pour it into the cutter more easily. Next, add some oil to your frying pan, and pop it over a low heat. Brush your cookie cutters of choice with some oil, too, then add them to the pan (with the sharp side down). Finally, pour the eggs into the cutters, cover the pan with a lid, and leave everything to cook until the egg whites have almost set; removing the eggs at this stage will ensure they slide out of the cutters with ease.
Grab some oven gloves, and carefully press down on each cutter to remove any escaped egg white. As you lift each one up, the egg should come away from the cutter. You can now leave the eggs in the pan, covered, for a final few minutes to cook through completely.
Make kid-approved sandwiches
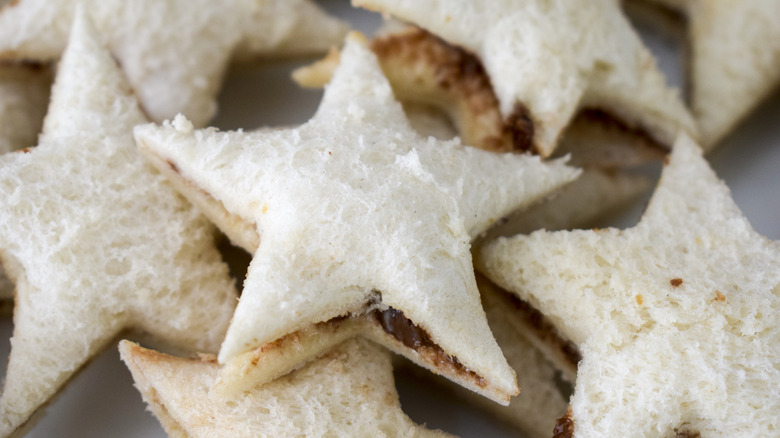
Why make plain old square-shaped sandwiches when you could have neat little sandwich stars, Christmas trees, pumpkins, or just about any shape you fancy? If your kids can be fussy when it comes to lunch, this is a fantastic way to get them excited about their food. Plus, you can even get them involved in the sandwich-making process.
Start by simply making a sandwich as usual. Classic combos like peanut butter and jelly or ham and cheese will work brilliantly here, though Nutella is always a crowd-pleaser, too. Once assembled, grab an appropriately-sized cookie cutter — one that fits within the surface area of the bread. Press the cutter down firmly into the prepared sandwich, and voila! You'll now have a kid-approved, crustless treat, and you can always serve the end cuts on the side or snack on them as you go to reduce waste.
Round cookie cutters can also come in handy if you're making dainty tea sandwiches, giving them a wonderfully elegant look. And heart-shaped cutters are ideal for creating a Valentine's Day-themed lunch for your loved one. You could even go all out and build a platter of various sandwich shapes for a holiday-themed party.
Create fun fruit shapes
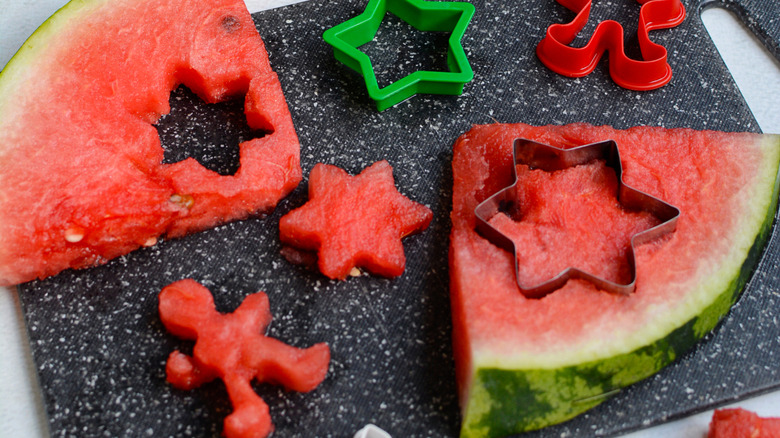
To transform simple fruit slices into something a little more creative, consider digging out those cookie cutters. This works beautifully with larger fruits like melons or pineapples. But depending on the size of your cutters, the same approach can be applied to pretty much any fruit you have to hand, including apples, kiwis, strawberries, and pears.
Slice the fruit into rounds or wedges, and stamp out the shapes with your cutters; the formed pieces are perfect for dunking into a homemade fruit dip. Of course, this technique can work just as well with veggies, too, so try using mini cutters to shape slices of zucchini, carrot, or cucumber.
Another fun idea involves starting with a round slice of apple. Use your cutter to remove a heart or star-shaped section from the middle, before using the same cutter to cut a piece from a different fruit. You could even opt for a slice of cheese, and can pop it into the apple slice to fill the gap you cut out. You can also do this with slices of strawberry, instead filling the holes with melted chocolate and chilling them in the fridge until set.
Craft a themed charcuterie board
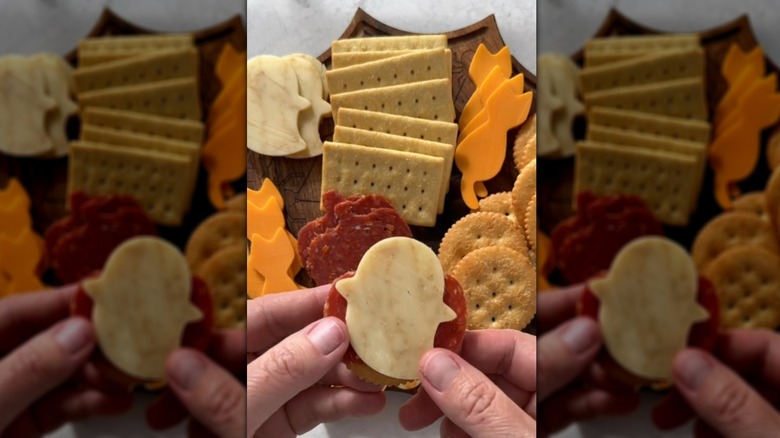
Give your next charcuterie or snack board (there's a difference) a serious upgrade with some whimsical cut-out shapes. This will work well with both cured meats and cheeses, and there's the option to spruce up any fruits and veggies you're adding, as well.
Start by cutting the cheese slices nicely thin, ensuring each one has the maximum surface area possible. Of course, you can also save time by using pre-sliced cheese. Cured meats are generally pre-sliced, but go ahead and prep these, too, if required. After this, it's time to get shaping. The possibilities are endless here, so feel free to get creative with your shapes.
There's also an easy cookie cutter hack available if you're including a whole wheel of brie or camembert cheese on your board. Take a cutter and gently press into the center of the wheel, cutting ½ inch or so into the cheese. Then, carefully lift away the top layer of the cut out area with a butter knife to remove the tough outer rind. Your cheese should have a pleasingly-shaped indentation, which can be filled with a layer of jam or chutney before being proudly displayed on your board with a selection of dippers.
Make pancakes extra special

A plateful of pancakes already feels like a treat as is. But you can make your weekend brunch stack even more appealing by shaping each fluffy delight into a unique design. After all, cookie cutters can serve as an effective tool if you're looking to whip up a batch of Instagram-worthy pancakes.
First, mix up your pancake batter with the usual suspects. A thicker batter is ideal here, as it's less likely to leak out of the cutter during cooking. Grease the cutters next by rubbing them with oil or spritzing them with cooking spray, and make sure you're using metal, heat-safe cutters for this. After you place the cutters in the pan, spoon or pipe the pancake batter into each cutter, ensuring it's spread out in a nice even layer (and into every nook and cranny).
After a few minutes of cooking — essentially when bubbles begin to appear on the surface of the batter — use kitchen tongs to carefully lift each cutter and flip it over. Take a butter knife and gently press down on each pancake until it releases from the cutter. You can now leave the pancakes to cook for a final few minutes until they're lovely and golden on the bottom, and they'll retain their shape.
Decorate a homemade pie
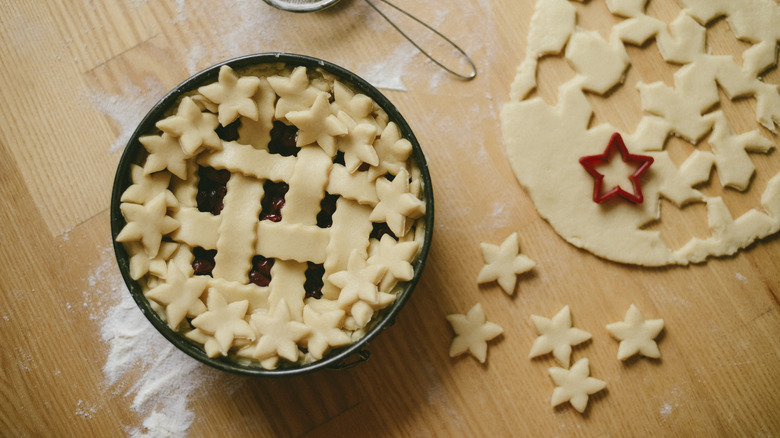
What could be more appealing than a freshly baked pie? Well, one that's been adorned with adorable decorations, of course. When topping a pie with pastry, there are a whole host of decorative opportunities to explore. You can go for a classic lattice design, add elegant leaf- or fruit-shaped pastry cut-outs, or give your pie a seasonal twist with cookie cutters.
You can totally use a store-bought pie crust for this, but it's also easy enough to whip up from scratch. Regardless, once the dough's rolled out, you can get to work cutting out some fun shapes. If your cutters have a tendency to stick to the dough, try dipping them in flour beforehand.
For a partially open-topped pie, layer your cut-out shapes of choice directly on top of the filling, leaving some areas exposed. Conversely, you can start by draping a single layer of pastry over the filled pie and sealing the edges, before adding your selection of shapes on top. Make sure to brush the pastry with beaten egg before baking to achieve a gloriously golden, shiny finish.
Whip up some stuffed pasta
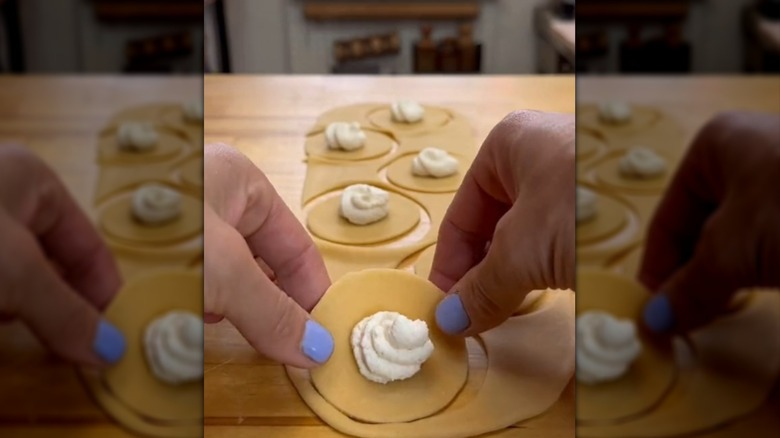
You don't need a fancy ravioli cutter to make stuffed pasta. In fact, if you grab a simple round cookie cutter, you'll be good to go. Once you've prepared the pasta dough, rolling it out nice and thin, go ahead and cut some circles out of the dough. You can add your filling of choice to the center of the circle, whether that's a creamy ricotta mixture, a meaty medley, or some finely diced sauteed veggies.
When it comes to sealing the ravioli, there are two main methods to consider. The first is simply taking a second round of dough, and placing it over the first circle to cover the filling. Pinch the edges together, crimping them with a fork if desired, and your filling will remain snugly inside.
Alternatively, you can fold the filling-topped circle in half, again sealing the edges to create a semi circle shape with the filling enclosed within. The final step is boiling the ravioli for two to three minutes, then it's ready to enjoy, perhaps tossed with butter or marinara sauce.
Make perfect mini cakes
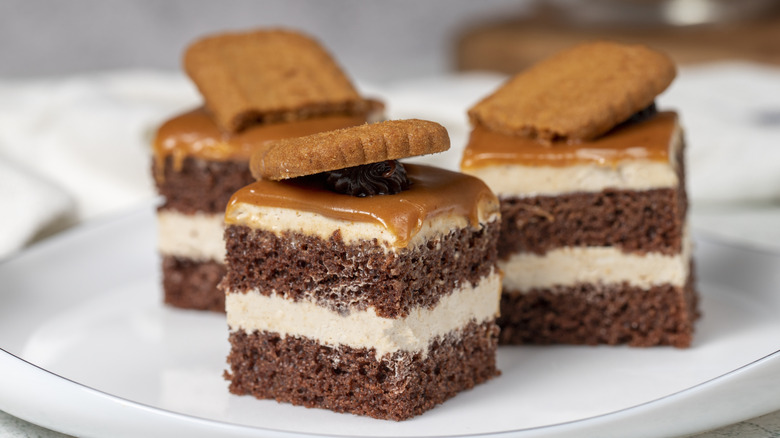
Cutting cakes into neat, bite-sized portions is a wonderful way to give them a touch of sophistication. And with the help of a cookie cutter, it couldn't be easier. Start by baking two separate layers of cake in large rectangular pans. The flavor is completely up to you here, so take your pick; vanilla, chocolate, lemon, or red velvet would all taste fantastic. If you're using a light-colored batter, tinting each layer with a dash of food coloring is an amazing way to amp up the presentation, as well.
Once the cake layers have cooled completely, they're ready for cutting. Place a layer onto a cutting board, then use the cookie cutters to create your desired shapes. Circular, square, or rectangular cakes are sure to look beautifully polished, but you can absolutely shake things up with more unique, themed cutters. For each mini cake, you'll cut two of the same shape and stack them on top of each other, filling the middle with frosting, jam, or whipped cream. There's plenty of room for creativity when it comes to decoration. Try topping the mini cakes with fresh berries, edible flowers, chocolate shavings, or crumbled cookies.
You can also create these decadent sweet treats without even switching on the oven by transforming a basic store-bought sheet cake into mini cakes. Carefully scrape off the frosting, set this aside, and cut out your cake shapes, before stacking and sandwiching them with the reserved frosting.
Bake some mini pizzas
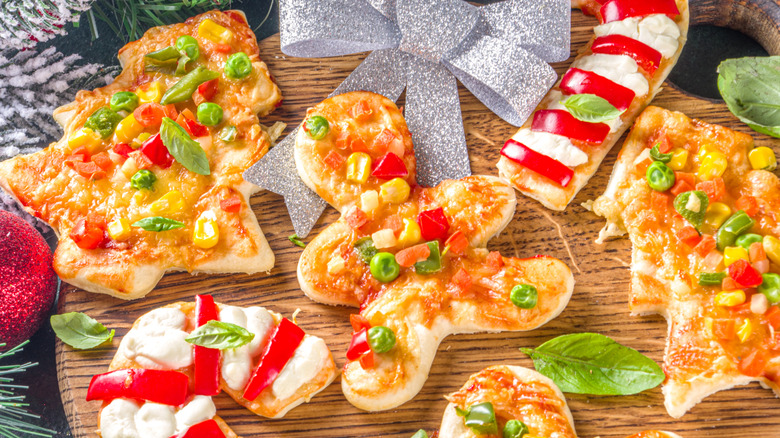
We'll stick with the mini theme here while delving back into the savory realm with super cute cut-out pizzas. It's another brilliantly easy technique that can be carried out with either store-bought or homemade pizza dough, and the resulting pizzas can be customized to your taste with a variety of toppings.
You'll first need to roll out or hand stretch your pizza dough until it's approximately ⅓ inch thick. Using your chosen cutters, create some shapes, and place these onto a parchment-lined baking sheet. Make sure to leave an inch or so of space between each mini pizza to allow room for spreading, as well. You can add some toppings, too, though for a classic Italian-inspired approach, start with a layer of marinara sauce and sprinkling of cheese. Mozzarella, cheddar, or Parmesan all work great, followed any meat and veggie toppings, before baking the mini pizzas for around seven minutes at 425 degrees Fahrenheit.
Cut Jell-O into jigglers
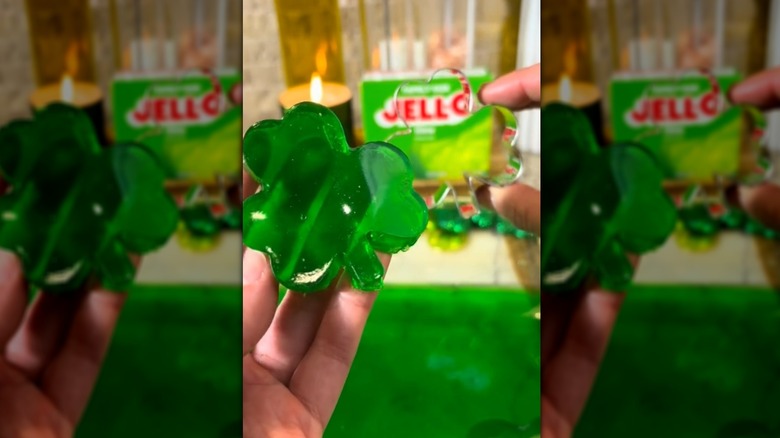
With their vibrant hues and satisfying wobble, Jell-O jigglers are the perfect solution when you want to prep an easy, kid-friendly dessert or snack in advance. The mixture can be made in minutes, before being popped in the fridge to set. Of course, we're creating these perfectly portioned treats with the help of cookie cutters, as well, because why wouldn't you want to shape your Jell-O into something fun?
To make these, you'll need two 3-ounce boxes of Jell-O (any flavor will work). Empty the contents of both boxes into a mixing bowl, and pour over 2 cups of boiling water. Stir well, ensuring all of the powder has dissolved. Grease a large rectangular baking dish or high-sided pan with cooking spray, and pour in the mixture. Give the dish a few sharp taps against the countertop to remove any bubbles, and poke any stubborn remaining air pockets with a sharp knife if required. After chilling in the fridge for at least four hours (or overnight, if preferred), remove the gelatin by briefly submerging the outside of the pan in warm water, then turning it out onto a cutting board.
Now comes the fun part. With the right cutters, you can craft beautiful Jell-O stars, hearts, animals, flowers, and more. In fact, a green, lime-flavored Jell-O dish is a particularly fitting choice for crafting clover-shaped jigglers for St. Patrick's Day.
Customize a basic bag of marshmallows
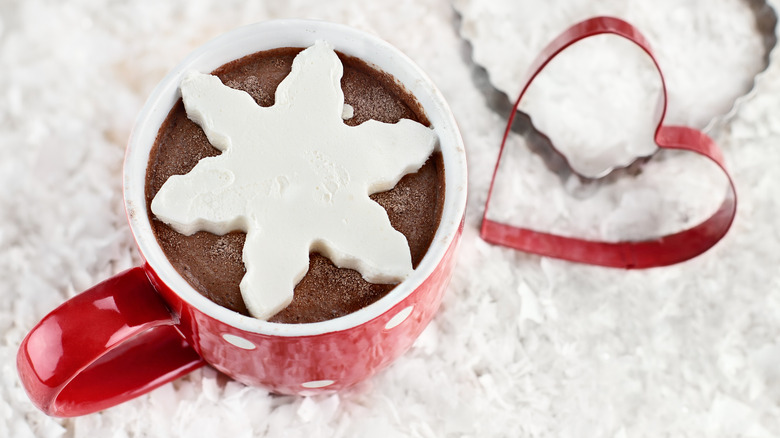
Marshmallows typically come in the form of satisfying, squishy cubes, but you don't have to leave them this way. Armed with your trusty cookie cutters, you can transform these treats into whatever shape your heart desires.
To do so, start by greasing both a rectangular baking pan and large microwave-safe bowl. Next, stir together some powdered sugar and cornstarch in a separate bowl, and set this mixture aside. Empty your store-bought marshmallows into the greased bowl and heat them in the microwave in 30 second bursts until fully melted. Pour the gooey melted marshmallows into the prepared baking pan, then dust some of the cornstarch mixture over the top (and use some to coat your hands, too). Push down on the marshmallow so it goes right up to the edges of the pan in a nice even layer, then leave it to set for about 30 minutes.
When you're ready to cut the marshmallow shapes, dip your cutters into more of the cornstarch mixture, and use them to stamp out your designs. During the holiday season, we love making snowflake-shaped marshmallows, which are ideal for topping a festive spiced hot chocolate. Once your shapes are perfected, dust each cut-out with a final layer of powder, which will prevent them for sticking together when you store them. They should keep well in an airtight container at room temperature for up to three weeks.
Give Rice Krispies treats a new look
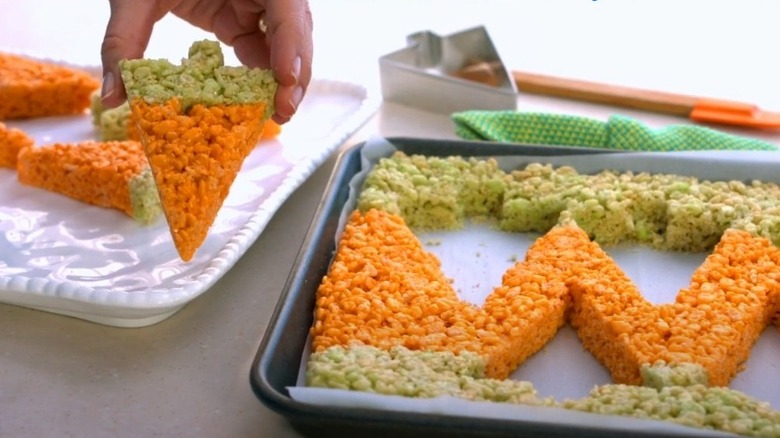
Rice Krispies treats are a beloved snack or dessert. They're hassle-free to prep, and require just a handful of simple ingredients. And while they're generally cut into rectangular slices, giving them the cookie cutter treatment can enhance your treats with a whole new look.
To prep the cereal mixture, first melt together butter, marshmallows, and a dash of vanilla extract in a large saucepan over low heat. Once off the heat, pour in the Rice Krispies, stirring everything together until the cereal is fully coated. Spoon the mixture into a greased rectangular baking pan, and use your hands or the back of a spoon to spread it out into a smooth, even layer.
You can scatter over any toppings as desired, such as sprinkles, candies, or extra mini marshmallows, then place the pan into the freezer for around 15 minutes so everything can firm up. Once your Rice Krispies slab is nice and solid, you can go wild with your cookie cutters, pushing them into the sticky cereal mixture to create an array of different shapes.
Use them as molds for homemade fudge
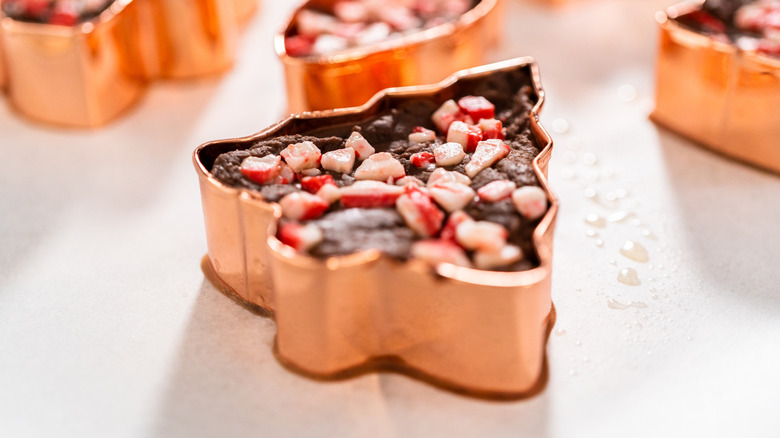
Homemade fudge is another excellent candidate for crafting fun designs, with cookie cutters serving as effective molds. To use them, first grease each cutter, then place a piece of foil over the bottom of each one, wrapping this up over the sides to create a secure, leak-proof base. Arrange the cutters foil side-down on a baking sheet or cutting board, and they're ready to be filled.
For the fudge mixture, you can use your go-to recipe. Common ingredients include chocolate, butter, peanut butter, and marshmallows. Dark chocolate peppermint fudge works beautifully if you're whipping up some festive fudge shapes, while strawberry marshmallow fudge is ideal for crafting Valentine's Day-themed goodies. Generally, recipes will involve heating the ingredients together in a microwave-safe bowl until melted and combined, but be sure to follow the specific instructions depending on which flavor you choose.
Pour your mixture into the prepared cutter; a toothpick or small knife can be useful for spreading everything right up to the sides. You can add some toppings if you'd like (such as crushed candy canes, freeze-dried berries, or chopped nuts), then place the filled cutters into the fridge for at least two hours. Once the fudge has set, remove the foil from the cutters, and gently push the surface of each fudge shape until it comes away from the cutter — before tucking into your decadent creations.