TT Culinary Institute: Pie
Learn to master piecrust and fill it with the flavors of the season
We may receive a commission on purchases made from links.
For more lessons in cooking, check out the TT Culinary Institute.
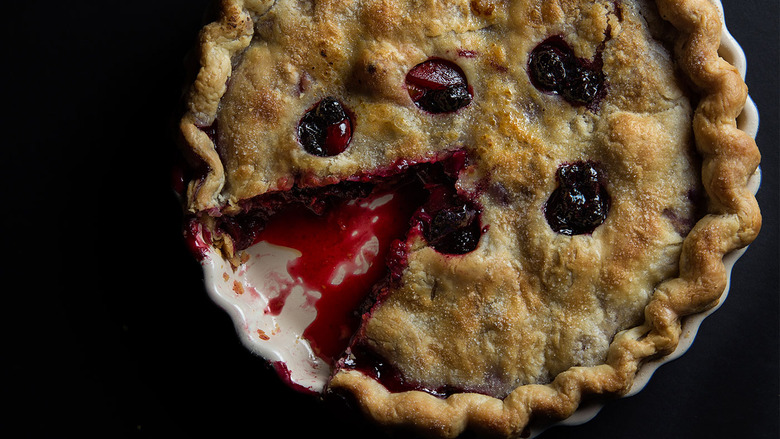
Pie is a year-round romance for most dessert lovers. We celebrate the bounty of the harvest in fall; tuck into hefty chocolate, toffee and nut concoctions—or light, bright citrus—in the chill of winter; and fall face-first into rhubarb and mint the second spring beckons. But summer is perhaps pie's finest hour.
It's a simple way to put the market's best—berries, cherries, stone fruit and herbs—into the spotlight, nestling it all in a beautifully crafted crust that's as much about science as it is about love. Though the latter is up to you, the former is a matter of following some precise but simple steps (see the recipe) to make sure the whole is even more than the sum of its perfectly made parts.
TT's kitchen assistant, Katy Peetz, a seasoned pastry chef, has spent so many hours mixing, rolling, filling, crimping and baking so many pies, she could probably make a fantastic one in her sleep. Luckily for the rest of the staff, she opted instead to serve more than a few in our Test Kitchen—along with a generous serving of her acquired knowledge.
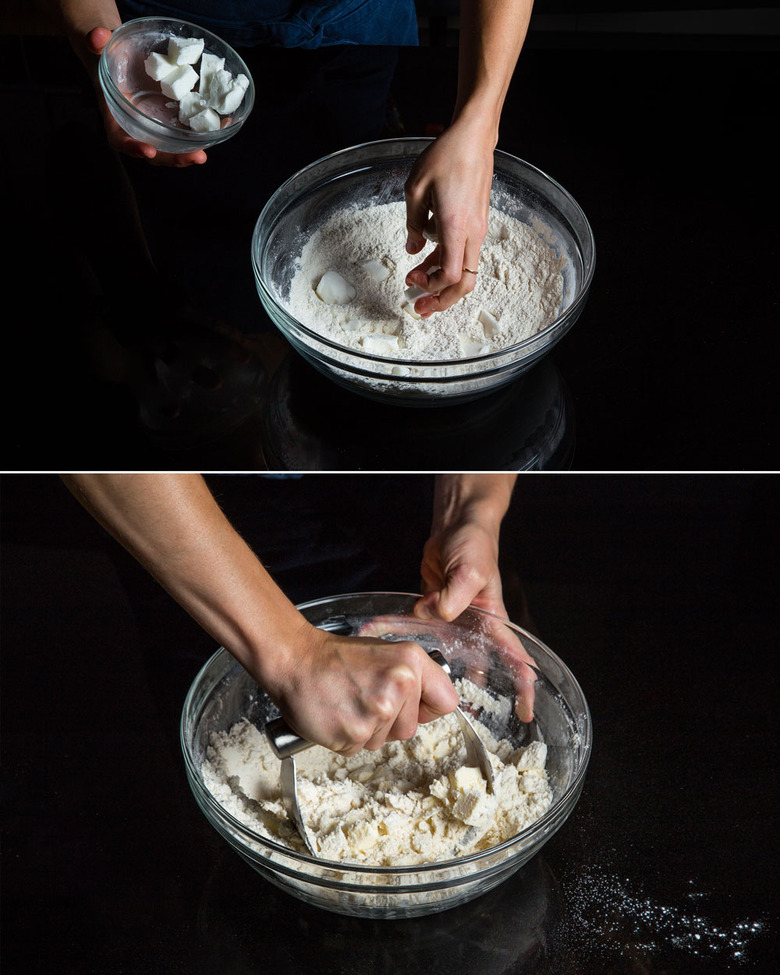
Work the shortening into the flour with a pastry cutter until the mixture has the texture of cornmeal. Then cut the butter in, using a fork to scrape away any large chunks, until the dough forms flaky, pea-size pieces.
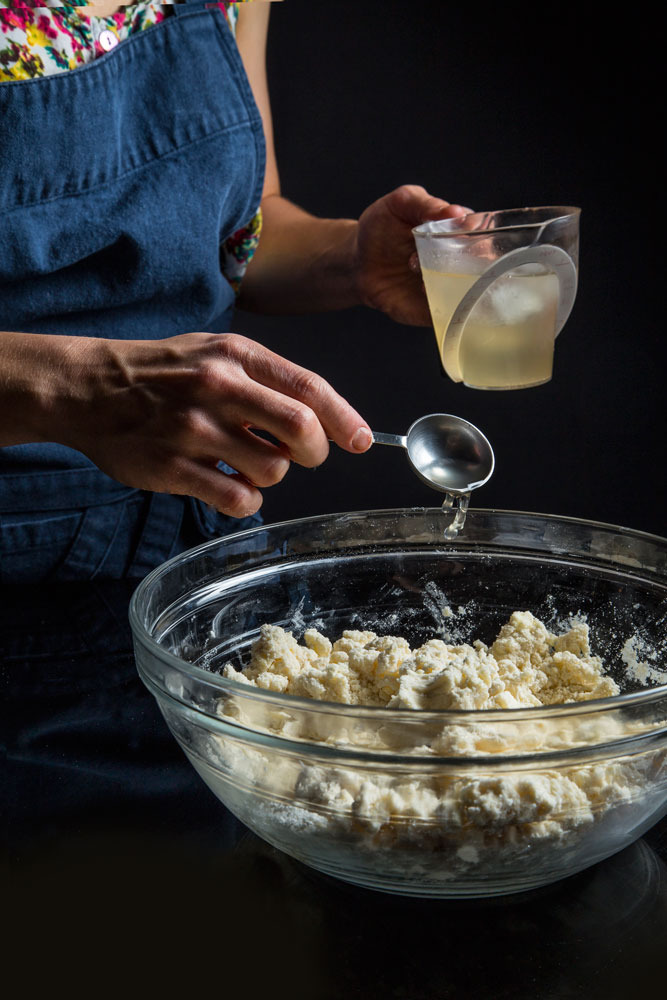
Add the chilled vodka, vinegar and ice water to the mixture, and work it together with a fork.
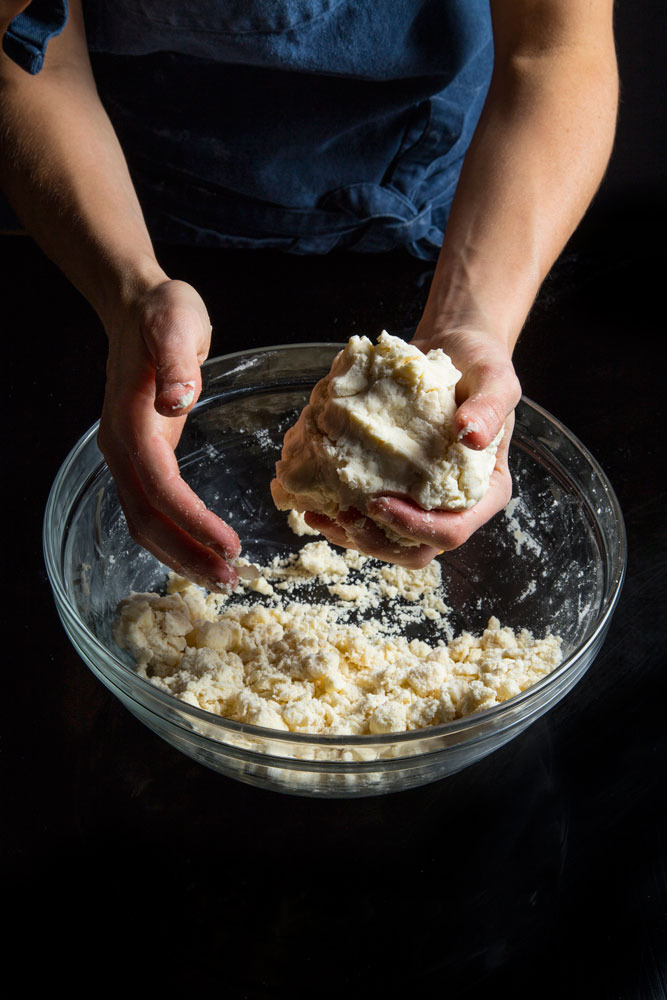
Form the dough into two shaggy balls with your hands, making sure not to overwork it. If there are scraps at the bottom of the bowl, add water and pinch them into the dough balls.
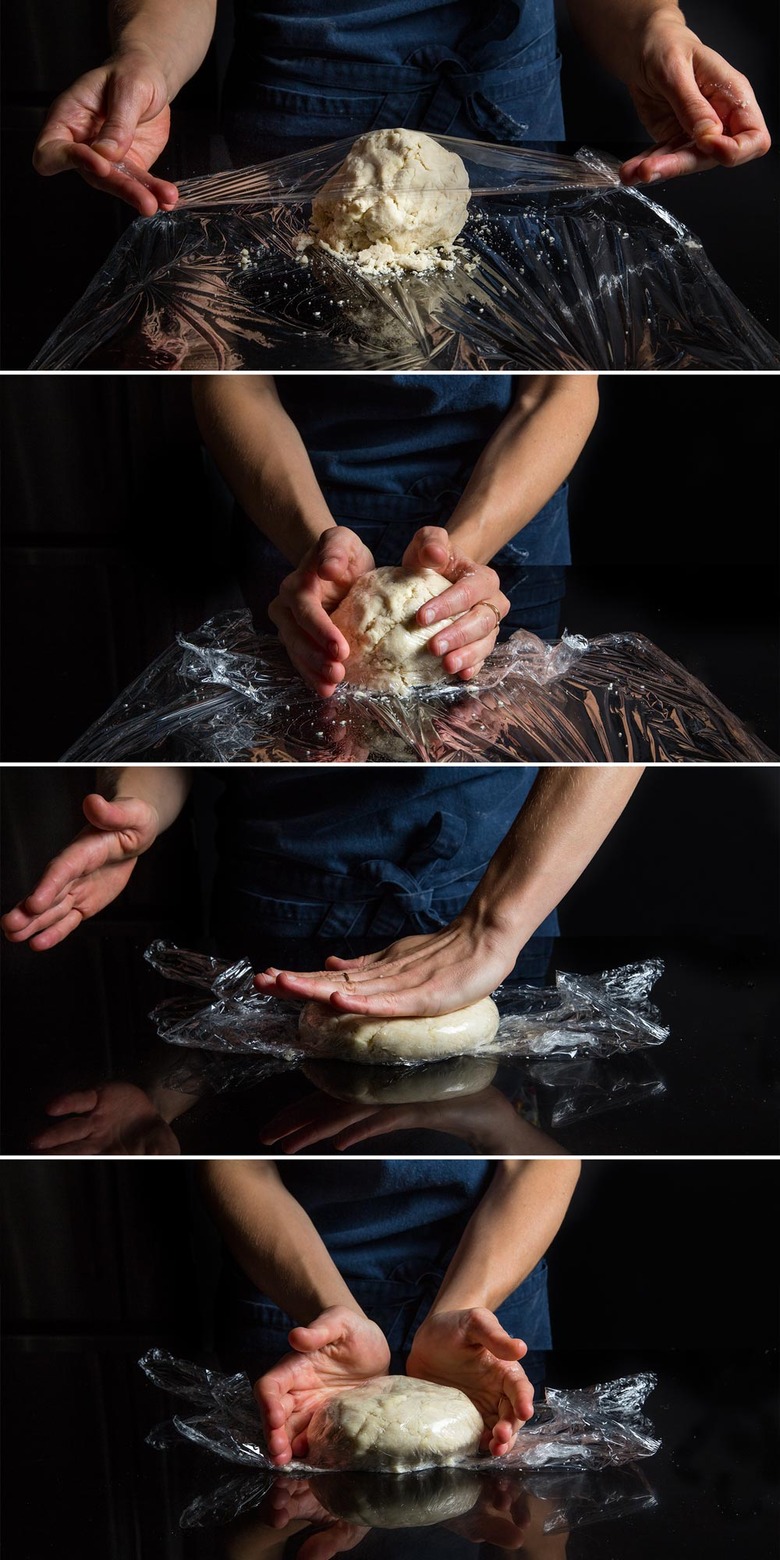
Cover each ball with plastic wrap, tucking the edges under, then flatten them into smooth, four-inch-diameter discs and refrigerate them for at least an hour.
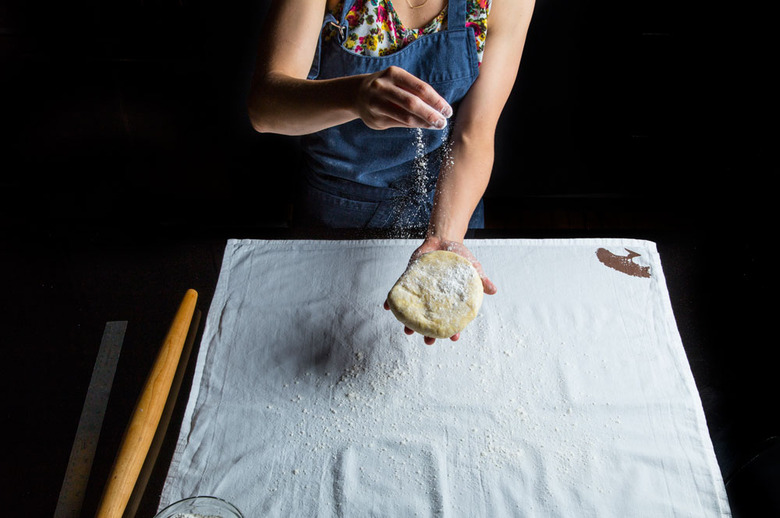
Spread a floured towel on your work space and flour a dough disc.
Using a rolling pin, gently but firmly pound the disc out to a diameter of around seven inches. Rotate the dough and roll it out from the center in an X shape to one, five, seven and 11 o'clock, rotating and reflouring as needed until about an eighth of an inch thick, with marbling streaks of butter and smooth edges.
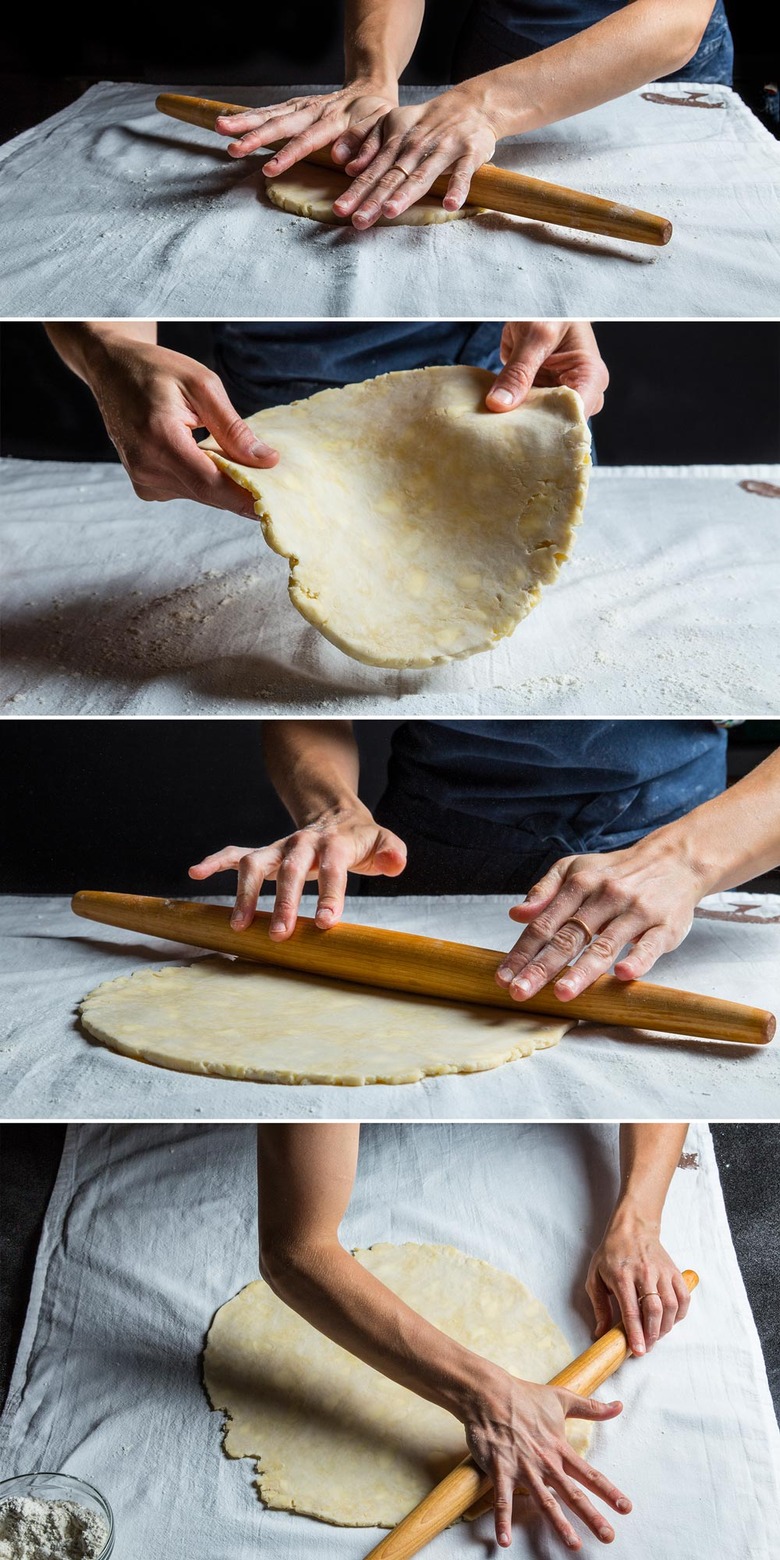
Fold the dough in half and then quarters; transfer and unfold it onto a baking sheet.
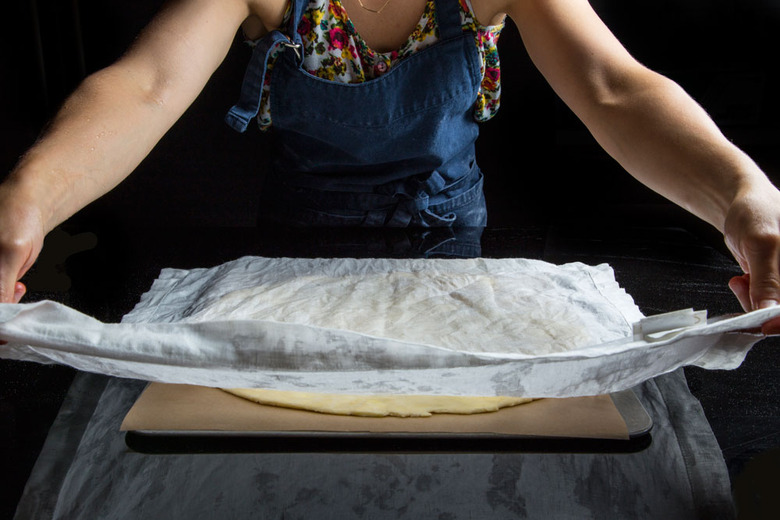
Cover the dough with a moist towel and let it rest in the refrigerator for at least an hour.
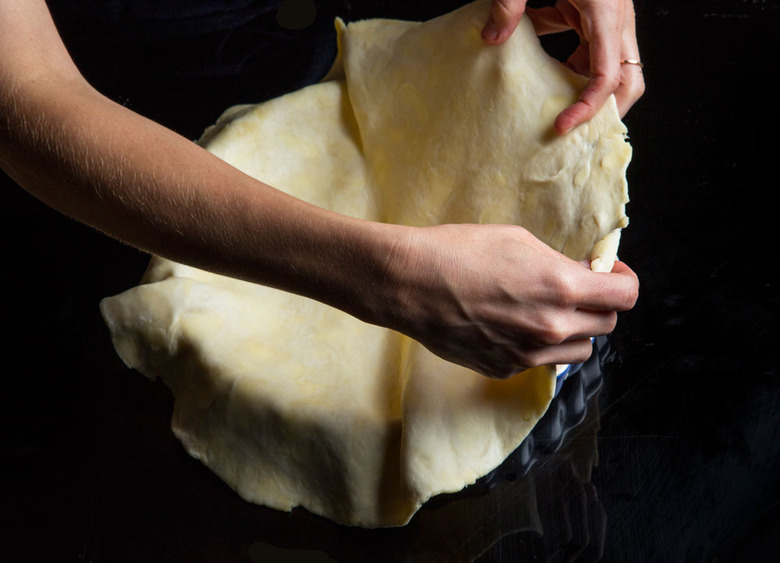
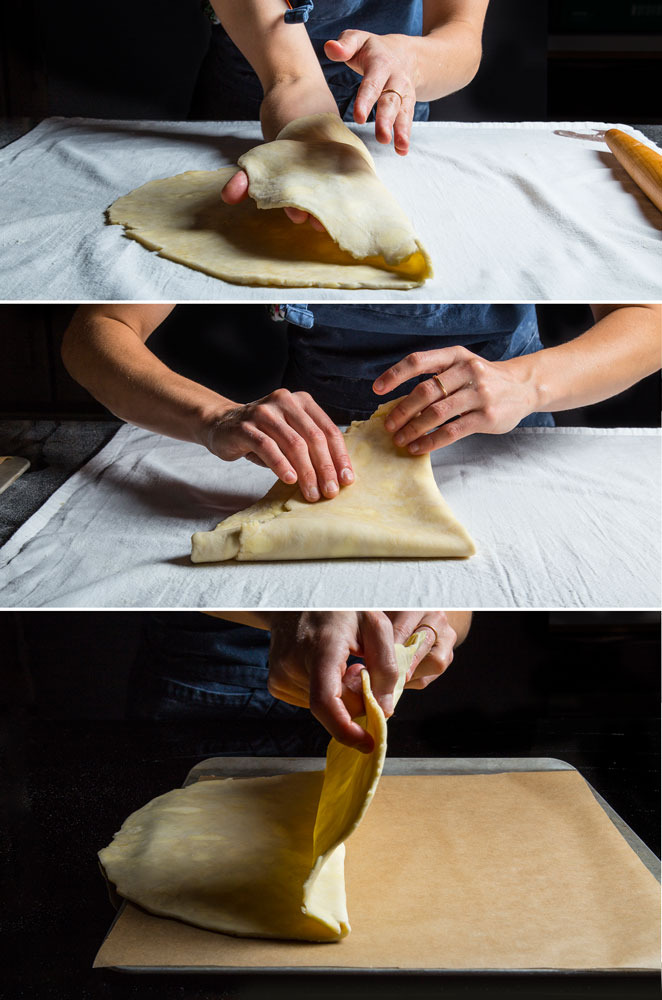
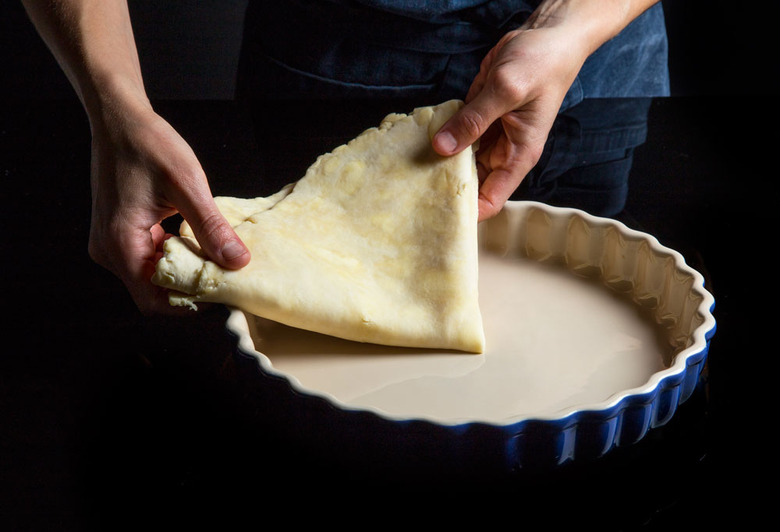
For a single-crust pie, place the dough into a pie plate using the quarter-fold method and unfold it in reverse, making sure to press it into the bottom and sides. Let the dough hang over the edges.
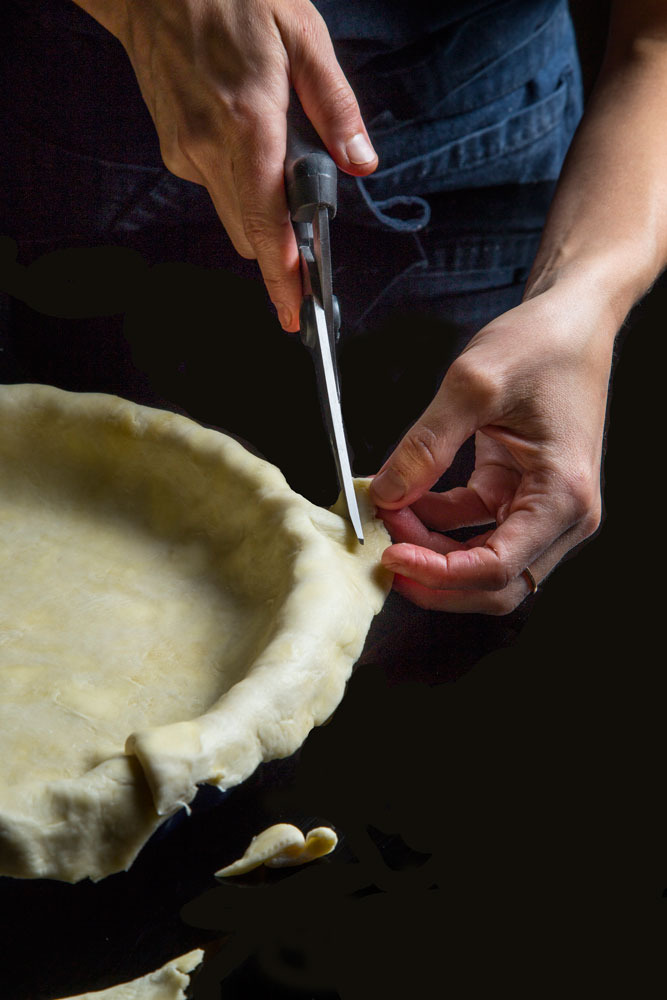
Trim the dough to three quarters of an inch, measuring from the top of the pie plate.
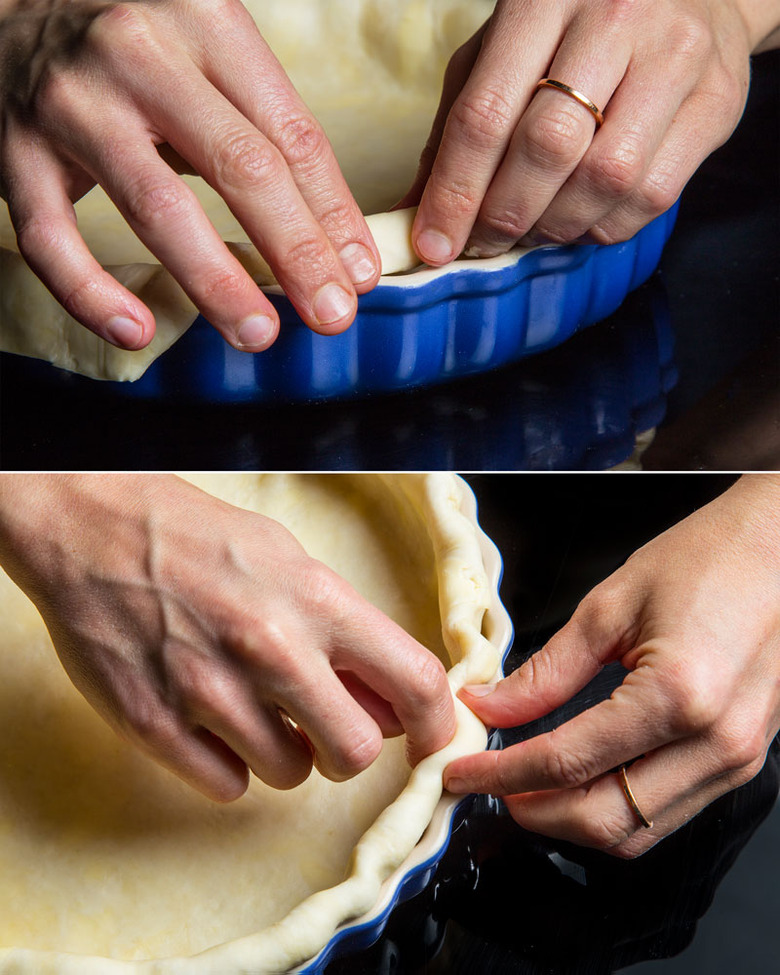
Roll the dough inward, then use your fingers to crimp the edges.
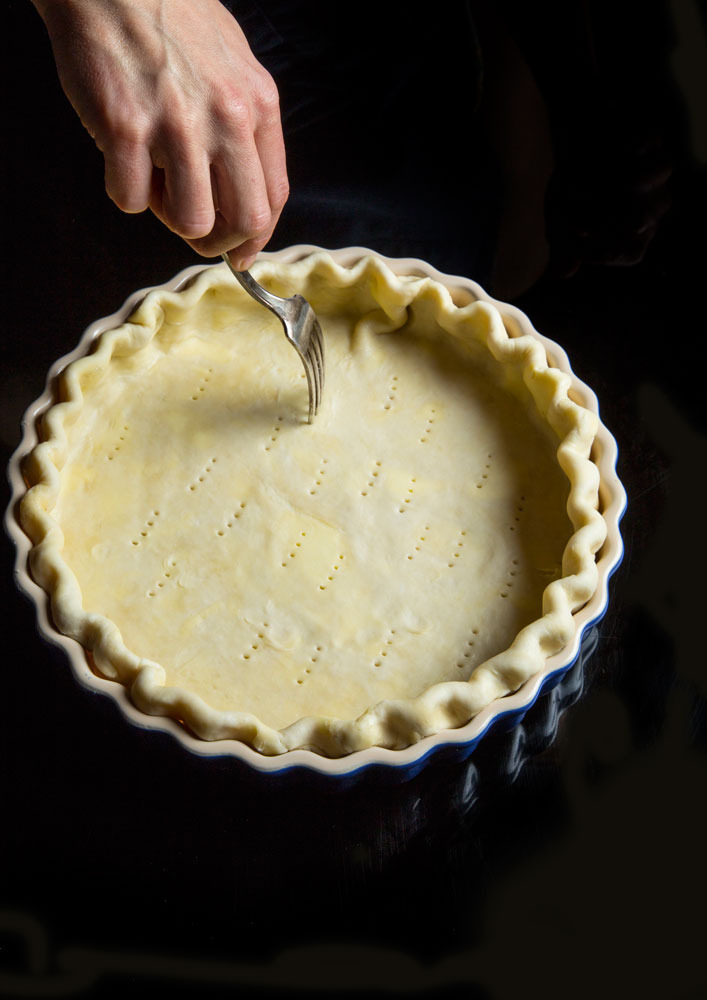
Use a fork to prick holes in the dough.
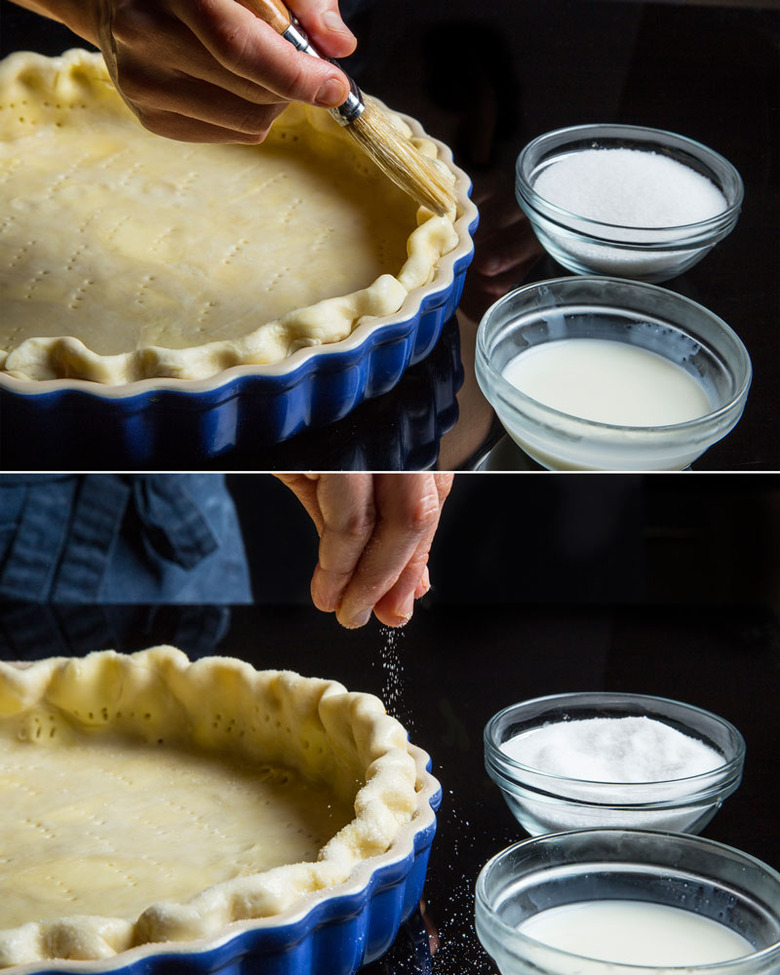
Brush the crimped edges with milk and sprinkle them with sugar.
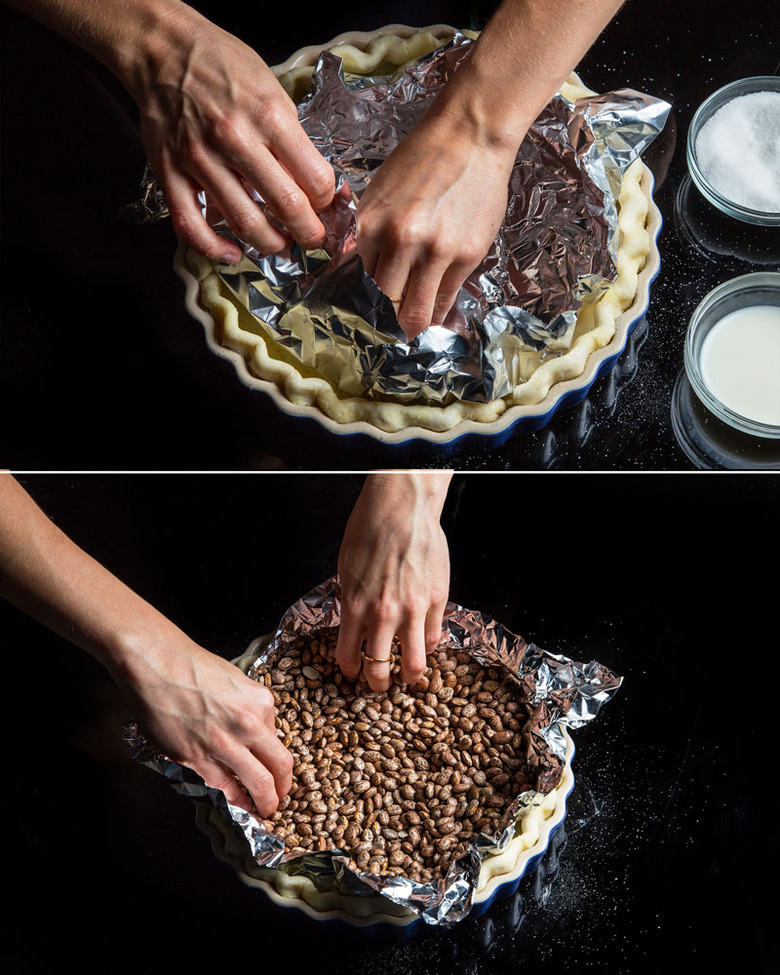
Line the crust with aluminum foil and then fill the pan with pie weights or beans, making sure they cover the inside edges. Bake the crust until the edges are golden brown.
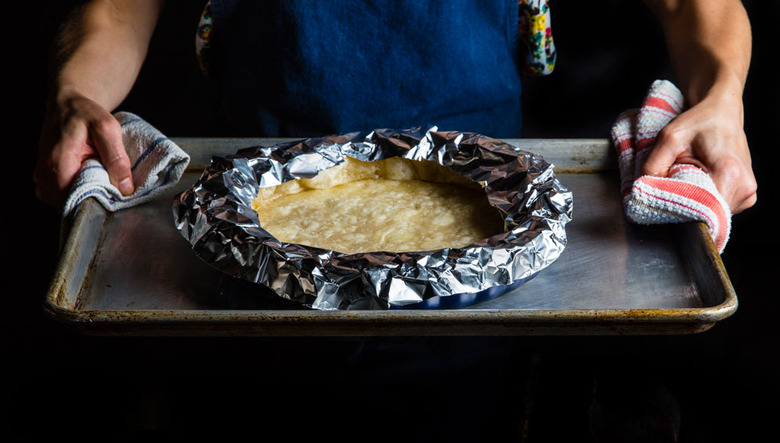
While the crust is baking, make a foil ring cover. Tear a 12-inch piece of aluminum foil and use a pair of scissors to cut the center into a circle. Bend the foil and round the edges. Remove the pie from the oven, remove the foil and pie weights and use the ring to cover the browned edges. Return it to the oven and bake until dried and golden brown.
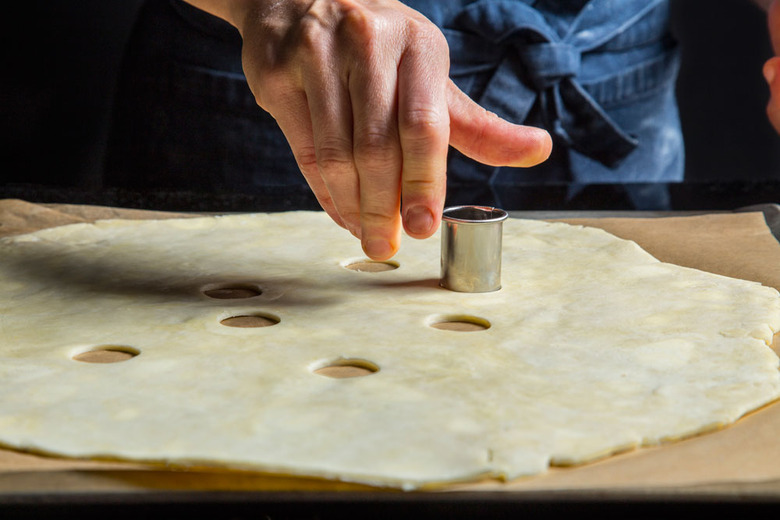
If you are making a double-crust pie, punch or cut out vents in the dough, then refrigerate it.
Unfold the bottom crust dough in the pie plate and let the edges hang over.
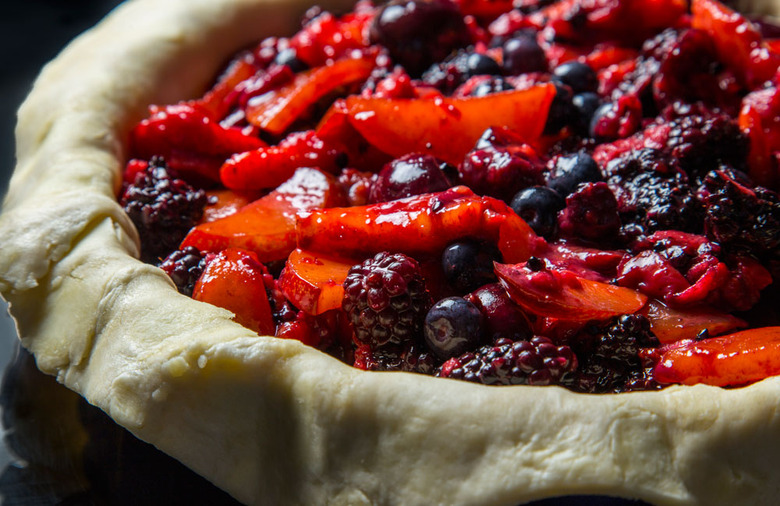
Add your fillings to the plate.
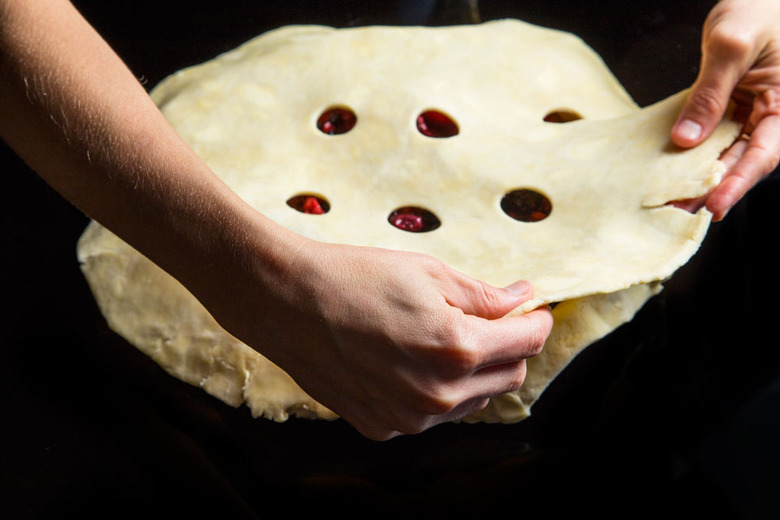
Lay the chilled top crust over the fillings, letting the edges hang over.
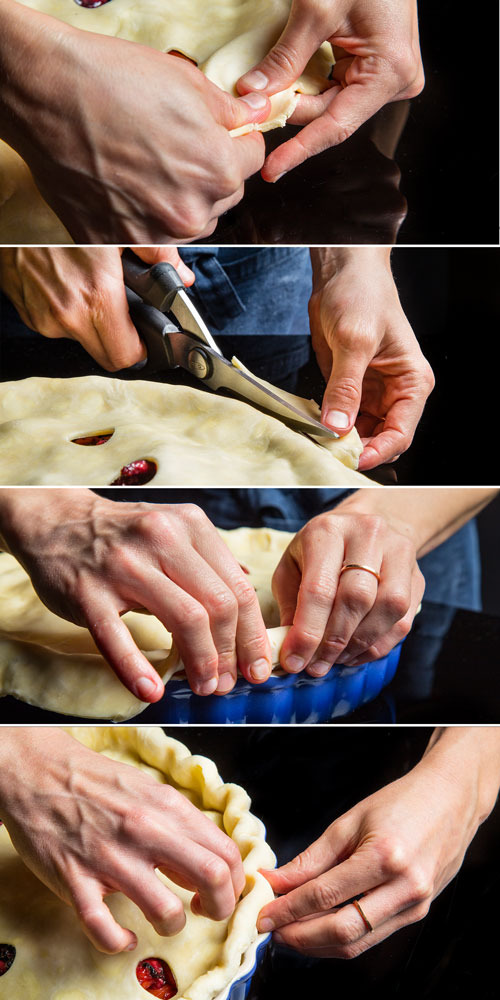
Pinch the two crusts together with your thumbs and index fingers to create a seal, and trim them to a three-quarters-of-an-inch overhang then crimp them together.
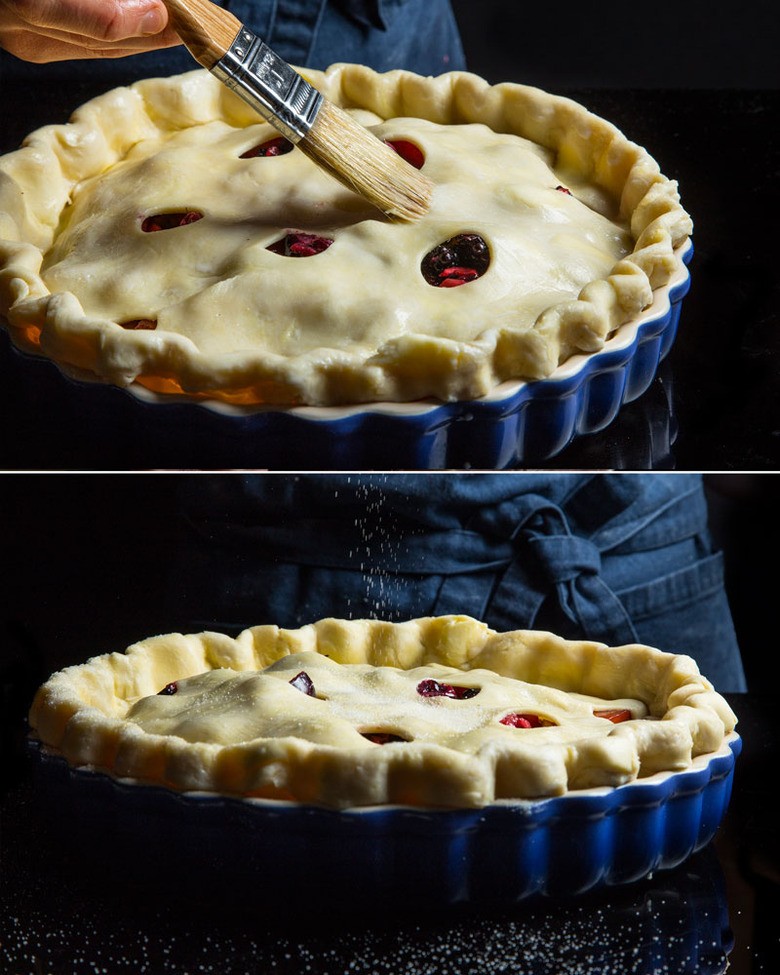
Brush the top crust with milk and sprinkle with sugar.
Fat's where it's at. Though some may swear by lard, shortening or straight-up butter, Katy prefers a combo of equal parts butter and shortening. Butter is unparallelled in flavor but doesn't do much for tenderness, she says, and shortening is vice versa. For her, an even mixture of the two yields a consistent dough that is easy to handle, tastes great and has fantastic texture.
Stay cool, man. Keep everything extremely cold, Katy advises. Refrigerate the butter pieces until they're very cold and freeze the shortening. It won't freeze solid, but will hold an ideal firmness for cutting into the flour. She even recommends refrigerating the measured-out dry ingredients in a large mixing bowl for at least 20 minutes.
If at any point the butter starts to become soft, press pause on the mission and transfer the bowl to the refrigerator or freezer for 10 to 15 minutes. If the butter melts, your crust will separate, and you'll end up with just a gloppy crumbly, greasy mess.
Mix and mingle. Combine the flour, salt and sugar in a large bowl and whisk them with a fork to both break any clumps and aerate the mixture. Once that's done, use a pastry cutter—a cheap tool that'll soon become indispensable—to cut the fat into the flour.
Katy swears by a technique she learned at The Blue Stove in Williamsburg, Brooklyn: adding the fats separately. First, add the shortening to the flour and incorporate the two, cutting and stirring with the pastry cutter until the mixture resembles cornmeal. Then add the butter and cut that in, using a fork to scrape away any large chunks. Work that in until the dough is in flaky, pea-size pieces with just a few butter chunks remaining.
Take a shot. Of vodka and vinegar, that is. The spirit evaporates faster than water and adds no flavor—plus, the alcohol will cook out during the baking process. The acid in the vinegar cuts gluten strands. The two will be mixed with water and ice for a chilled liquid that will lead to fantastic texture.
Hands off. After the dry ingredients, fat and liquid have gotten a chance to hang out, use a fork and then your hands to gather the dough into two loose, shaggy spheres. But don't overwork them, Katy cautions, because that will cause gluten to form and the crust to toughen. (If dry scraps are left at the bottom of the bowl, add a little water and pinch them into the dough balls.)
RELATED Our Best Pie Recipes "
Wrap each ball in plastic; tuck them into smooth, four-inch-diameter discs; and rest them in the refrigerator for at least one hour, preferably, overnight, or up to three days. Move them to the freezer and you may have just crafted the crust for the pie you'll eat a month from now.
Roll with it. Lay a towel on a smooth, clean surface and flour it lightly, along with both sides of the cold dough disc. Though any number of implements can get the job done, Katy prefers using a handleless, tapered French wooden dowel to get things rolling, because its design places the pressure in the middle of the pin while rolling the dough outward, giving her maximum control over even thickness.
She advises gently but firmly pounding the disc with the pin, rotating to a diameter of around seven inches, taking care not to cause cracks around the edges. Then begin rolling in an X shape, starting in the center and moving outward at one, five, seven and 11 o'clock, then rotating, reflouring the dough as needed, until you have a 13-inch circle, about an eighth of an inch thick, with marbling streaks of butter and smooth edges. Then refrigerate that for 20 minutes to let the gluten (and your arms) take a breather. You're almost there.
Slide into home plate. Katy tested ceramic, metal, glass, disposable aluminum tin and a cheap nonstick pie plate, and her favorite was a nine-inch ceramic Le Creuset with fluted edges, both for easy crimping guidelines and even heating. She also found that a quarter fold is the easiest way to center the dough into the pie plate, creating a snug fit. Fold the dough vertically into a half moon, fold that horizontally and transfer it to the bottom right corner of the pie plate—then unfold it in reverse. Very gently, press it into the corners and sides, letting the dough hang over three quarters of an inch, measuring from the top of the pie plate. Refrigerate it while you're working on your fillings or wrap and freeze it for up to a month. When it's time to fill it, let the dough sit at room temperature until it's pliable but still chilled.
Time to get filling. Though these crust methods are useful year-round, Katy fell in love with two recipes that really celebrate the best of summer produce: a vibrant, generous and endlessly variable double-crust berry and stone fruit pie (see the recipe), and a chilled, pillowy, meringue-topped cream pie, underscored by tart raspberries and fresh, heady lemon verbena leaves, rosemary and thyme (see the recipe).
Whichever you choose to make (why not both?), if you follow Katy's rules, every last slice is bound to be right.