Festive Easter Bunny Cake Recipe
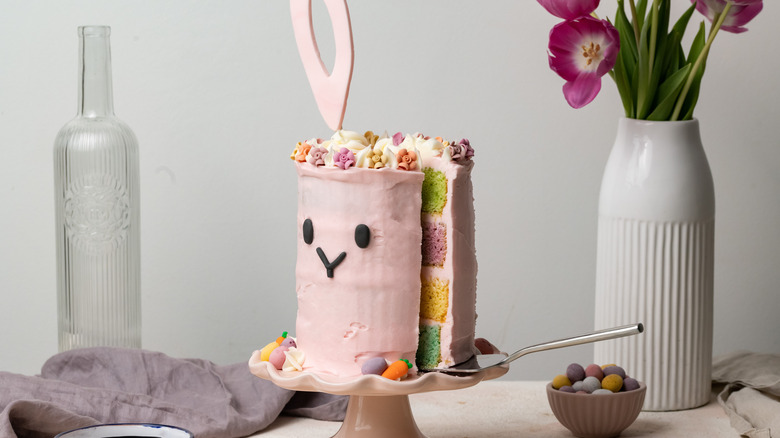
Easter is quickly approaching and you may well be starting to plan your Easter weekend menu. To celebrate properly, you'll definitely want a showstopper of a cake at the center of your Easter spread, so why not try this delicious, fun, and super cute Easter bunny cake, created by recipe developer Jennine Rye.
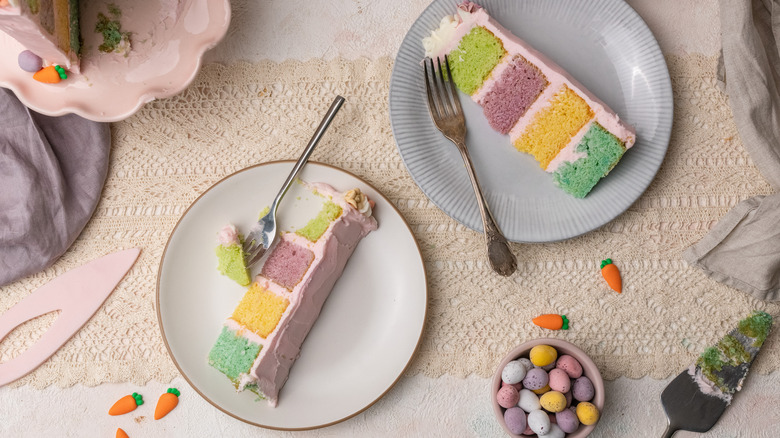
This adorable bunny cake may well have been created for Easter-time, but don't let that stop you from serving this four-tier celebration cake any time of year. It would also make a really wonderful themed birthday cake and can be adapted to be any color you choose. And, although we absolutely love the bunny themed design of the cake, let's not forget that it's what's on the inside that really matters. This cake is created using vanilla-flavored sponges in four festive pastel colors, making it both beautiful and universally loved. Read on to find out how, with a bit of time and patience, you too can make this super fun Easter bunny cake at home.
Gather the ingredients for this Easter bunny cake
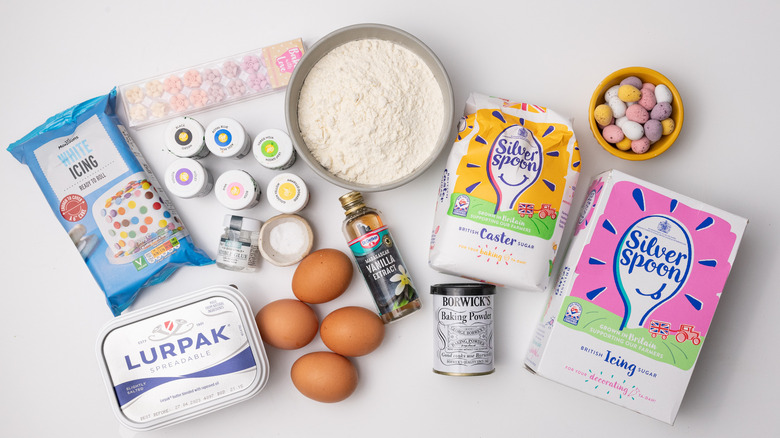
To make this Easter bunny cake, first you will need to gather the ingredients. You will need white fondant icing, a selection of gel food colorings, and edible glue, to make the bunny ears and face. For the cake you will want butter, granulated sugar, eggs, vanilla extract, flour, baking powder, salt, and powdered sugar. To decorate, you might want to use chocolate mini eggs, decorative sugar flowers, and decorative sugar carrots. You will also need two cake pop sticks to attach the bunny ears to your completed cake.
Create the fondant bunny ears
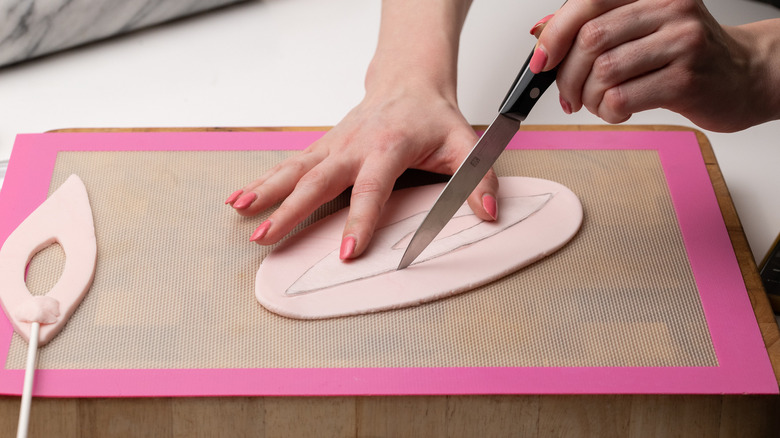
To create the bunny ears, add a little pink gel food coloring to fondant icing and mix it until the fondant is a uniform light pink hue. Roll the fondant icing out, and then, using a homemade or online template for bunny ears, cut out the fondant bunny ears using a sharp knife. Use edible glue to attach cake pop sticks to the ears, and then set them aside for at least 24 hours to dry.
If the ears are not dry enough, they will likely bend and break when stood upright, which is why it is important to give them ample time to dry out. To help them dry out more quickly, it is possible to turn the fan on in the oven (but not the heat!) and place the fondant bunny ears into the oven for a few hours.
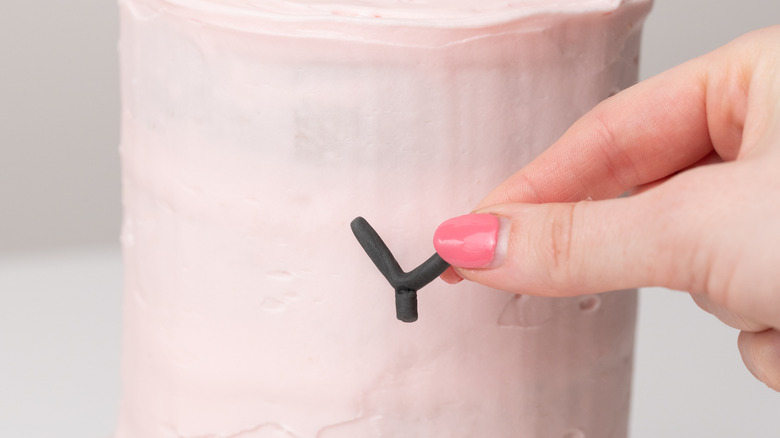
Make the bunny nose and eyes
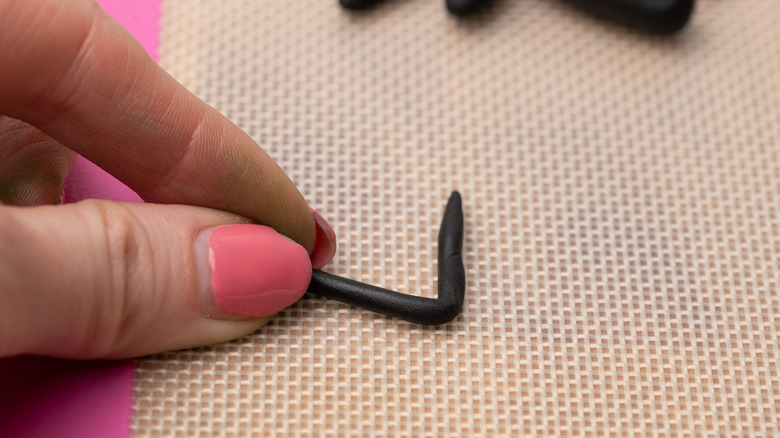
To make the eyes and nose, color a little fondant icing with black gel food coloring. Roll a small amount of the icing into a thin strip and bend it into a 'V' shape to create the bunny nose, and then roll a little more of the fondant icing into oval shapes for the eyes. Set these aside to dry.
Fondant icing can be quite polarizing in the culinary world — you either love it or you hate it. But whether you enjoy the taste or not, it certainly has its uses in baking and cake decorating. This recipe only uses a fondant icing for a few decorations, and it's doesn't affect the final flavoring of the cake, giving you the best of both worlds!
Bake the cakes

When the fondant decorations have hardened, it's time to make the cakes. Preheat the oven to 350 F and grease four 6-inch cake tins. Start by beating butter and sugar together until it is light and creamy. It's important to allow the butter and sugar time to reach the correct consistency, as these humble ingredients are key to creating a lighter textured cake with a finer crumb. Then, beat the eggs and the vanilla into the mixture, and finally mix in the flour, baking powder, and salt.
To color the sponges, divide the cake batter into four even-sized portions, and add different colors of gel food coloring to each. Mix the coloring in, making sure not to over-mix the batter, before pouring each bowl out into the prepared cake tins. Bake for about 30 minutes, or until the cakes are springy and bounce back when you touch one.
Mix the buttercream
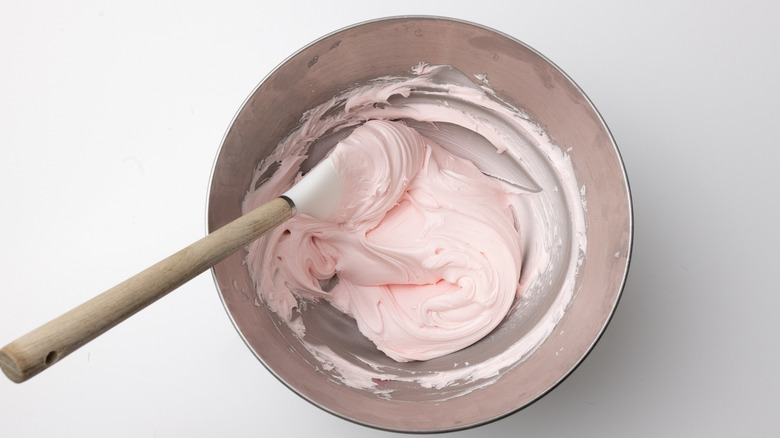
While the cake sponges cool, it's time to create the buttercream icing. For this step, all you need to do is mix together butter, powdered sugar, and vanilla extract until it is thoroughly combined. Separate out a little of the buttercream, and then use gel food coloring to tint the rest of the buttercream a soft pink hue. Although it is possible to use liquid coloring for this stage, we recommend using gel coloring as it is often more concentrated, thus less is required and it won't affect the resulting thickness of the buttercream.
Assemble your Easter bunny cake
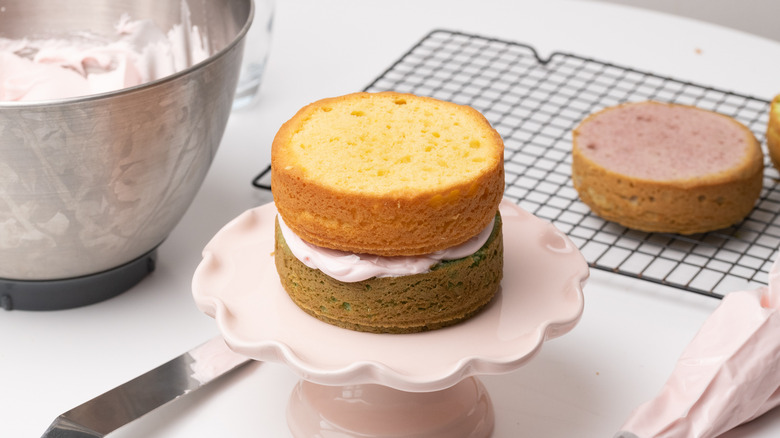
It's finally time to assemble your Easter bunny cake! Gather together the cooled sponges, the buttercream, the bunny ears, eyes and nose, and any other decorative items you plan to use. On a plate or cake stand, begin to assemble your cake by placing a sponge down and then piping a layer of buttercream, before sandwiching another sponge cake on top. Once all four sponges have been layered up, you may want to use a skewer to hold the cakes steady. Simply push it down from the top of the cake through the layers. Pipe more of the buttercream around the outside of the cake, and then use a palette knife to smooth it down.
Add the finishing touches
Now that the cake has been assembled, it's time to add the finishing touches. Using the reserved white buttercream, pipe two swirls on the top of the cake, and then push the pop cake sticks with the hardened bunny ears down through the swirls of buttercream icing, until you are happy with their placement and they are firmly held in place. Place the eyes and nose on the front of the cake, and then use the remaining icing to pipe around the top edge of the cake. Decorate with mini eggs, as well as sugar flowers and carrots if you are using them.
This fun Easter cake can be safely stored at room temperature, and should ideally be covered and consumed within three days.
Festive Easter Bunny Cake Recipe
If you want a real showstopper on your Easter table, this festive bunny cake is sure to delight.
Ingredients
- ¾ cup white fondant icing, divided
- pink gel food coloring, divided
- black gel food coloring
- 2 cups butter, room temperature, divided
- 1 cup + 2 tablespoons granulated sugar
- 4 large eggs, room temperature
- 3 teaspoons vanilla extract, divided
- 1 ¾ cups flour, sifted
- 2 teaspoons baking powder
- ¼ teaspoon salt
- green gel food coloring
- blue gel food coloring
- purple gel food coloring
- yellow gel food coloring
- 3 ½ cups powdered sugar
- ¼ cup chocolate mini eggs
Optional Ingredients
- edible glue
- decorative candy carrots, for garnish
- decorative mini flowers, for garnish
Directions
- Start by making a template for the bunny ears. Using baking paper and a pencil, draw bunny ears that are roughly 6 inches tall. You can freehand or find an online template for guidance. Cut the ear template out.
- Remove 1 tablespoon of fondant and set it to the side, then mix a few drops of pink gel food coloring into the rest of the fondant icing until it is a uniform shade of light pink. Roll this out using a rolling pin, and then place the bunny ear template on top. Use a sharp knife to cut out 2 bunny ears.
- Attach a cake pop stick to each bunny ear by dipping it into edible glue (if using) and then placing it 1-2 inches up the back of each ear. Use a pinch of the leftover pink fondant icing to create a seal over the top of each cake pop stick. Alternatively, just use fondant entirely to attach the ears to the cake pop sticks.
- Allow the ears to sit out for 24 hours to dry. Store any leftover pink fondant for future projects.
- To make the bunny nose and eyes, mix the remaining tablespoon of fondant with black gel food coloring until it is a uniform, dark color. Pinch a small amount off to roll into a thin, small sausage shape, roughly 1 ½ inches long. Trim the ends and then bend the thin strip into a V shape. Using a little more edible glue, attach one of the trimmed ends to the bottom of the V to complete the bunny nose. Set this aside to dry.
- Use the remaining black fondant to make the eyes by dividing it into 2 balls and rolling them into similar shaped ovals. Set these aside to dry.
- Preheat the oven to 350 F and grease four 6-inch cake tins.
- In a stand mixer, beat together 1 cup of butter with the granulated sugar until it is pale and creamy.
- Beat in the eggs one at a time, then add 2 teaspoons of vanilla extract and mix again until smooth.
- In a separate bowl, combine the flour with the baking powder and salt, before mixing into the rest of the ingredients to form a thick cake batter.
- Divide the cake batter evenly into 4 separate bowls (about 1 cup of batter into each bowl). Add in a few drops of green, blue, purple, and yellow gel food coloring separately into each bowl. Be careful to only mix the batter until the food coloring is just combined.
- Pour the cake batter into the four prepared cake tins, and then bake them for 30 minutes in the oven, until they are risen and spring back to the touch. Remove the cakes from the oven and set them aside to cool completely.
- To make the buttercream icing, beat the remaining cup of butter in a stand mixer for 2 minutes, until it has paled in color. Then, sieve in the powdered sugar 1 cup at a time and mix until combined. Add the remaining teaspoon of vanilla extract and mix once more. Remove ½ cup of the buttercream icing and set to the side. Add a few drops of pink coloring to the rest of the frosting and mix until it is a light pink color.
- To assemble the cake, trim the domed tops off of each cake using a bread knife or cake leveler. Transfer the pink buttercream to a piping bag with a large round nozzle, then stack up the cakes, piping pink buttercream between each layer.
- To keep the cake steady while icing the outside, you can optionally push a metal or wooden skewer through the top to hold the layers together. Using the piping bag, apply pink buttercream to the outside of the cake, then use a spatula to smooth the buttercream. The frosting doesn't have to be perfectly smooth.
- To finish off, pipe a little of the reserved white buttercream around the edges of the cake, and pipe 2 swirls on top where you will place the bunny ears. Push the cake pop sticks holding the bunny ears into the cake so that they are firmly held, and then add the eyes and nose to the front of the cake to form the bunny face.
- Decorate with a few mini eggs, and some sugar icing flowers and carrots if you choose.