10 Tips For Fermenting Your Own Soy Sauce
Is there anything that soy sauce can't do? Whether you need to quickly liven up a humdrum bowl of rice or add a kick of umami flavor to your burger recipe, soy sauce always has your back. The savory mixture of fermented wheat, soybeans, and koji serves as the basis for countless international dishes in addition to its stellar reputation as a condiment. If you're anything like us, you'll go through bottles of soy sauce like water. But what if there were a way to replenish your supply from the comfort of your kitchen?
Fermenting your soy sauce may sound daunting, but the process is far simpler than you might think. Learning how to create soy sauce from scratch can help you appreciate its subtle nuances even further, and fresh soy sauce is the perfect accompaniment to dishes like sushi and crudités. We had the pleasure of learning the basics of soy sauce fermentation from Cabi Foods founders Eri Miyagi and Miki Nomura during a recent demonstration in Brooklyn, New York. The entrepreneurs are on a mission to bring traditional Japanese flavors and culinary methods to the masses, and their recipe for homemade soy sauce is a must-try. Drawing from their expert tips and exclusive commentary, we'll show you everything you need to know to make your own Japanese soy sauce at home.
Understanding traditional soy sauce practices

Before starting your soy sauce, it's helpful to familiarize yourself with the basics of soy sauce production. Miyagi and Nomura founded Cabi Foods to make Japanese cooking accessible to home chefs outside Japan. In doing so, they've closely studied the practices of soy sauce makers to help preserve and utilize their traditional techniques. "We've visited different parts of Japan to find different types of soy sauce," says Miyagi. "Even if you have the same ingredients, flavors will be different because of how they make it and the barrels' wood."
According to Miyagi and Nomura, the art of making soy sauce isn't all that different from winemaking. "We talk a lot about winemakers but don't really talk about soy sauce makers," notes Nomura. Indeed, there are numerous similarities — from selecting freshly grown ingredients to diligently monitoring the fermentation process over a period of months. "Most soy sauce makers use a gigantic machine to steam soybeans and roast wheat," explains Nomura.
It isn't always possible to faithfully replicate traditional soy sauce-making techniques at home, but there are simple steps you can follow that yield similarly delicious results. It all starts with koji, a type of mold. "Almost everything [in Japanese cuisine] contains koji, a beautiful creature similar to yeast," says Miyagi. "It has many health benefits, and it's metabolism-boosting and stress-reducing."
How to source soy sauce-making materials
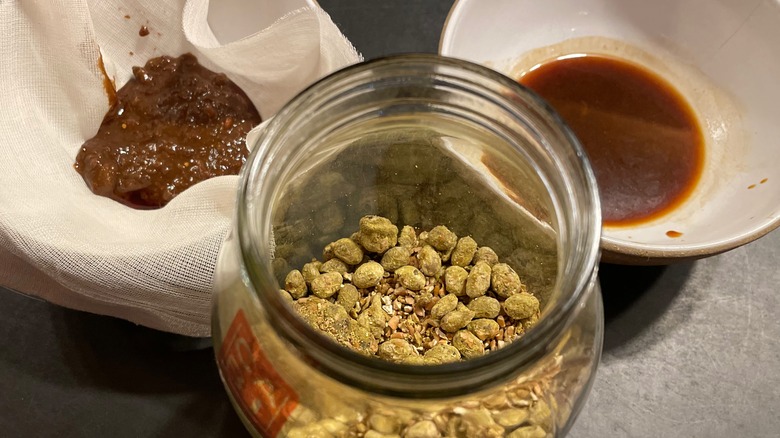
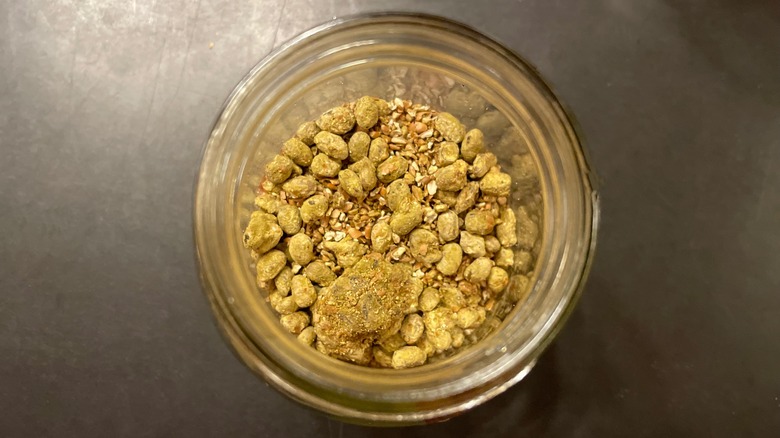
To begin the soy sauce-making process, gather your ingredients to make moromi. Moromi is a mixture of koji and salt water that will serve as the foundation for your soy sauce. Per Miyagi's instruction, the preparation ratio is one part soybean, one part wheat, and three parts salt water. You'll also need a wide-mouthed glass jar, a bowl, some cheesecloth, and a clean, empty glass bottle.
For the soy sauce koji, you'll want to grab beige soybeans and wheat berries, which can be found at most natural or international grocery stores. However, you'll most likely need to obtain the koji spores online. Miyagi recommends purchasing Hishiroku Koji Starter Spores, which you can mix with roasted wheat and cooked soybeans to activate. Once you've prepared the ingredients, you'll leave them to develop for about three days.
Cabi's founders recommend keeping the mixture around 85 degrees Fahrenheit — ensuring it doesn't exceed 100 degrees — to encourage healthy mold growth. "Koji mold is like a little creature and needs a specific environment to grow. If it gets too hot, they die or are deactivated," says Nomura. And don't be alarmed if your koji takes on a verdant hue, says Nomura. "A greenish color is really specific for soy sauce koji."
Choosing the correct type of salt is also highly important. "Many makers won't use salt with minerals. This is because mineral content can vary and lead to an inconsistent taste," Miyagi exclusively tells Tasting Table.
Make sure your moromi is off to a good start
Once your moromi ingredients are good to go, you can dive into the fun part: stirring them all together. First, add the dry koji mixture to your wide-mouthed glass jar. You may notice that koji has little in common with soy sauce at this phase. "It doesn't smell like soy sauce — it smells kind of weird," says Nomura.
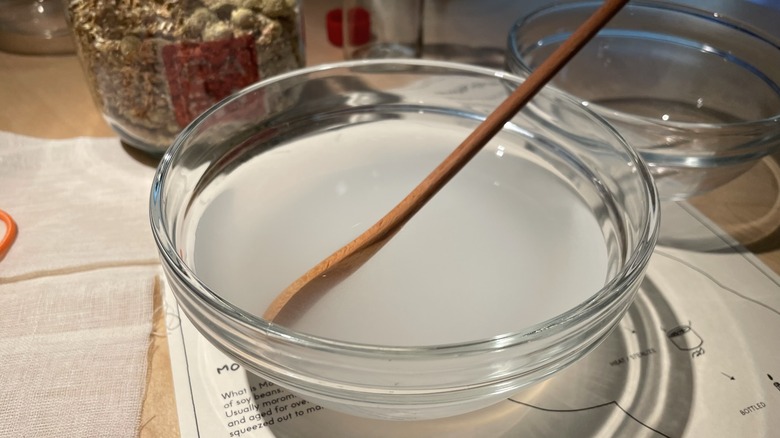
After you've situated your koji, you'll prepare the salt water, consisting of a 20% salt concentration. Mix the salt into a bowl of room-temperature water and stir thoroughly until the granules dissolve completely. "It takes a little while, so be patient," notes Nomura. It's important to fully incorporate the salt during this step, as Cabi's founders recommend against adding salt in the later stages of fermentation.
With the solution mixed, pour the salt water into the wide-mouthed jar containing the koji. Add the salt water to your dry ingredients with a small wooden spoon or spatula until everything is saturated. According to Nomura, the amino acids inside the mixture break down to create the familiar umami flavor of soy sauce over time. Though you may notice changes to the moromi's color or aroma in its early days of development, it will be quite a while before you can extract soy sauce from the mixture.
How to care for your moromi during the fermentation process
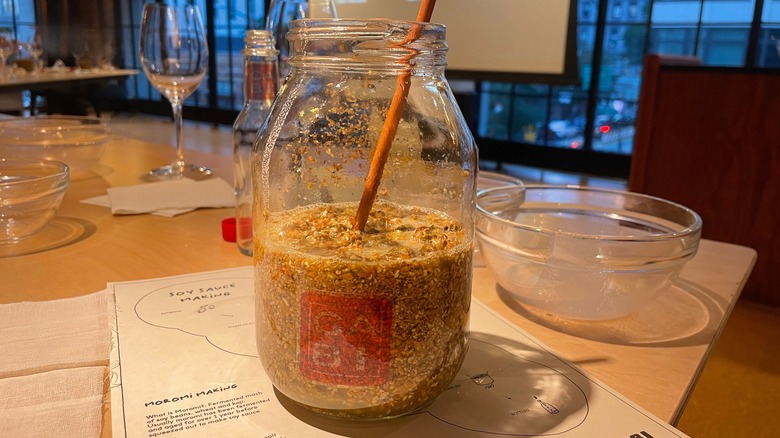
Congratulations — your moromi is now one of your largest responsibilities. Like the classic home economics assignment of caring for an egg or battery-operated infant, you'll be doting on this mixture for several months. However, there's more at stake than a good grade here, as the quality of your soy sauce depends on the health of your moromi.
To keep the mixture happy, you'll want to stir the moromi once a day for the first seven days. From there, you can stir it once every two to three days until you approach month two. "Each time, mix the entire mixture thoroughly for at least a few minutes. Do this about twice or once a week from two months to six months. After that, it enters a maturing period, so avoid over-mixing," Miyagi tells us.
Your moromi will be just fine living on a kitchen shelf or cupboard at room temperature, but it's imperative that this little 'creature' be kept out of direct sunlight. Additionally, it's not unusual to see some white spots in the mixture, says Nomura. Although these pale dots in your moromi are not mold, they are considered a sign to mix more frequently or thoroughly.
Common problems that arise while growing moromi and how to avoid them
Growing moromi is arguably the most nerve-wracking aspect of the fermentation process — after all, you'll be closely monitoring the mixture for a period of several months. As touched upon earlier, seeing small whitish spots in moromi isn't a significant cause for concern. However, it's best to mix your moromi consistently to prevent any issues from sprouting up. It can be helpful to make reminders on your calendar or keep a written schedule posted near your growing moromi.
You shouldn't encounter any issues if you follow these tips closely. Still, taking extra precautions with your moromi is never a bad idea. "Due to its high salt content, it is difficult for bacteria to enter. However, there is a possibility of bacterial contamination, so store it in a clean place to prevent bacteria from entering," Miyagi tells Tasting Table. In order to further minimize the risk of harmful bacteria or mold in your moromi, wash and dry your stirring instrument after each use. Most importantly, keep your moromi jar tightly covered with a clean, dry piece of cheesecloth, which you can hold in place with string or a rubber band.
Patience is key when extracting soy sauce from moromi

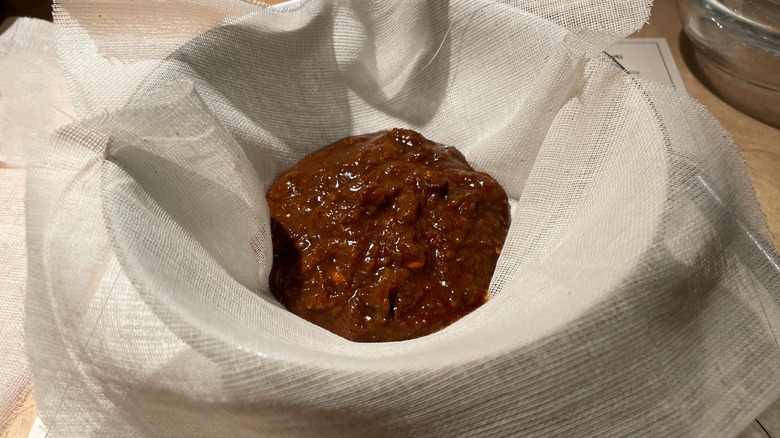
By month six, you can reap the benefits of all your hard work. At this time, you'll need a few materials to begin harvesting your precious soy sauce. First, grab a bowl, a new piece of cheesecloth, and a spoon. The first method of extraction is by hand. Carefully scoop your moromi mixture into a large square of cheesecloth and twist it around to create a ball. Holding the moromi pouch over the bowl, gently massage it until its contents begin to drip forth. According to Miyagi, this action is closer to holding than squeezing. By using too much force, you'll be left with cloudy soy sauce. If this happens, it won't spoil your soy sauce but may affect its flavor or texture. "It tastes a little bit different; you can taste the [particulate] a little if it's left cloudy," says Nomura.
If you don't have the patience to squeeze your soy sauce by hand, you can also use a pour-over coffee device, like a Chemex. "For optimal results, it's recommended to squeeze the liquid as slowly as possible. Use a coffee dripper and let it drip gradually," Miyagi tells Tasting Table. "Once it ceases to drip, add a slight weight and apply pressure incrementally."
How to bottle and preserve your soy sauce
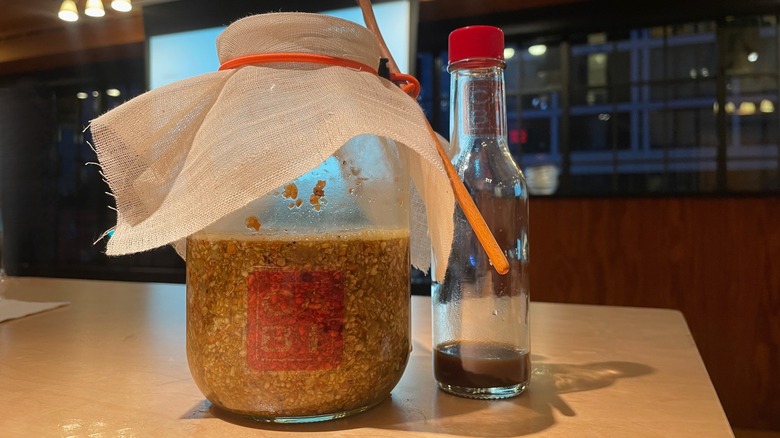
Once you've collected your soy sauce in a bowl or drip coffeemaker, you can move on to the bottling process. All you'll need for this step is a funnel and a clear glass bottle with a tight-sealing cap. If you'd like to repurpose an old bottle, just ensure it's thoroughly cleaned and dried first to avoid introducing contaminants or unpleasant odors. Lastly, place the funnel into the mouth of the glass bottle and simply pour the contents of your bowl or carafe into it.
Wondering how long your soy sauce will keep? According to Cabi Foods' founders, fresh soy sauce should last about one to two weeks when kept in the refrigerator. Since this homemade soy sauce recipe is unpasteurized, it's best enjoyed soon after preparing it for optimal flavor and freshness. As such, it may be helpful to split larger batches into multiple bottles to share with friends and family.
Simple ways to use up leftover moromi
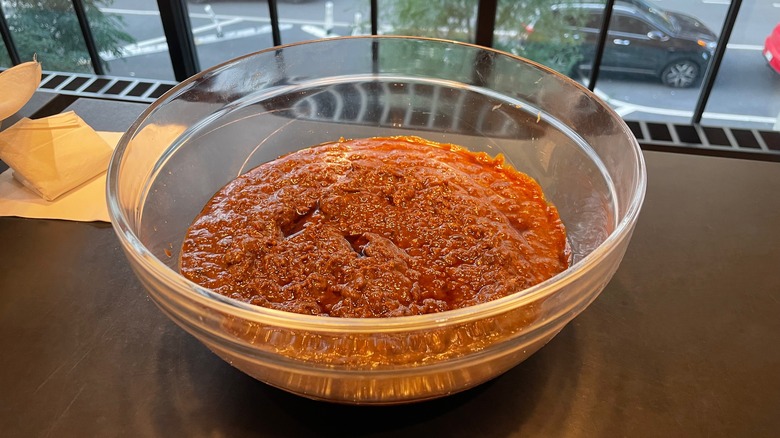
After spending months caring for your moromi, you might wonder if you can do anything with the remaining mash. According to Nomura, the answer is a resounding yes. Instead of discarding the moromi after you've finished extracting your soy sauce, you can use it alongside many different dishes as a condiment.
In terms of its flavor, moromi tastes more complex and full-bodied than soy sauce. It enhances sauces and stir-fries and even works well as a standalone dip or dressing. "You can mix [leftover moromi] with cucumber — you don't want to waste it," says Nomura. This popular combination is known as morokyu in Japan. Morokyu is an incredibly easy-to-make and delicious dish made with chilled, sliced cucumber. Although its refreshing taste makes it an ideal summer snack, you can enjoy morokyu year-round. To prepare it, select the freshest cucumber you can find and slice it into sticks or decorative shapes. You can serve the cucumber pieces with a dab of moromi atop them, dip them, or spread a thin amount of the mixture onto each segment.
The best culinary uses for fresh soy sauce
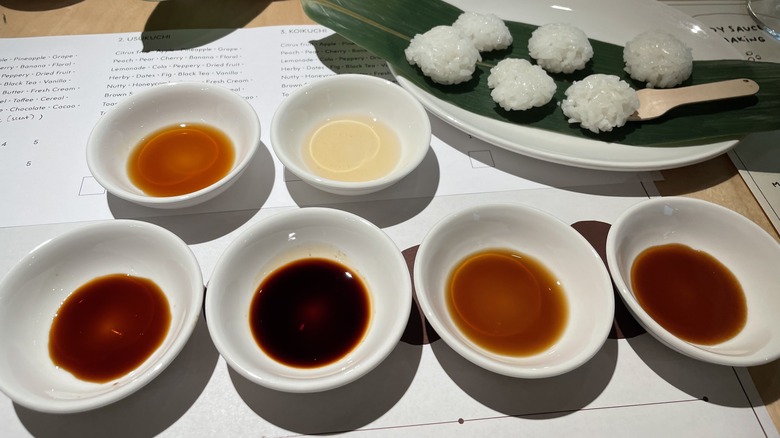
You can add fresh soy sauce to anything your heart desires, but it's helpful to compare it to other types of soy sauce to appreciate its full pairing potential. During Cabi Foods' soy sauce demonstration, we tasted a spectrum of soy sauces, from light and sweet to rich, umami-packed varieties. Though personal preferences indeed come into play, some sauces are better suited to specific purposes than others. Light soy sauce, for example, can enhance a dish's flavor without altering the color of fresh vegetables or noodles. Darker soy sauce, like koikuchi shoyu, is a popular option in Japanese cooking that you can use in many different recipes.
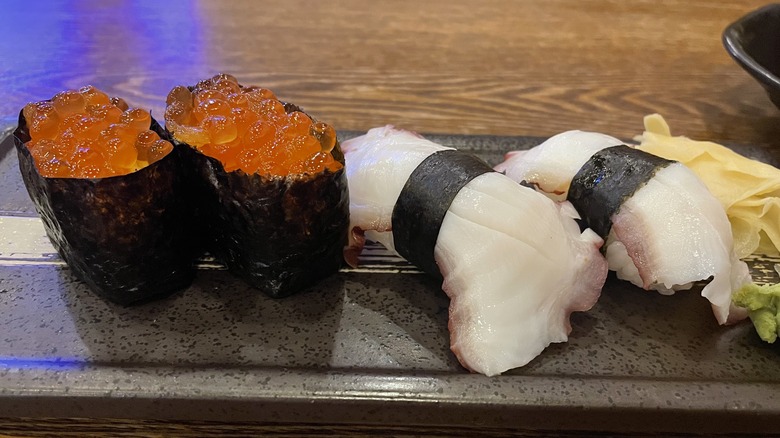
On the other hand, the delicate flavor of just-squeezed soy sauce might get lost in piping-hot dishes like soups or stews. Just as you might expect, fresh soy sauce pairs best with fresh foods. If you're looking for the perfect food to use your soy sauce on, sushi is highly recommended by Cabi Foods' founders, as are fresh vegetables. With that in mind, you're welcome to experiment with your new culinary creation anywhere you see fit.
Ways to ferment other types of soy sauce
Now that you've learned how to create your own soy sauce at home, you may be curious if it's possible to make other versions. For example, if you want to produce a lighter or darker soy sauce, you'll want to adjust its maturation time. "The longer the aging process, the darker the color," says Miyagi. "For instance, koikuchi matures for 1-2 years, while shiro shoyu matures for about six months, and light shoyu matures for around eight months."
Want to try your hand at brewing a gluten-free fermented soy sauce instead? Tamari, a variant often referred to as gluten-free soy sauce in the States, requires a slightly different process than the recipe outlined in our guide. After introducing koji to salt water, soy sauce makers place a stone on top of the ingredients. "It uses less salt water, and unlike common soy sauces, it isn't stirred," Miyagi tells Tasting Table. "As the liquid gathers at the bottom, it's repeatedly scooped up and poured over the top, creating a convective motion." This soybean-rich variety is noticeably darker and thicker than koikuchi, making it a fantastic option for marinades, dips, or dressings.