Homemade Waffle Cones Recipe

It's time to indulge your ice cream parlor maestro with a nostalgic childhood treat — a homemade waffle cone that'll have you feeling like you are 5 years old once more.
According to Ksenia Prints of At the Immigrant's Table, these waffle cones are the ultimate crispy, chocolatey, sprinkle-covered vessels of frozen dessert delight.
Forget the store-bought options that pale in comparison to these homemade wonders. Picture this: golden-brown cones, lovingly crafted with a dash of wit and a sprinkle of magic, ready to cradle scoops of your favorite ice cream flavors. It's a DIY treat that will not only impress your taste buds and elevate your ice cream game to new heights.
So, grab those ingredients, dust off the waffle cone maker, and embark on a journey of sweet indulgence that will make you the star of your ice cream parlor.
Gather the ingredients

To make this blast from the past, you will need large eggs, white sugar, butter, milk, vanilla extract, all-purpose flour, salt, vegetable oil, semi-sweet chocolate chips, and sprinkles. With this arsenal of ingredients, you'll be ready to embark on a waffle cone-making adventure that promises to deliver crispiness, sweetness, and indulgence.
Whisk the batter
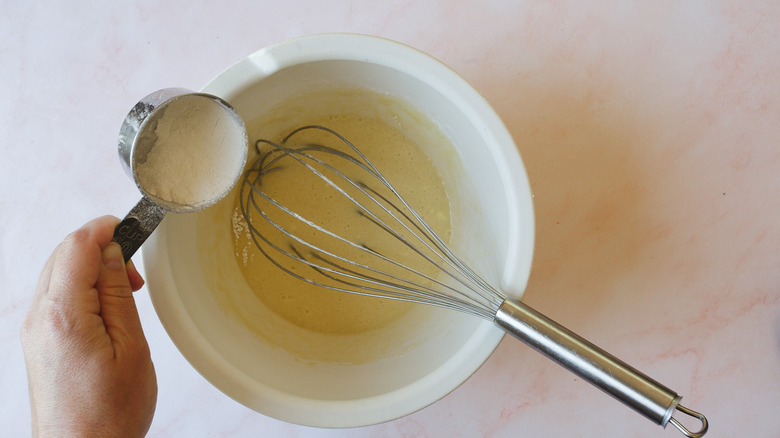
Whisk together the eggs and sugar in a large bowl until the mixture becomes frothy. Next, add the melted and cooled butter, milk, and vanilla. Gradually add the flour and salt to the mixture, whisking until the batter turns smooth. It even helps to sieve the flour, as it helps ensure the batter is free of lumps and smooth. You want the batter to have a thin consistency. You can stir in additional milk to achieve the desired texture if needed.
Cook the waffle cones
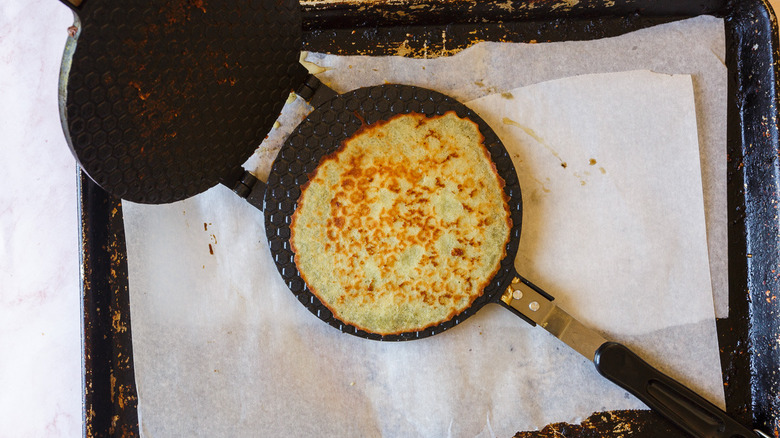
The next step depends on how you will be making the cones themselves. You can use an ice cream cone machine, a waffle griddle, or a thin crêpe pan. Heat whatever tool you use over medium heat, and lightly brush it with oil. Pour approximately ¼ cup of batter onto the skillet and spread it into a thin circle by turning it.
If using a waffle machine, follow the machine's instructions. If using a griddle or a pan, wait for the underside to become golden brown, flip the waffle, and cook until the other side turns golden. Each side can take about 2 to 3 minutes to cook.
Shaping the cones
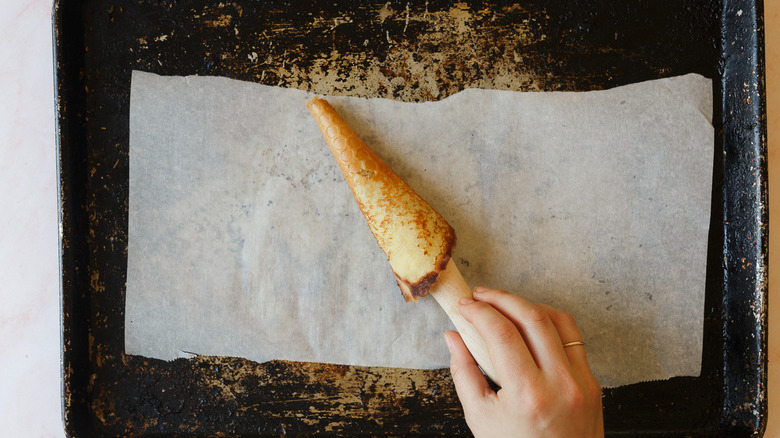
Remove the cooked waffle from the pan and shape it into a cone while it's still hot, ensuring to seal the end. This can be done by gently rolling the waffle around a cone-shaped mold or using a specialized cone-shaping tool. The heat will help the waffle maintain its shape as it cools.
Place the formed waffle cones on a wire rack to cool and harden completely, usually taking 3 to 4 hours. This allows the cones to firm up, resulting in a crispy texture. Repeat the process with the remaining batter, individually shaping and cooling each cone.
Adding the chocolate-sprinkle edge
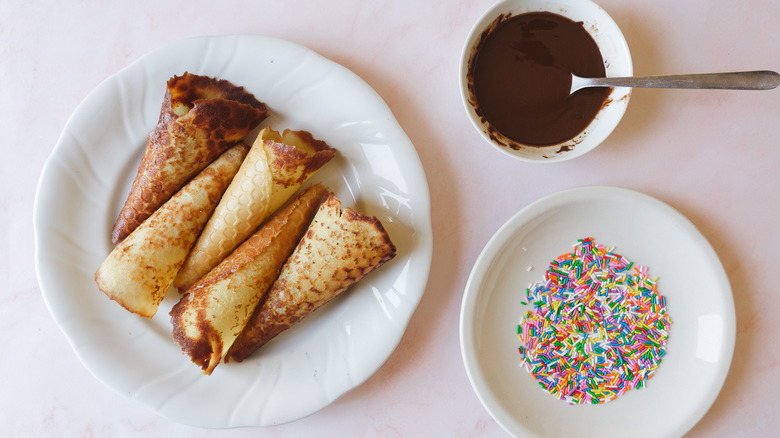
But if you thought just making homemade waffle cones would be enough, you were wrong. We're about to take the nostalgia one step further by giving them a chocolate-and-sprinkles touch every kid would love.
Once the cones have hardened, creating the chocolate-sprinkle edge is time. In a microwave-safe bowl, melt one cup of chocolate by microwaving it in 30-second intervals, stirring in between, until smooth. Hold an ice cream cone upside down and dip the top into the melted chocolate, gently shaking off any excess. Pour the sprinkles on a flat, shallow plate. Roll the chocolate-coated end in the sprinkles, ensuring it is well-coated. Place the prepared cone in a cup to allow the chocolate to harden. Repeat the process for the remaining cones.
Give the chocolate at least 1 hour to set before indulging in your delightful homemade waffle cones.
Serve the waffle cones with your choice of ice cream

It may seem like a lot of fuss, but homemade waffle cones are tastier, crispier, and much prettier than most commercially sold cones. Plus, once you get the hang of it, it's a breeze to make a large batch of these together and freeze them for later!
To truly enjoy your homemade chocolate-sprinkle waffle cones, fill them with your favorite ice cream, blast some pop music, or watch "The Babysitters' Club" remake. Either way, a trip down nostalgia lane is all but guaranteed.
Homemade Waffle Cones Recipe
Whip up some of these waffle cones so you're ready to enjoy your favorite ice cream on a sunny afternoon.

Ingredients
- 2 large eggs
- 1/2 cup white sugar
- 1/4 cup melted and cooled butter
- 3 tablespoons milk,or more
- 1/2 teaspoon vanilla extract
- 1/3 cup all-purpose flour
- 1/8 teaspoon salt
- 3 tablespoons vegetable oil,or more
- 1 cup semi-sweet chocolate chips
- 1/2 cup sprinkles
Directions
- In a large bowl, whisk together the eggs and sugar until the mixture becomes frothy.
- Next, whisk in the butter, milk, and vanilla. Gradually add the flour and salt to the mixture, whisking until the batter turns smooth. The consistency of the batter should be thin, but if needed, you can stir in additional milk.
- Heat an ice cream cone machine, a waffle griddle, or a thin crêpe pan over medium heat, and lightly brush it with oil. Pour approximately ¼ cup of batter onto the skillet and spread it into a thin circle by turning it.
- If using a waffle machine, follow the machine's instructions. If using a griddle or a pan, do not close the lid. Instead, wait for the underside to become golden brown, flip the waffle, and cook until the other side turns golden. Remove from the pan and shape it into a cone while it's still hot, ensuring to seal the end.
- Place the formed waffle cones on a wire rack to cool and harden completely, usually taking 3 to 4 hours. Repeat the process with the remaining batter.
- When the cones have hardened, proceed with making the chocolate-sprinkle edge. Add one cup of the chocolate to a microwave-safe bowl. Microwave for 30 seconds, stir, and then microwave again for another 30 seconds. Repeat the process until all the chocolate is melted.
- Hold an ice cream cone upside down and dip it straight down into the bowl of melted chocolate. Very gently shake the cone in an up-and-down fashion. This will force the excess chocolate to drip off and back into the bowl of melted chocolate.
- Next, pour the sprinkles into a flat plate. Roll the chocolate-covered ends of the cone in the sprinkles until all the chocolate is covered. Set the prepared cone inside a glass. Repeat with the remaining cones, setting each one into its glass. Wait for the chocolate to harden for at least 2 hours.
Nutrition
| Calories per Serving | 452 |
| Total Fat | 25.2 g |
| Saturated Fat | 11.0 g |
| Trans Fat | 0.1 g |
| Cholesterol | 83.1 mg |
| Total Carbohydrates | 57.6 g |
| Dietary Fiber | 1.9 g |
| Total Sugars | 49.5 g |
| Sodium | 80.1 mg |
| Protein | 4.3 g |