The 13 Best Ways To Prepare A Pan For Baking
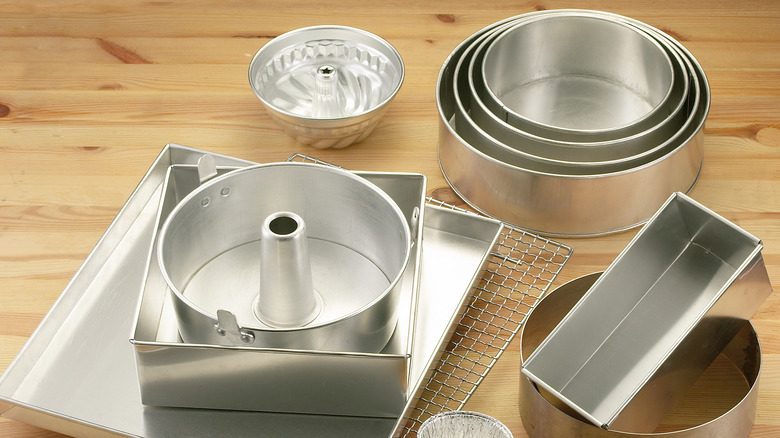
Whether you're trying to make a pillowy loaf of banana bread or an enormous two-tier cake, one important thing you should not forget to do is prepare your pans. It can be easy to overlook this step since you might focus on getting the ingredients right and mastering baking techniques, yet it is an equally crucial part of the baking process. Before getting into specifics, let's determine precisely what a baking pan is (because baking dishes are not the same as baking pans). Simply put, bakeware companies make pans from metal (most being aluminum or non-stick). Meanwhile, baking dishes are usually made from glass or porcelain.
Baking pans can require a bit more prep than their glass counterparts because food tends to cling onto the material. While some preparation practices are more common than others, there are several different hacks you can use to make your pastry project run successfully. Follow these steps and you will undoubtedly save yourself some trouble by doing so because your sweet treat will effortlessly release from the pan and, consequently, look the best possible; let alone, you'll have less of a mess to tidy up. So, say farewell to baking disasters and hello to smooth sailing.
Cut parchment to fit your pan perfectly
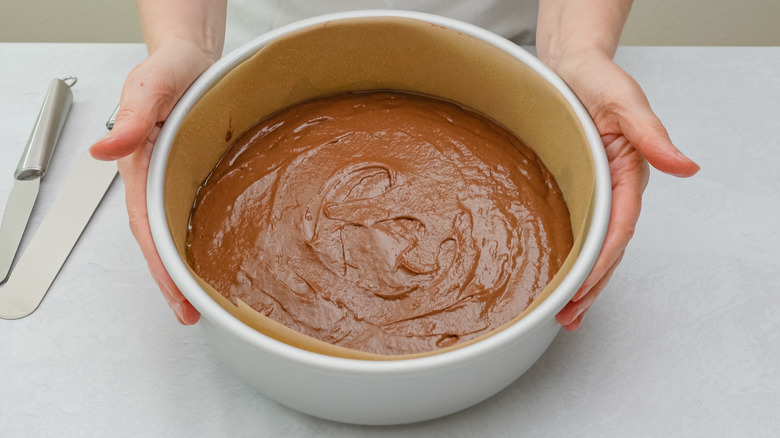
Parchment is a handy product for bakers; you can make a pastry bag to write with chocolate or even use it to roll a cookie dough log. However, one of its best uses is to line baking tins because it makes releasing the bread or cake much easier. Although parchment typically comes in rectangle sheets or on a roll, you can shape it to fit almost any pan (aside from specialty pans, like Bundt pans, but there are other preparation methods for those that will be discussed later). Nevertheless, you can line a round pan with parchment paper, and you'll only need scissors.
Grab a piece of parchment that is larger than your bakeware's circumference. Next, you'll want to create a rectangle by folding it twice (bringing the short edges together). Then create a triangle (fold twice again) and line the tip up with the pan's center. Then, cut where the paper meets the pan's edges. As for the sides, you can cut strips to fit the walls of the pan. If you have trouble keeping the paper in place, Alton Brown has a trick to make the parchment paper stick to the pan: Simply reach for a spray bottle full of water and give the pan a spritz. The parchment should stay in place, and you can be confident that your baked goods will come right out of the pan when needed.
Use the classic butter and flour combo
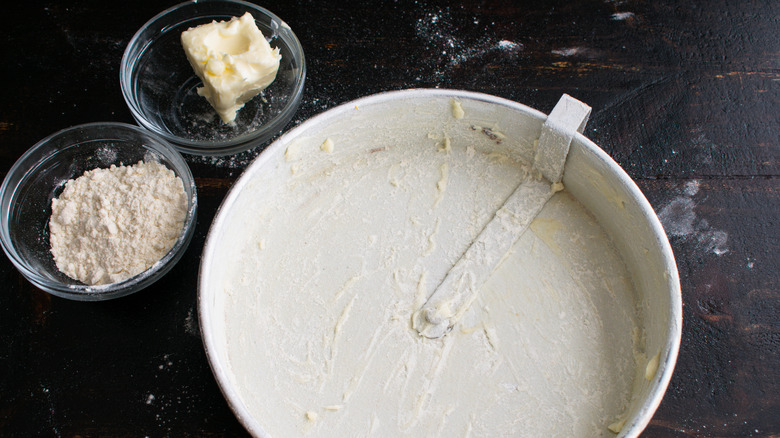
One of the most traditional ways to grease a pan is to spread butter over it and then dust it with flour. This method is simple and effective, and if you are baking, then odds are you already have flour and butter on hand, so it will save you from taking a trip to the store. This practice will even work for pesky tins that pastries frequently stick onto and help to ensure your baked goods don't stick to cast iron.
Whether you opt for a cast iron pan or not, use butter that's been melted or softened. If you've completely melted the butter, carefully coat the pan with the liquid using a pastry brush. On the other hand, if you've only softened the butter, you can use your hands to smear the butter onto the bakeware and cover it thoroughly. Next, sprinkle flour across the whole pan, lifting and turning it as needed to ensure it is coated. Make sure to get rid of any excess flour before pouring in your batter or placing your dough, otherwise, you could end up with a dry pocket of flour in the final product.
Freeze the pan after brushing it with butter
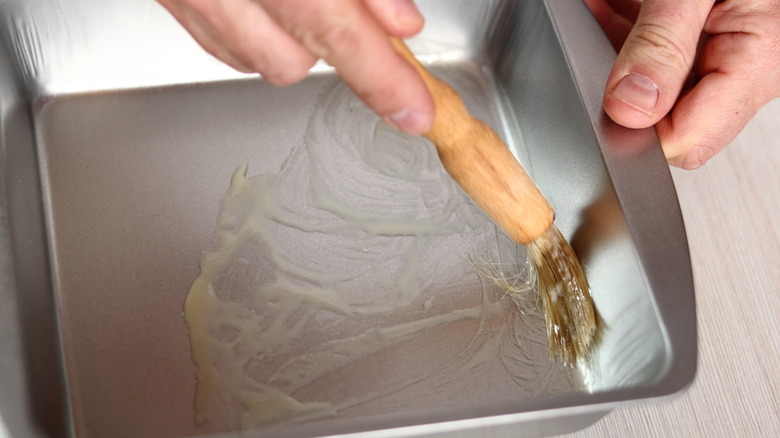
There is a butter hack you should use for coating cake pans; it is similar to the butter and flour method, except it has a twist. To try this method out, you'll need to melt a couple tablespoons of butter or another type of fat. Next, completely coat the pan with melted fat before transferring the pan to the freezer. You'll only have to wait a couple of minutes for the magic to happen, and if you place it in the freezer while still working on the dough or batter, those couple of minutes will fly by.
Once ready, the butter should be in a solid state inside the bakeware. That way, when you pour the batter into the pan, the butter won't move around with the batter, leaving un-greased spots. Beyond coating cake pans, you can use this hack with a variety of baking pans including loaf pans, muffin pans, or even brioche molds.
Take advantage of cooking spray
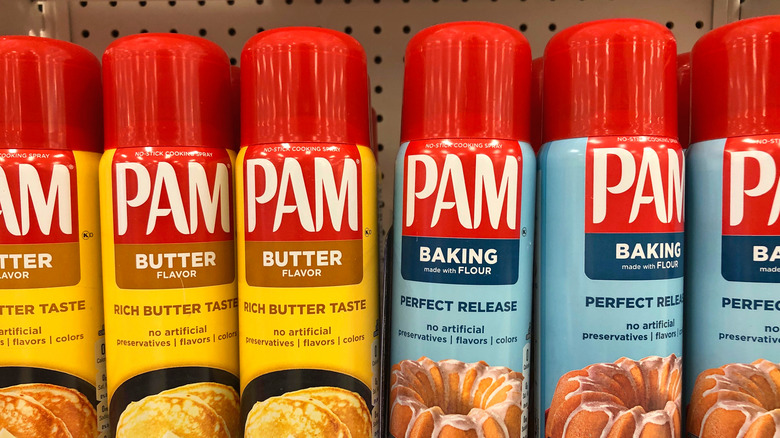
If you are in a rush to get your baked goods in the oven, cooking spray can be beneficial and convenient. It is one of the best substitutes for parchment paper because it helps prevent baked goods from sticking to the tin and requires minimal effort. All kinds of cooking sprays are on the market, ranging from non-flavored to butter-flavored.
Additionally, you can choose which kind of oil the spray is made from, which is good for those who have allergies or preferences (olive oil, canola oil, and vegetable oil are just a few options). Cooking spray will certainly work for the average aluminum pan; remember that only a light coating is needed. It might be tempting to douse the pan in spray, but using extra spray will only leave residue on your baked goods. Additionally, you should avoid using it on non-stick bakeware because it can damage the pan in the long run.
Use coconut oil for a smooth release
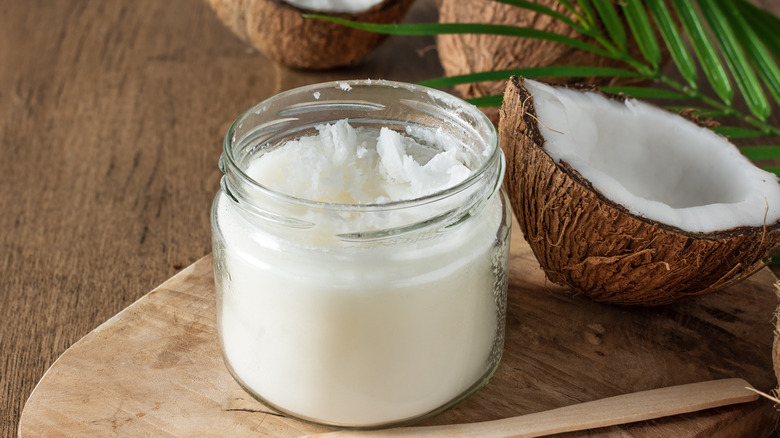
Did you know you can use coconut oil to grease baking pans? It will keep baked goods from adhering to the pan in an unwanted manner, and unlike butter, coconut oil happens to be a vegan-friendly option. In addition, it can withstand high temperatures, so it is perfect for baking foods that require you to blast the oven. One thing to keep in mind is that your baked goods will turn out best when using refined coconut oil because its flavor profile is subtler than the unrefined version. Therefore, if you're baking a sweet treat that you don't necessarily want to taste like coconut, you don't have to worry about it altering the food's taste.
To use coconut oil to grease your bakeware effectively, melt it down to liquid and brush it all over the pan. You could even use the butter hack and stick it in the freezer to set it up (if your batter is thin enough where it could make the coconut oil slide). Try testing the coconut oil trick out, and you will be in awe of how effective it is.
Replace flour with cocoa powder for added flavor
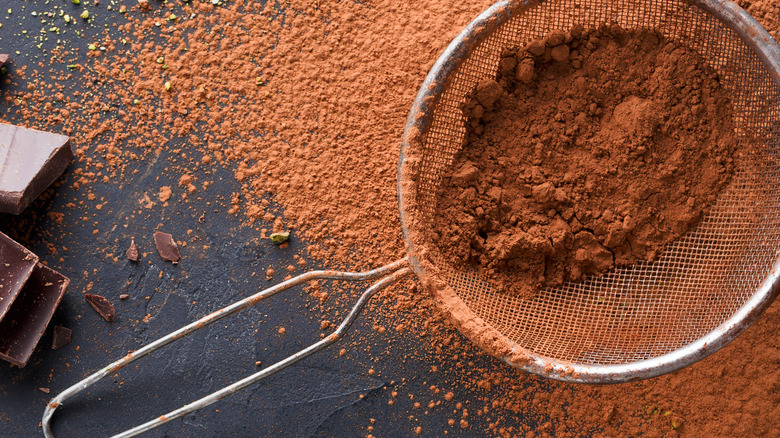
For chocolate cakes and goodies, you should use cocoa powder to flour your cake pans. This is because cocoa powder will provide an extra chocolatey flavor to your treat and give the same benefits as flour, with some added benefits. Using cocoa for chocolate-based treats is superior because it won't leave a white residue that clashes with the dessert's dark appearance; This saves you from dusting any flour of your baked cake. When using the cocoa powder trick, the smartest thing you can do is sift the cocoa powder before dusting your bakeware.
Also, remember that you should never use sweetened cocoa powder to flour cake pans. If you're wondering why, it's because the added sugar in the sweetened version tends to cook against the tin. Ultimately, it can cause the outside of your cake to become slightly scorched from the caramelization. No worries, though; unsweetened cocoa is more than enough to give your sweet treat some extra oomph and prevent it from attaching to the bakeware.
Line the pan with aluminum foil
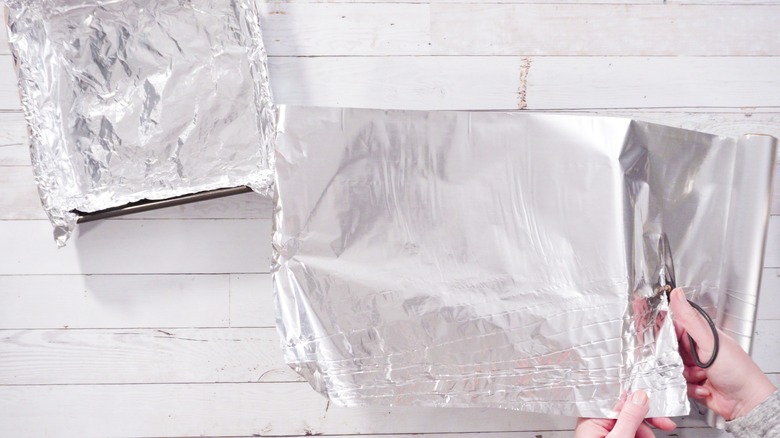
Aluminum foil has all sorts of functions, from storage to wrapping items destined for the grill. But, when it comes to baking, it can be used to preserve the cleanliness of a pan. You might think you have it down when lining your bakeware with it, but the truth is, you've been lining your baking tin with aluminum foil all wrong. Yep, there is an easier way to do it, and it doesn't require crinkling the foil in awkward ways to make it fit the pan. Instead, you can flip the pan upside down and use it as a mold to shape the foil. Then, when you place the foil in the bakeware, it will fit like a glove.
In addition, you can utilize aluminum foil to shape a cake into unique designs. Even if your bakeware is round or rectangular, creating fun-shaped cakes is possible with this hack. To do this, form the foil into your preferred shape and make sure it has multiple layers to hold the batter's weight. You can then place it in your pan after stapling it a few times to give it more stability. In the end, whether you choose to line your pan in a form-fitting way or with a custom form, you can be sure that it will be an easy clean-up.
Use a coffee filter in a pinch
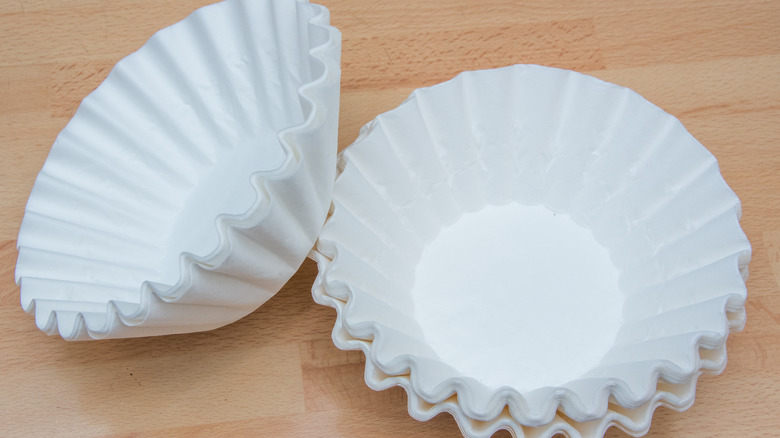
If you've found yourself short on parchment paper, you can use coffee filters to line your cake pan. Of course, you won't necessarily be able to line the sides of the bakeware with it, but it will make it much easier to release the cake from the foundation of the pan. It turns out that a standard-sized coffee filter will flawlessly fit a 9-inch round tin.
If you are using a smaller-sized pan, you can always take advantage of some scissors to adjust the coffee filter accordingly. Then, once you have the right fit, use the filter as you would use parchment paper. And, if you are hesitant about using a filter because you're making something on the stickier side, you're welcome to spray it with cooking spray just for good measure. Not only is this practice creative, but it works like a charm when you're in a jam.
Brush cake goop on the pan
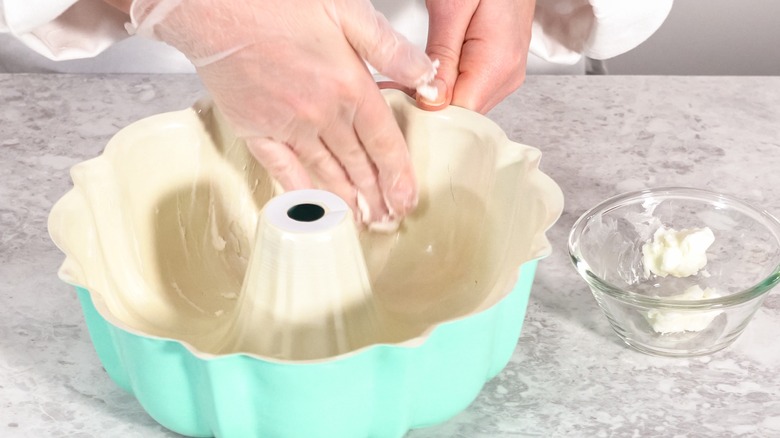
Although basic round or loaf tins can be easy to prep for baking, there are some trickier ones. When it comes to things like Bundt pans, tube pans, and specially shaped molds, you'll need extra caution to ensure the baked goods won't cling to the bakeware. It is always devastating to spend heaps of time on a cake only for its presentation to be destroyed while releasing it from the mold. However, there is a fix for this: cake goop. Taking advantage of this lovely lubricant offers a simple method to prevent Bundt cakes from sticking to the pan, and you can also use it for other baked goods as well.
Not to mention, you can make a substantial amount of goop and store it for later use, so it's ready to go every time you bake. Create the cake goop from a simple mixture of vegetable shortening, oil, and flour. Try using an electric mixer to whip it up or mix it by hand until all components are evenly blended. You don't need to melt it because it is the perfect consistency for brushing onto the bakeware. After applying an even layer to your Bundt pan or mold, you are free to fill it with your unbaked batter and proceed with your baking adventures.
Coat the pan in sugar
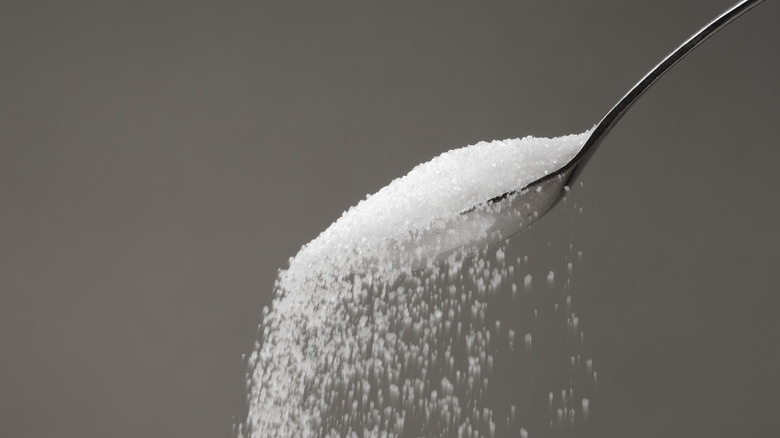
Another alternative to flouring your cake tin is sugaring it. To do so, simply coat the pan with some type of fat, then pour a bit of sugar into it. Tilt and tap the pan until all surfaces are evenly covered, with the sugar gloriously adhering to the fat and bakeware. If there is excess, make sure to remove it before using the pan.
Using this method will lead to a perfectly greased cake pan. Not everyone knows this trick, but once you try it out, it might just be your new favorite. Ending up with a crisp exterior on your cake is another benefit of prepping your bakeware this way. The sugar hardens up a bit during the baking process, so once you remove your cake and it cools, then frosting it will be a walk in the park—cheers to not having to deal with crumby cakes falling apart.
Try out a silicone baking mat
If you are hoping to find something that is easy to work with and will undoubtedly be non-stick, consider Investing in a silicone mat. Most people likely think of rectangle silicone mats for sheet trays, but other sizes are available to fit an array of baking tins, even round ones. Bakers commonly use silicone mats for making candies and other tacky sweets, so you can only imagine how well it would work for something simple like zucchini bread or brownies. The best part is that no special preparation is needed to use it, simply place it in your empty pan, and it's ready to go.
Another benefit: Silicone mats are reusable, and using them consistently can lengthen the lifespan of your bakeware. Simply put, the mat protects it from damage, and you won't need to vigorously scrub the pan after preparing it with silicone.
Use liners for cupcakes and muffins to avoid a sticky situation
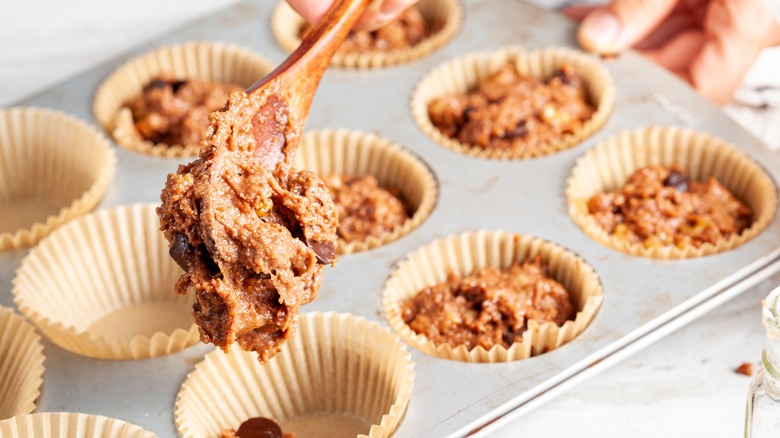
When baking cupcakes or muffins, we recommend that you consider using liners. First off, it results in easier cleanup, so you won't need to worry about soaking the pans for ages once you're done baking. Not to mention, you'll be able to make multiple batches before washing the pan, which is highly convenient for those planning to bake up a storm.
Additionally, with liners, you can pop your cupcakes or muffins out of the tin before they cool to stop them from drying out. Because whether you know it or not, leaving the hot baked goods in the pan is likely the simple reason your muffins or cupcakes turned out dry. With that said, utilizing baking cups will save you a lot of trouble. Running a knife along the edge of every individual cupcake or muffin can get a bit tedious, but you can avoid that situation altogether by planning ahead with liners.
For tube pans, avoid leaking by wrapping the bottom of the pan
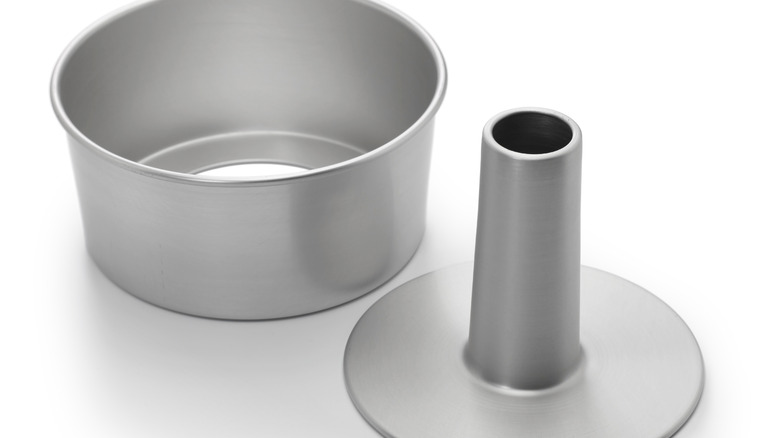
Some pans are two-piece sets that makes releasing your sweet treat much easier. However, with the complexity of the mold comes the need for special preparation. Tube pans are a perfect example of this. It is easy for people to confuse Bundt pans with tube ones because of their similar appearances, but the two-piece feature is one of the differences between a Bundt pan and a tube pan. Since bakers commonly use tube-shaped tins for sponge cakes where greasing the bakeware is bypassed, the pan separates into pieces to make it easier to remove the cake.
When using these tins, cake batter will often leak out the bottom of the pan because of the tiny gap in the pieces. You can get around this by putting a round piece of parchment on the bottom of the bakeware. Then, wrap the outer base in aluminum foil to seal it. The double lining guarantees you won't lose any of your beloved batter, and your oven will be mess-free.