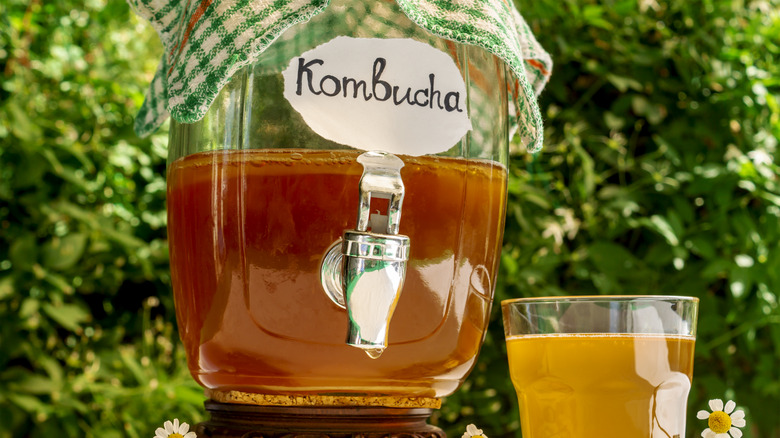
Your Step-By-Step Guide To Making And Caring For Kombucha

Maybe you're a kombucha enthusiast, constantly searching for the next brew that excites you more than the last. Maybe you're a curious home cook who is looking to dabble in a new project. Whatever the case, if you're reading this, you're in the right place. Welcome to the wonderful dimension of home-brewing kombucha, where the alchemy of tea, sugar, and a living culture transforms into a refreshing and probiotic-rich elixir. In this guide, we invite you to embark on a journey of fermentation, creativity, and the art of crafting your very own batch of this effervescent beverage right in the comfort of your home.
There's a lot to learn about and work towards perfecting when making kombucha. From selecting the right ingredient to make your tea substrate to troubleshooting when brews go awry, I've been through just about everything when it comes to kombucha brewing, having experienced many highs and lows when I operated my kombucha pop-up, Ether Ferments, in New Orleans during the COVID-19 pandemic. Home-brewing allows you complete agency over how your kombucha is made so you can work toward tailoring your favorite fizzy drink to your tastes. Cutting out the middleman also saves you plenty of money on your kombucha habit in the long run. You might also avoid supporting some not-so-savory kombucha companies in the process.
What is a kombucha SCOBY?

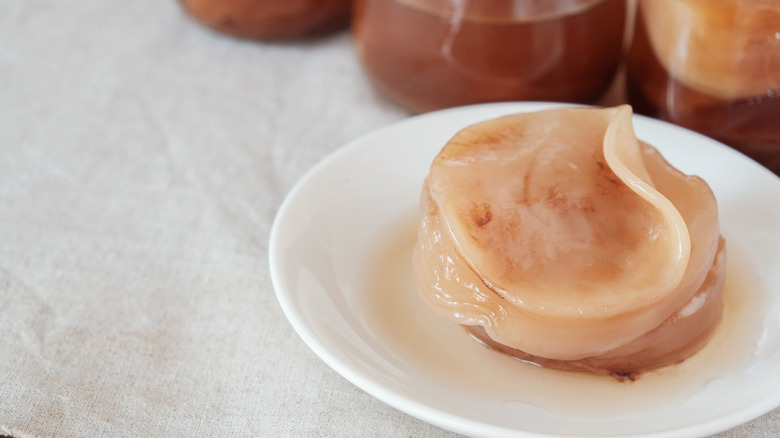
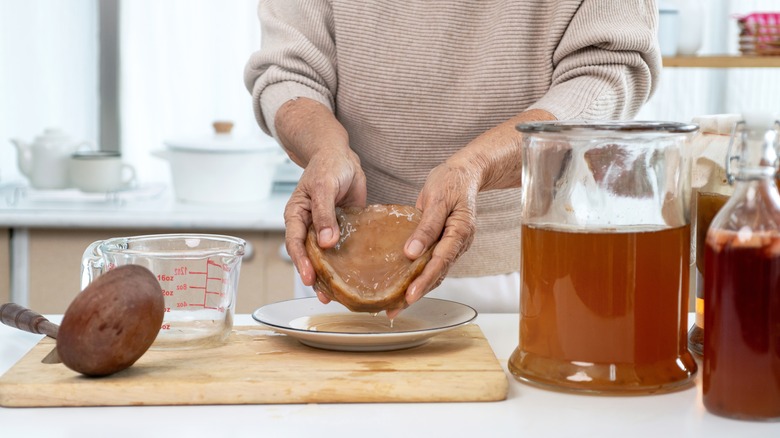
The root of all kombucha is its Symbiotic Culture of Bacteria and Yeast, also known by its acronym: SCOBY. The kombucha colony resembles a rubbery, pancake-like disc, called a pellicle, which floats atop the kombucha while it brews. If you've never seen kombucha being made before, there's still a good chance you have seen a SCOBY even when consuming kombucha. Because kombucha is harvested and bottled in active fermentation, the beverage is still alive when you're drinking it. Mini SCOBYs, called flocculates, continue to develop over time in kombucha bottles even after they are chilled and stored. They appear as stringy "floaters" in kombucha and are completely harmless to consume.
During the fermentation process, bacteria and yeast in the SCOBY work together to metabolize sugars, producing acids and gases that makeup kombucha's distinct tart flavor and fizzy nature. As the SCOBY floats like a raft at the surface of the brewing liquid, it acts as a natural barrier, protecting the developing kombucha from harmful contaminants. SCOBY is the driving force behind kombucha's complex flavor profile and probiotic health benefits.
Get the basic ingredients
Home-brewing kombucha is a relatively low-cost hobby that only requires a few items — which you might already have on hand at home — to get started. The first basic ingredients you'll need to make kombucha are sugar, water, tea, or some other sort of ingredient to steep in the water. Water is the substrate in which the SCOBY will live and grow; it is also what you will ultimately drink when you harvest your kombucha. Therefore, your water should be of good quality. Choose filtered, dechlorinated water so that no contaminants or chemicals interfere with the brewing process. White granulated sugar is recommended for kombucha brewing and provides the necessary nutrients for the SCOBY to grow.
Finally, while SCOBY can grow just fine in unflavored water, you'll want your kombucha to taste like something besides sweet and sour water. Most commercial kombucha brands use black tea as the background of their kombucha flavors, which also gives the kombucha a bit of caffeine. But contrary to popular belief, tea is not a necessary additive in kombucha. You can stick a SCOBY in just about any liquid that contains sugar, so think outside the box if you like. Think hibiscus, brewed coffee, tamarind, or even the fresh juice of fruits and vegetables. Finally, you'll need a starter tea — an already-fermented kombucha that helps lower the pH and provides acidity to kickstart the fermentation process — to backslop (mix) into your sweetened liquid.
Gather your equipment
Beyond the basic ingredients, you'll also need some equipment to cook with — or, rather, ferment with. First, look for a large glass (preferred) or food-safe plastic (the next-best thing) container that is clean and large enough to hold your desired batch size. Then, find a clean cloth that will fit over the top of the container and a rubber band that can stretch to fit tightly around the surface of the container. This will be your lid of sorts. Your SCOBY needs oxygen to survive, so your towel should allow for airflow through its cloth, while also having a high enough thread count to prevent contaminants and parasites, like fruit flies, from getting to your batch. You'll also need a large pot to boil your water in to make tea.
Next, invest in or collect glass bottles with tight-sealing lids. These bottles will ultimately be used for the second part of the fermentation process and storage once the kombucha is done brewing. Other optional but not necessary equipment includes pH strips to test the acidity of your brew, a thermometer to maintain proper fermentation temperature, and a refractometer to analyze the sugar content in your kombucha.
Source a kombucha SCOBY
Getting your hands on a kombucha SCOBY is actually easier than you might think. While plenty of online home-brewing stores will sell and ship SCOBY directly to you, you'll save money by either getting one from a friend who makes kombucha or making one yourself. If you know someone who actively makes kombucha at home, ask them if they have any extra SCOBY they're willing to part with. Like the mother of vinegar, SCOBY grows constantly and exponentially with each batch of kombucha made, so over time, every home-brewer will end up with an excess of SCOBY that can be trimmed off and disposed of, consumed, or given away.
If you don't have anyone you can get a SCOBY from, you can always make your own using just one bottle of store-bought kombucha. Simply make a small batch of sweet tea following the first fermentation instructions below, and backslop the contents of the entire bottle into the sweet tea. Wait for a pellicle to form, and bam — you've got yourself a brand new baby SCOBY.
Brew your tea

Again, while it's not necessary to specifically use tea to make kombucha, for this guide, we will be referring to the sweetened liquid that your SCOBY will live and grow in as "tea." First, decide how much kombucha you want to make, considering the limits of your brewing vessel. Find the amount of water you'll be using and bring half of it to a boil in a large pot. It will help to keep the other half of the water cool or cold during this time.
Once the water's boiled, remove it from the heat source and add whatever flavoring agent you want to steep in the water. Make sure that once your tea is steeped, you remove any remaining solids such as seeds, tea leaves, or grounds from the liquid. Then, while the tea is still hot, add your sugar and stir to dissolve. As a general rule of thumb, you want to add 1 cup of sugar for every gallon of water. That said, you may choose to use slightly less sugar if the ingredient you're steeping your tea with already contains sugar, like fruit juice. You can play around with the ratio as you continue brewing.
Start first fermentation
Once your sugar is dissolved, add the other half of the water to the pot and stir to cool down the water to body temperature. You should be able to comfortably stick a finger into the liquid without sensing "hot." If your mixture is too hot, you risk killing the SCOBY once you introduce it to the liquid. You might need to wait a bit longer for it to cool off. If it's too cold, fermentation might be stunted while the mixture warms up. Consider increasing the heat. While SCOBY can live between 60 F and 85 F, it grows best at a warm room temperature between 75 F and 80 F.
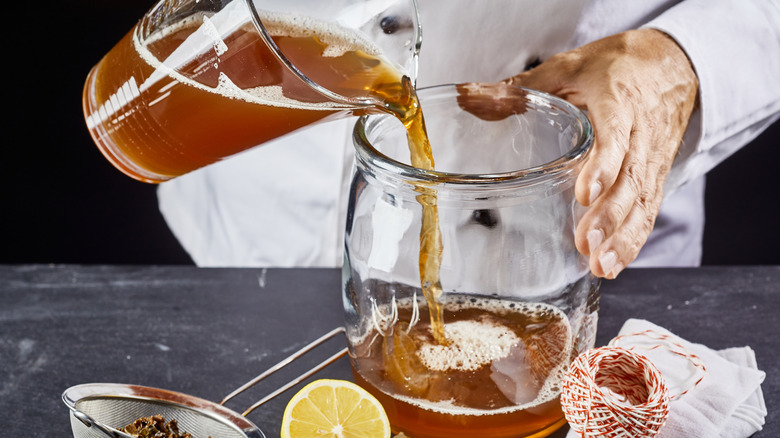
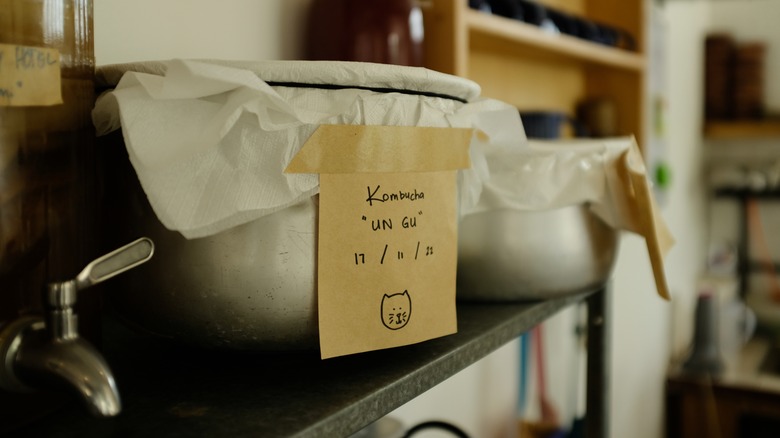
When your sweetened tea is made and brought to the proper temperature, you're ready to begin the first of two fermentation cycles, commonly called "F1." Simply pour your ready-made tea into your clean and dry brewing vessel and add your SCOBY and starter tea to the mix. The mixing of the starter tea into a new batch of kombucha is called "backslopping," which the Fermentation Association refers to as "the practice of saving a bit of the last successful batch and incorporating it into the new one." Backslopping ensures your new batch is inoculated with enough of the right microbes for successful fermentation. Finally, secure your clean cloth over the top of your brewing vessel with the rubber band, label it with the date, and store it in a warm place in your kitchen.
Check and taste your brew religiously
The younger your SCOBY is, the more crucial it is to check on it to ensure health as it grows. But really, all who dabble in the practice should be checking on their fermenting batches regularly; not doing so is one of the biggest mistakes rookies make when making kombucha. Any number of factors can throw off a perfectly good batch of booch if a close watch isn't kept on it. You can mitigate disaster — such as fruit flies laying eggs on your SCOBY or mold growing on the surface of your kombucha — or prevent it completely by being an attentive home-brewer.
When brewing a new batch of kombucha, it will behoove you to conduct a quick check on your brew every day or two to make sure things have gotten off on the right foot. Make sure to use all your senses when inspecting the vessel. How does the kombucha look? Over time, the mixture will become cloudy and bubbly, and the SCOBY pellicle will start expanding. Make sure to agitate the mixture here and there to keep the top of the pellicle moistened, otherwise it can start to mold. Also, ensure the integrity of your cloth barrier to keep pests out. How does it smell and taste? The brew should start to smell and taste slightly more acidic each day. It's ultimately up to you to decide how tart or how sweet you'd like your kombucha to be.
Decide what to do with your SCOBY after first fermentation
When your kombucha has reached a tartness level that's almost where you want it to be, it's time to end the first phase of fermentation. You want your booch to be just slightly sweeter than you'd like to drink when coming out of F1, as the kombucha will continue to acidify during the second phase of fermentation. This second phase, called "F2," takes place without the SCOBY present. So, where does the SCOBY go?
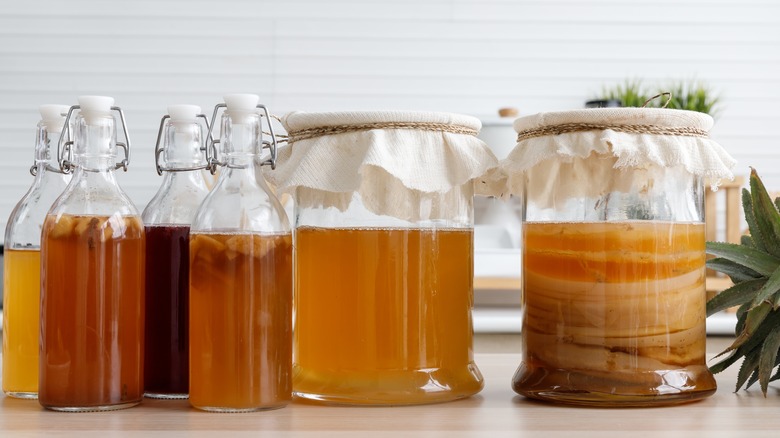
After the first phase of fermentation, your SCOBY has to be immersed in a sugary liquid to survive. You can brew another batch of kombucha or make a SCOBY hotel to reserve your pellicle for use at a later date. To make another batch of kombucha, reserve some kombucha from your current batch to use as a starter tea and repeat the first steps of brewing and F1, or follow the continuous brew method instructions toward the end of this guide.
To make a SCOBY hotel, mix a small batch of (unflavored) tea and backslop with a cup or 2 of reserved kombucha from your batch. Submerge the SCOBY in the liquid and cover it with a towel and rubber band. This is your SCOBY hotel. Store it in a temperate, dark place and check on it periodically to ensure the SCOBY is moist and healthy. Make sure to feed the SCOBY about every month by replacing about 75% of the liquid with fresh sweet tea.
Start second fermentation
Once your SCOBY is tucked away into a new batch or hotel, it's time to start the second phase of fermentation for your current batch. This is the part of the process that gives kombucha its effervescence, and the step that takes the most practice and finesse.
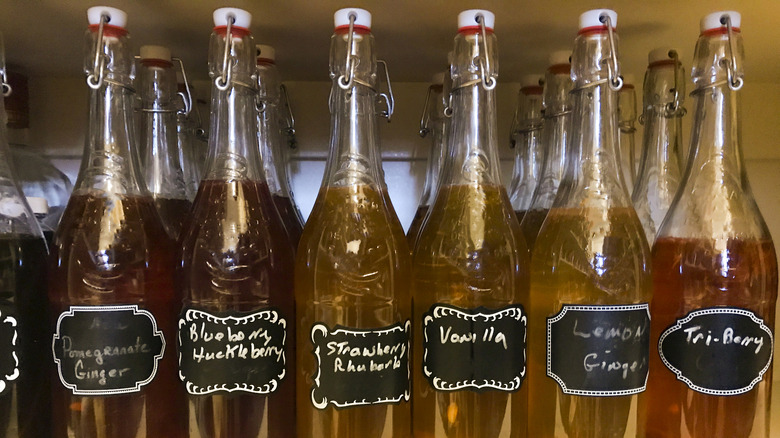
F2 is a good opportunity to add any additional flavors or ingredients to your kombucha — such as herbs, spices, or fruit — that you might want. Keep in mind that active yeast is what makes for strong carbonation in kombucha. Adding extra sugar or certain ingredients that contain natural yeasts — such as ginger, chamomile flowers, and honey — during F2 can increase the carbonation in your booch.
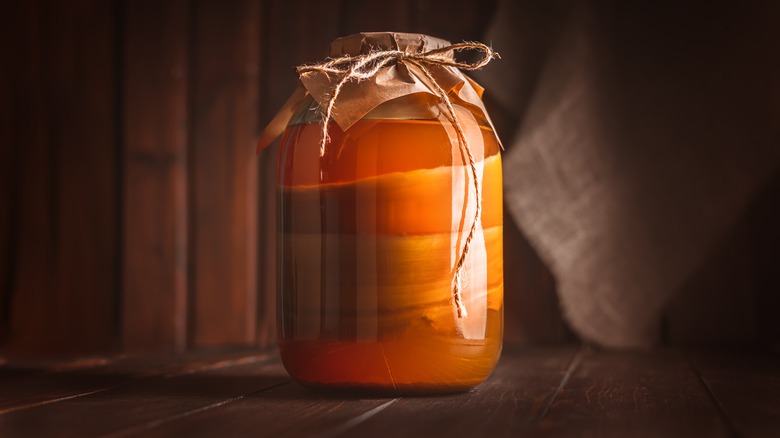
First, prepare your glass bottles. During F2, your kombucha will carbonate only under airtight conditions, which is why you might choose to bottle only in swing-top bottles with airtight caps. Make sure they're clean and sterile before you pour any kombucha into them, otherwise you risk contaminating your batch. Add any additional ingredients to either the kombucha or the bottles. Then, pour your kombucha into each bottle, leaving an inch or two of headspace at the top of the neck. This will ensure that your bottles don't explode from over-pressurizing during the fermentation process. Close the lid of your bottles to create an airtight seal over the tops. If you spilled on the outside of the bottles at all, now's a good time to rinse and dry them off, and even add dated labels.
Chill, observe, enjoy
The length of F2 is different for everyone and depends on many variables. It might take a couple of batches to get it down pat to the exact level of carbonation you want. Generally speaking, F2 can take anywhere from 24 hours to four days. That said, you don't want to ferment under pressure at room temperature for too long, or else you risk over-carbonating your kombucha, which can cause a mess when opening your bottles later.
Once your kombucha has carbonated sufficiently, it's time to refrigerate it. Refrigerating carbonated kombucha keeps carbon dioxide gas — which is the source of effervescence in the drink — dissolved in the liquid. It will also slow down the fermentation process to keep the carbonation at a steady equilibrium. Remember that kombucha is an active, living microbiome that will continuously ferment regardless of the temperature it's at. Kombucha doesn't die when chilled in the fridge, it just slows down its fermentation so significantly that there is barely any change noticeable.
When your booch is cold, feel free to pop a bottle and enjoy. If you're going to make kombucha brewing a regular hobby, make sure to take note of the kombucha, asking yourself the following questions: How's the flavor of the beverage? Could it have fermented for more or less time, or is it just right? Did the ingredients you added taste delightful or unpleasant? Is it fizzy enough? What could you do better next time to make it even better?
How to make a continuous brew
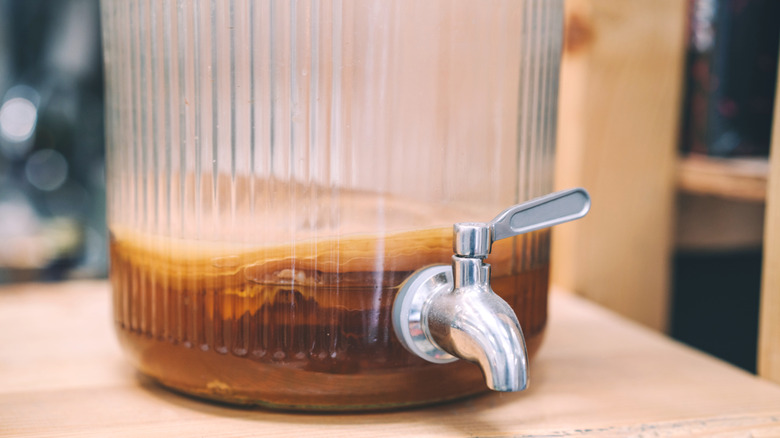
Making a continuously brewing batch of kombucha, as mentioned above, is a great option if you always want to have fresh booch on deck for your convenience. To brew a continuous batch of kombucha, we recommend using a glass brewing vessel with a spigot for easy harvesting and bottling.
There's not much to this method of brewing that deviates from the traditional batch method. Simply make a batch of sweet tea and ferment it as you normally would in the spigoted vessel. When it comes time to harvest the kombucha after F1, leave the SCOBY in and drain the kombucha you're going to consume from the spigot and leave about 20% remaining in the vessel. Then, make another batch of sweet tea and pour it into the vessel with the remaining kombucha and SCOBY, and stir to backslop. Now you've got another batch of kombucha already fermenting. If you're into it, you can even drink your kombucha straight from the tap after F1.
What to do with excess SCOBY
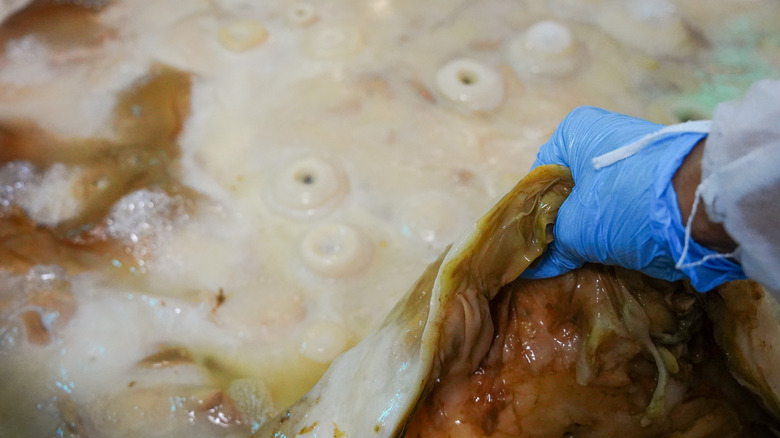
As you continue along your kombucha brewing path, you will inevitably end up with a massive SCOBY, which is a beautiful thing. But eventually, the SCOBY will grow so large that it becomes over-encumbering to any vessel. That means it's time to trim the fat and let some of it go. Sure, you can toss it or give it away, but the former is wasteful and the latter, well —you'll eventually run out of willing recipients of your yeast and bacteria sludge. So, what else can you do with it?
It's worth noting that handling SCOBY can be kind of intimidating, but don't worry too much about hurting it. Cutting through SCOBY won't harm it in any way as long as you're working with clean hands and tools.
When you find yourself with excess SCOBY, you might first look to diversify your kombucha arsenal. Why not cut your SCOBY in half and ferment a new flavor alongside my other ones? It's a great opportunity to test a new flavor. If you're not planning on making any more kombucha, there are myriad other inventive ways to use SCOBY, which is high in protein, fiber, and good bacteria. Slice it up like fish to use as sashimi or in sushi rolls. Toss it with spices and dry it in a dehydrator to turn it into jerky. Blend it into smoothies for a thicker texture and gut-healthy probiotic boost.
Experimenting with flavors
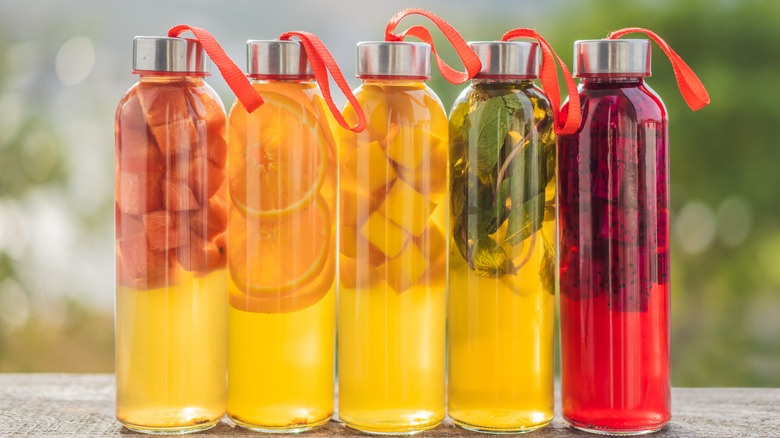
There are seemingly innumerable amounts of flavor combinations to experiment with when home-brewing kombucha, so don't be shy; the sky's the limit. If you're new to brewing kombucha, it's easier to start simple. Think of some of the most refreshing flavors of store-bought kombucha brands you love: ginger lemon, cayenne, lavender, and mango habanero are some classic flavor combinations to experiment with, to name just a few.
As you continue brewing, you might decide to make your flavor experimentation more advanced. The Noma Guide to Fermentation is a fountain of inspiration for the curious kombucha brewer, with gorgeous photos of novel and off-kilter kombucha flavors like lemon verbena. There's the possibility of savory kombucha, as well — you could ostensibly make a kombucha made entirely from the water extracted from vine-ripe tomatoes. Remember: Any liquid substrate that contains sugar can become a formidable medium for a SCOBY to grow, even rice milk horchata. The most important thing is to keep trying when you fail — and as a fermentation enthusiast, you ultimately will fail many times. But in the end, the adventure of experimentation was the most exciting part — especially when you get it right and create a brand new flavor all on your own. Happy brewing.
Static Media owns and operates Tasting Table and Mashed.