The Step-By-Step Guide To Photographing A Cocktail
Learn our lighting tips and tricks
People are always asking us, "How did you shoot that?"
Sometimes, it's an easy question to answer, but food photography can be more than a little involved. Smoke and mirrors, people!
For instance, with the opening photo of "Rinse Cycle," a story inspired by Jordan Salcito's rinsed wine and beer cocktails at Momofuku's Ko, we wanted to capture the mist from a spritzer as it coated the inside of a cocktail glass.
Sounds easy, right? Not so much. The picture required a pretty unusual setup, but we made it happen with two carefully positioned lights (and a host of other tricks).
Want the details? Keep reading, and we'll tell you how we captured the perfect mist-meets-glass moment seen below.
 The final product
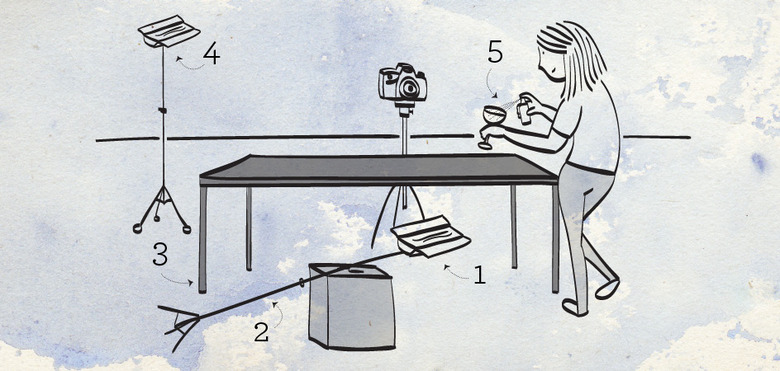
Challenge #1: Mist is translucent. We had to do two things to make it appear: light it from behind and shoot it on a dark background. We positioned our first light directly behind our subject and shot against a dark gray wall at the corner of our Test Kitchen, which faded to black in the photograph.
Challenge #2: Height. We wanted the light to sit about two feet above the ground. But our stand was too tall, and these particular lights get very hot (and would burn if placed directly on a surface). Solution: We simply leaned the stand over an apple box to position the light closer to the floor.
Challenge #3: Blocking the light. At first, the camera was pointing directly into the light source (kind of like staring at the sun). So we placed a small table directly beneath our subject to block the light that was flowing into the camera's lens. The mist and the glass stayed illuminated. (You'll notice there is no table in the final photo; it was just a prop.)
Challenge #4: Reflections. We needed to illuminate the rest of the picture from the front with a second light, but we didn't point it directly at our scene. Glass is reflective, and we didn't want to see a reflection in the coupe's rim. Instead, we raised the light high on its stand and pointed it upwards, effectively bouncing the light back down into our picture.
Challenge #5: Getting it just right. We exposed the picture for the highlights along our model's arms so that they didn't become pure white. (In other words, we underexposed the picture very slightly so that we could balance it out later.) We also took our time–it took more than 200 spritzes to get the perfect shot.
See? Piece of cake.