Coconut-Chocolate Icebox Cake With Toasted Almonds
It's the easiest (and best) dessert you could possibly make
We may receive a commission on purchases made from links.
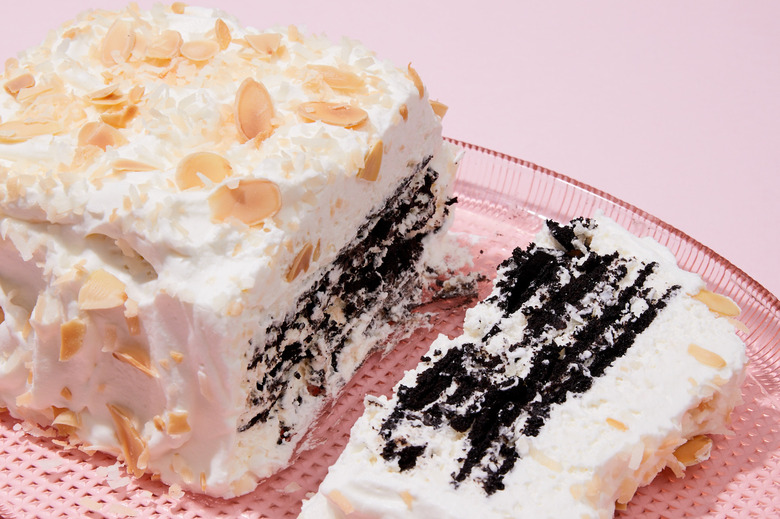
Both history geeks and sweets lovers in general will love The Vintage Baker, a throwback gem of a cookbook by Jessie Sheehan. This particular cake was inspired by a recipe found in a 1929 cookbook, and beyond the benefit of requiring zero oven time, it has the satisfying flavor combination of chocolate, coconut whipped cream and toasted almonds. Texture-wise, it's like a cloud—if spooning into a puffy cumulus always revealed layers of softened chocolate cookies.
When you chill the coconut milk, Sheehan recommends you store it in the coldest spot of your refrigerator, upside down, so that the coconut cream solidifies and separates from the liquid.
For more icebox cakes, try one with salted caramel or this Creamsicle®-inspired version.
Recipe adapted from 'The Vintage Baker,' by Jessie Sheehan
Coconut-Chocolate Icebox Cake with Toasted Almonds
Learn how to make this no-bake chocolate-coconut icebox cake, topped with toasted almonds, from old-school cookbook The Vintage Baker.
Ingredients
- Three 13-ounce cans full-fat coconut milk, chilled for 24 hours
- ½ to 1 teaspoon almond extract
- ¾ cup confectioners' sugar
- 1½ cups heavy cream
- 1½ cups shredded sweetened coconut, toasted
- 9 ounces crisp chocolate wafer cookies
- ½ cup sliced almonds, toasted
Directions
- Line a 9-by-5-inch loaf pan with plastic wrap that hangs slightly over the sides of the pan.
- Flip the coconut milk cans right-side up, open them and, using a rubber spatula, carefully scrape the solid coconut cream into the bowl of a stand mixer fitted with the whisk attachment. Save the liquid for another purpose.
- Add the almond extract and confectioners' sugar to the mixer, and whisk on medium speed until smooth and thick. Add the heavy cream and whisk on medium-high speed until the cream holds stiff peaks, about 2 minutes. Add the toasted coconut and fold it into the cream with a rubber spatula.
- Using a small offset spatula or the back of a spoon, spread a thin layer of the whipped cream on the bottom of the lined pan. Cover as much of the cream as possible with a layer of wafers, filling any gaps with broken wafers, creating one solid layer.
- Continue layering whipped cream and wafers until you run out or reach the top of the pan, ending with a layer of wafers. Gently cover the surface with plastic wrap and refrigerate for at least 6 to 8 hours, preferably overnight. If you have leftover whipped cream, store it in the refrigerator.
- Remove the cake from the refrigerator prior to serving and peel off the plastic wrap. Place a serving plate over the pan and invert it onto the plate. Carefully remove the pan and plastic wrap lining, and thinly spread any remaining whipped cream over the sides and top of the cake. Sprinkle the cake with the toasted almonds and lightly press them into the cream to coat.
- Using a serrated knife, cut the cake into slices and serve. The cake will keep, lightly wrapped with plastic wrap, in the refrigerator for up to 3 days.
Nutrition
| Calories per Serving | 487 |
| Total Fat | 39.7 g |
| Saturated Fat | 29.0 g |
| Trans Fat | 0.0 g |
| Cholesterol | 41.2 mg |
| Total Carbohydrates | 32.8 g |
| Dietary Fiber | 1.7 g |
| Total Sugars | 21.3 g |
| Sodium | 177.3 mg |
| Protein | 5.0 g |