How To Make Pour-Over Coffee At Home With A Chemex
Making pour-over coffee in a Chemex produces a morning cup bursting with flavor that washes over your consciousness in waves. Chemex coffee uses science, art, and culinary understanding of flavor profiles to produce the most delicious hit of caffeine you can imagine in your bleary-eyed morning state, but there is a specific process to align the elements going into your coffee maker. Still, get it right, and the beans bloom to release layers of taste and aroma that just aren't possible with other types of coffee brewing systems.
This technique produces a more rounded cup of coffee than other brewing methods, and it also requires some patience, both in learning how to handle the tool and in the brewing itself. It's not as easy as your standalone drip coffee maker, but if you want to experience a better cup of coffee every morning, it might be time to try Chemex coffee. A chemist may have designed it, but the Chemex coffee brewing system isn't rocket science. However, there are some tips, tools, and techniques you need to get started.
What is pour-over coffee?
The uninitiated might think that pour-over coffee is just a fussier version of good old drip coffee, but that oversimplifies a scientific process. Precisely measured and ground coffee is placed in a filter set in the neck of a carafe, in this case, a Chemex. Temperature-controlled hot water is poured with a specific technique to brew the coffee. Like drip coffee, pour-over coffee uses a drip extraction, but that's where the similarities end.
Pour-over coffee is more hands-on than drip coffee. This allows the person brewing to have more control over the temperature of the water, the speed of the brew, and, ultimately, the overall flavor of the final cup. French press coffee is another coffee brewing method that is often compared to pour-over, but these two are also not the same. French press brewing uses an extraction method where grounds are steeped for a set period of time, resulting in a cup that may be more bitter and less nuanced.
And finally, those who swear by the richly flavored espresso-like beverage they get from their moka pot might be surprised by what they are missing. This brewing system uses steam to force water through the grounds. At steam's high temperature, much of the delicate flavor of coffee is lost. Chemex coffee may require more attention to detail, but it's that attention that makes a superior cup. And that is worth a few extra minutes in the morning.
What tools you'll need for pour-over coffee
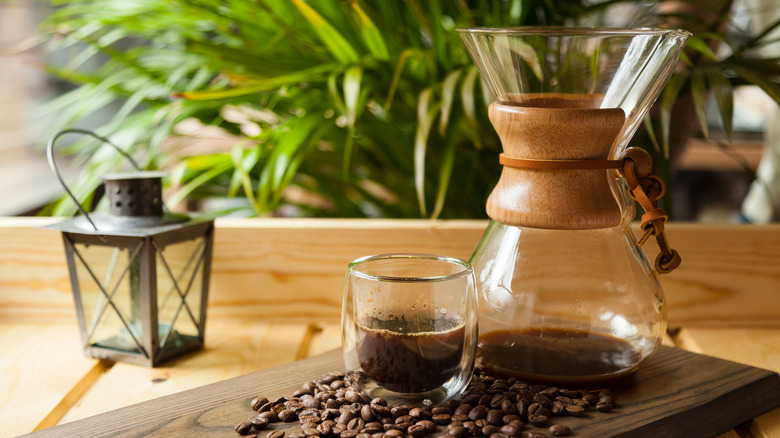
The best results come from using the proper tools. Dr. Peter Schlumbohm designed the Chemex vessel in 1941 in an attempt to create something that was purpose-built and beautiful to look at. The shape of the vessel is inspired by Bauhaus design but uses proper chemistry to ensure that coffee is extracted to get the most flavor. It is made from a single piece of borosilicate glass that tapers from a globular bottom to a neck with a wooden collar and a piece of rawhide tie. From this neck rises a cone that holds the filter. You cannot make Chemex coffee without this container.
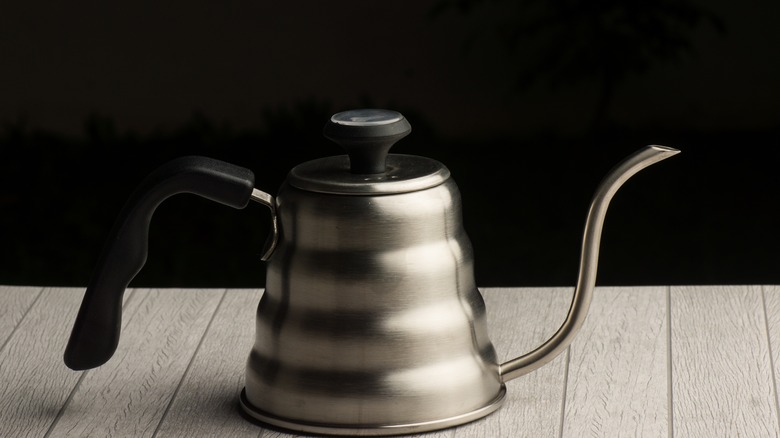
From there, you have some choices to make. You'll need a kettle for boiling water; some purists insist that a gooseneck kettle is best. The spout does allow for more precise placement of the hot water, but it's not strictly necessary. Any kettle will do as long as you can control the flow of water.
The filter that holds the coffee is most often unbleached paper in a cone or square shape. You can use metal or even fabric coffee filters. If you use metal filters, ensure the metal mesh is small enough to trap tiny coffee particles for a cleaner brew. A scale for weighing coffee is critical, too. Once you find an accurate one, all you need is a coffee grinder, a stirring spoon, and a timer, and you're ready to brew.
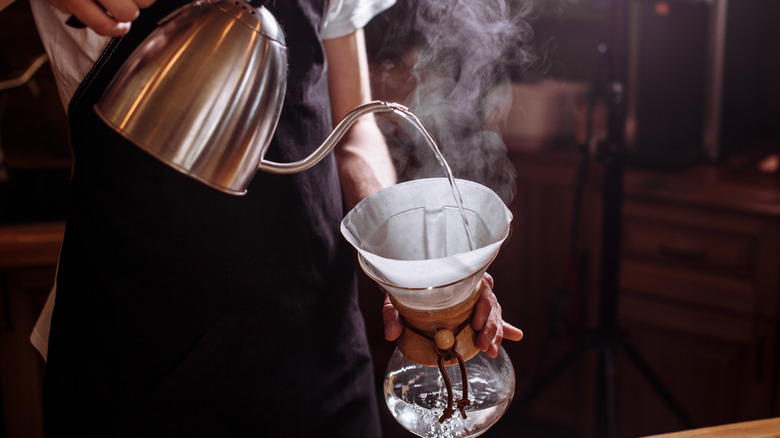
Boil water
It all begins with water. Filtered water with a neutral pH is always the best choice. Because everything should be as fresh as possible, don't use leftover water in your brewing process. Dump out any previously boiled water, then add fresh filtered water.
Pay attention as your water boils, too. Heating to a solid 212 degrees Fahrenheit deoxygenates the water, leaving it flat and stale. The ideal temperature for brewing is approximately 200 degrees Fahrenheit. Consider that water will cool by about ten degrees as you pour it from the kettle to the coffee. Turn the kettle off just before boiling for the freshest taste and best flavor extraction.
And mind how much you boil. Don't make the mistake of boiling the exact amount that fits in your Chemex coffee maker. You'll need a little extra to wet the filter and warm the Chemex prior to brewing. It is possible to use water that is not filtered, but take caution if your tap has hard water. Hard water has minerals that can noticeably alter the taste of your coffee. Some spring water might also have minerals that affect the final brew.
Weigh coffee
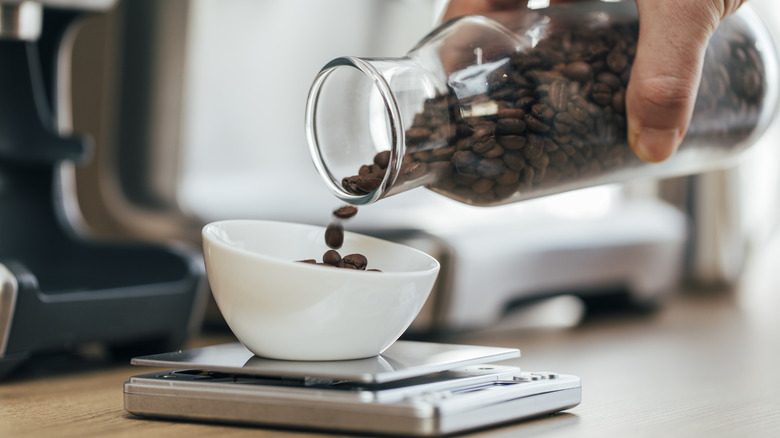
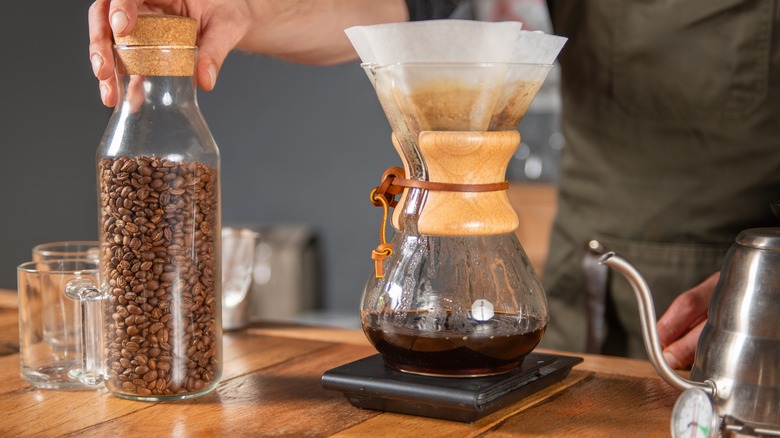
The best brew comes when you weigh the beans before you grind them. This is not a time to eyeball or use a measuring scoop. A delicious cup of coffee starts with proper measuring. And don't rely on a set amount for different beans. Coffee beans can vary in weight, throwing your coffee-to-water ratio off.
The type of coffee beans matters, too. You may love your dark-roasted espresso drinks, but when it comes to making coffee in a Chemex, you'll need to lighten up. In general, medium roast beans with a robust aroma and complex flavor profile are going to produce the best cup of coffee using this method. The bean's body should be full, with decent acidity levels. Much of the bitterness that seeps into a regular extraction method is removed by the filter, so it's okay if there are some bitter notes in the flavor profile.
If you're new to Chemex, it can take some time to find the beans you like best. Ultimately, whichever beans produce coffee that you enjoy is the best choice. For the best flavor and maximum extraction, grind your beans to a medium grind. This uniform size allows water to flow freely around the coffee. One caution: If you are making coffee for a crowd, grind your beans more coarsely. This prevents bitterness from occurring when coffee is exposed to heated water for longer during a larger batch brew.
Place and rinse the filter
Rinsing the filter has two purposes. The first is to remove debris or any papery taste from the filter. The second is to warm the body of the Chemex. A warmer Chemex means your coffee stays hot longer. If you like your coffee piping hot, this is especially important as a Chemex has no heating mechanism to keep your coffee toasty warm.
The filter placement technique varies depending on the type of filter you're using. If you are using a cone-shaped or square paper filter, open up the cone so that it has three layers on one side, or place the square so that there is more than one layer of the filter at the pour spout. This three-layered side should go against the pouring spout. Fabric filters can be placed in a way that makes sense — just take care to secure them so they don't slip around. It's less important to warm a metal filter, but it is part of the ritual and warms the body of the Chemex, so place that filter on the top before proceeding.
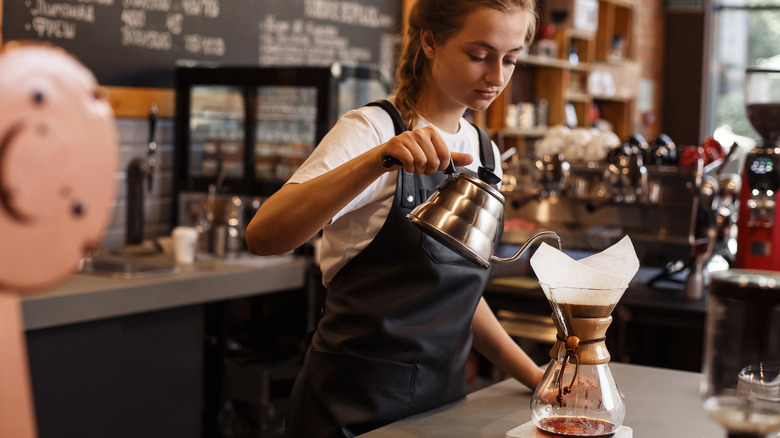
When your water is close to boiling, turn off the kettle or remove it from the heat. Carefully wet the entire filter, letting the water run into the Chemex. Swirl the heated water in the body of the vessel, then dump it out before brewing. You can carefully remove the paper filter to do this, replacing it in the same way as before.
Add coffee
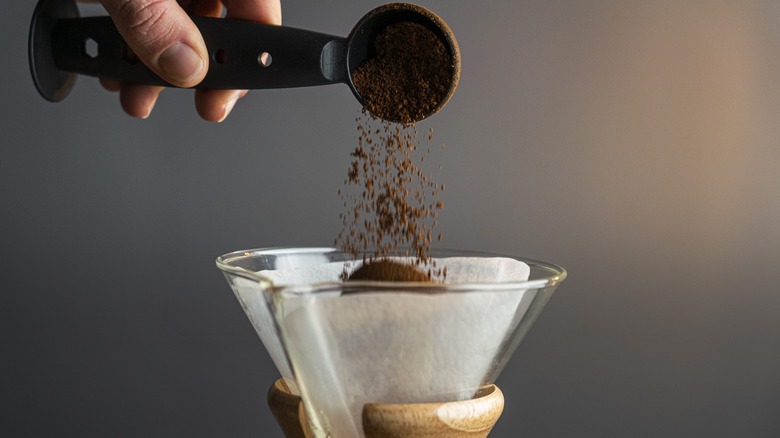
And now the question everyone has: how much coffee to use in a Chemex? There is an actual answer to this, and it's not "However much you like." Unlike a pot of brewed coffee, brewing in a Chemex is a carefully calibrated process that uses a ratio of coffee to water for the best results.
The ideal ratio for Chemex coffee is 1:15 — coffee to water. In other words, you'll use one gram of coffee for every 15 milliliters of water. For two cups of coffee, this means 50 grams (1.8 ounces) of coffee to 750 milliliters (just over 25 ounces) of water. Doing the math may seem complicated, but that's what the kitchen scale is for. When figuring out how much coffee and water you need for the coffee you're making, don't forget to heat additional water for the pre-brewing steps (rinsing the filter and heating the Chemex).
Bloom the coffee
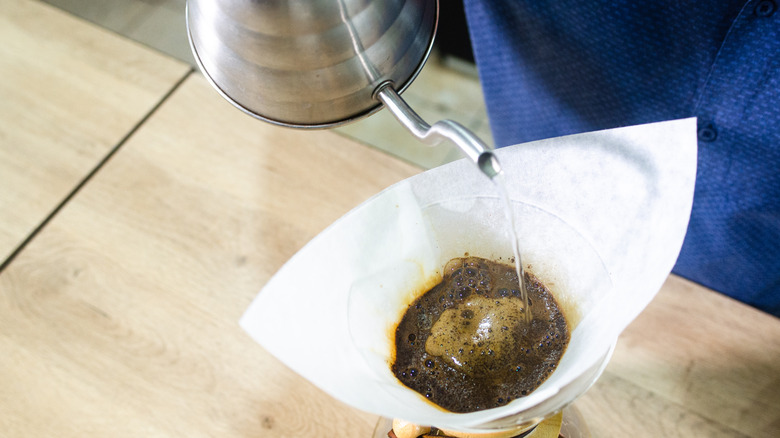
Another pre-brewing step is actually the first pour of heated water: blooming the coffee. To bloom your grounds, pour a small amount of heated water over them in a circular motion, just enough to wet them evenly. Stir with your stirring spoon to make sure all of the coffee is wet. Blooming your grinds helps coffee release trapped gases that can adversely affect the flavor of the brew. You'll see the coffee grounds swell (or "bloom"), and large bubbles may also form and pop. Let them sit for at least 30 seconds (and up to one minute).
If you're in a hurry, you may be tempted to skip this step. Resist the urge. The popping bubbles during the blooming step are actually caused by carbon dioxide released in the coffee. Carbon dioxide makes coffee taste sour, and it also repels water. So that careful extraction of flavor you're trying to achieve with a Chemex will be thwarted if there's still too much carbon dioxide in the coffee.
The bloom is also referred to as turbulence, and it can cause even more problems if not done correctly. Blooming coffee can quickly overflow the filter, slipping between the filter and the neck and into your carafe as well as all over your countertop. Set a timer, and take 30 seconds to bloom your coffee properly. It will result in a more delicious, nuanced cup of coffee and no mess to clean up.
Pour water
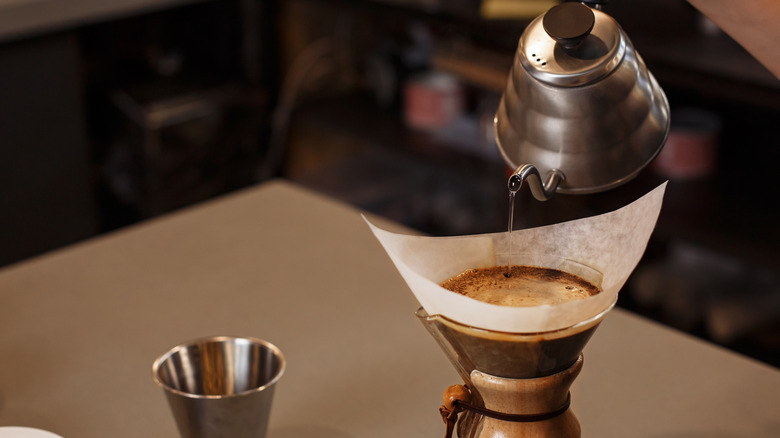
There is a proper strategy for this to get the best extraction. When the coffee is bloomed, right around 45 seconds or so, start your second pour. Set your Chemex on a kitchen scale and tare it to zero. This will help you pour the proper amount of water for the amount of coffee you use.
Pour heated water in a spiral from the center of the coffee to the outer edges of the filter until it reaches a fingertip width from the top of the filter. Stir carefully with your stirring spoon. Let the water from the first pour extract for about a minute, then, using the same spiral technique, pour heated water to the top of the filter and let it extract completely. You might want to give this a stir when there is some space at the top of the filter, but take care not to stir too vigorously.
Let water drain completely through the grounds
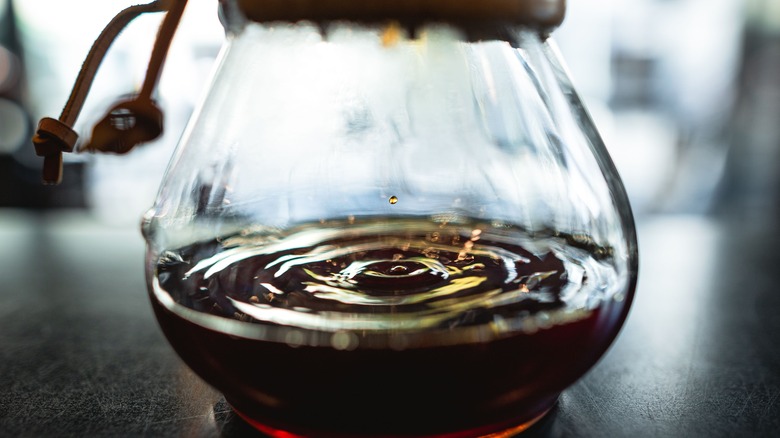
The entire brewing time (including blooming time but not including rinsing the filter and Chemex) should be between four and five minutes. If you want to see how things are progressing, you can lift the filter carefully to see if it's still extracting. But be careful as you lift the filter. Metal filters can be hot to the touch, and paper ones are less sturdy now that they've been soaked with hot water.
Above all, don't rush the process. Yes, it takes more effort to time and brew than simply dumping grounds in a basket and water in a reservoir and pushing go. This type of coffee-making can be considered a spot of mindfulness before you start your day.
Remove the filter
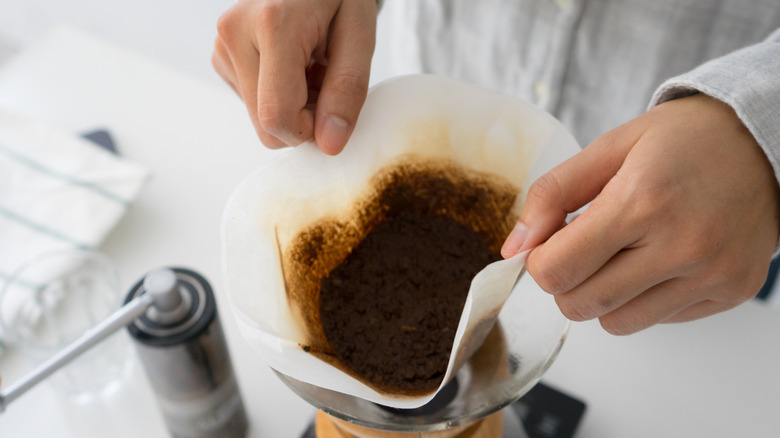
Once the extraction has mostly stopped, carefully remove the filter and place it in the sink. Paper filters can be disposed of, but fabric and metal need more consideration. Dump coffee grounds from each of these into a separate container and rinse out both fabric and metal filters. Give them a quick rinse. Although you'll clean them more thoroughly after you have your coffee, it makes the step much easier. Both forms of reusable filters will trap and hold oil produced from brewed coffee and should be washed regularly. If your water is hard, you may need to eventually use vinegar to descale your metal filter.
If you're a gardener, you can add spent coffee grounds to the compost or directly to the garden. Even if you don't have a green thumb, coffee grounds are used in many different ways. If you like to conserve resources, store old coffee grounds until you have enough to use.
Swirl the Chemex before serving
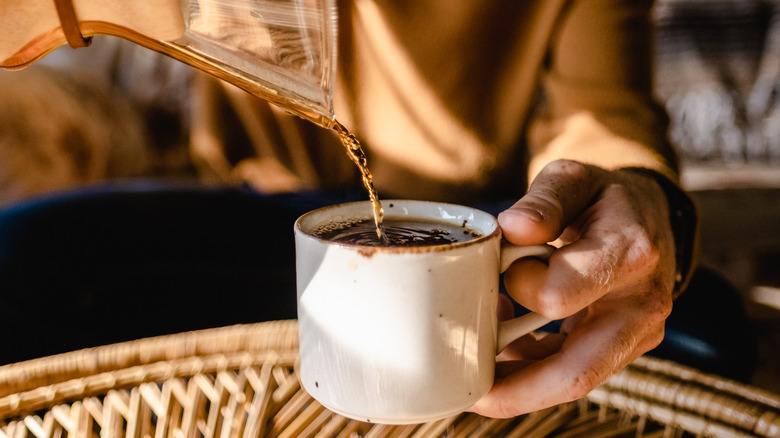
Now you're ready for coffee, but don't make a rookie mistake and pour the coffee directly out of the Chemex. That bulb-shaped bottom is great for the final step of brewing Chemex coffee: the swirl.
Hold the Chemex by the neck and give your brew a gentle swirl. This unites the three stages of brewing (the bloom with the first and second pours) so that you can taste all of the subtle flavors this coffee brewing method can produce. If you don't swirl, the first cup of coffee will taste very different from the last. So give it a gentle wave before you grab your favorite mug and enjoy.
Clean your Chemex
The shape of the Chemex means that cleaning it can be a bit of a challenge. For everyday cleaning, it is possible to use simple dish soap and warm water with a brush to reach the bottom of the pot, but every now and then, a deep clean is a good idea. This gets at any areas you have missed that may be muddling the flavor or causing an off-taste to your final brew.
Let your Chemex cool completely before you begin. Untie the rawhide string to remove the wooden collar and set it aside. Wash the carafe with dish soap and warm water, then rinse completely. Fill the carafe with equal parts cool water and distilled white vinegar. Allow this mixture to sit for a few hours or even overnight. If you are feeling especially tidy, take this opportunity to dunk the entire Chemex in a bucket or sink that is also filled with equal parts white vinegar and water.
When it is time, dump out the water and vinegar mixture, and scrub once again with a brush and dish soap, inside and out. Rinse with cool water, and dry completely. If you've neglected a deep cleaning for a long time, stains may form on the inside of the carafe. To remove them, fill it halfway up the carafe with ice and add salt. Swirl the salt and ice mixture around gently. The friction from the salt will remove coffee residue without scratching the glass.
Clean your reusable filter
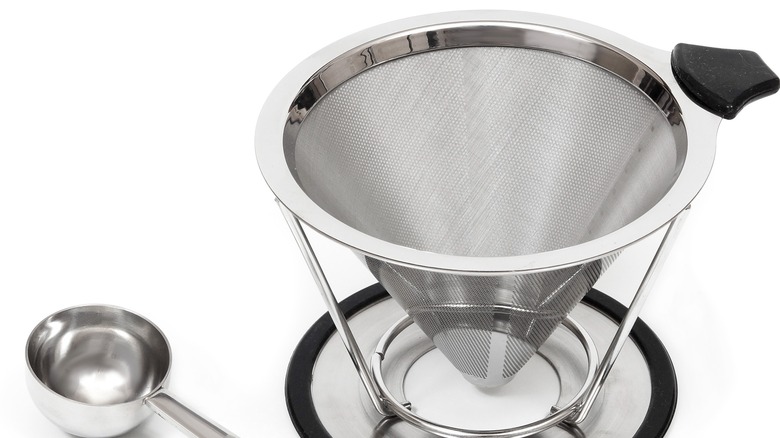
Your reusable filters need regular cleaning as well. Over time, coffee oils can clog filters, imparting a strange taste to your coffee. Usable filters are environmentally friendly and cost-effective, but if they make your coffee taste bad, it's just not worth it. Prevent this from happening with regular cleaning. For daily cleaning of metal filters, use hot water and dish soap to gently scrub after each brew. Rinse thoroughly and dry by hand to protect the metal from any deterioration.
Fabric coffee filters can be washed by hand as you might launder delicate garments. Start by rinsing as much of the coffee grounds out as you can. Add a drop or two of dish soap and scrub the cloth between your hands. For deeper periodic cleaning, there are a few different options. Soak filters in white vinegar and water, just as you did in the carafe. Metal coffee filters can also be washed in the top rack of the dishwasher. Stains will not necessarily affect the flavor of the coffee, but if you want the filter to look its shiny best, scrub it with baking soda to remove it.
For fabric filters, the sturdier ones can be tossed into a clothes washing machine. Be sure to set it on a delicate cycle. This should not be done frequently, but if stains, odors, or any sign of mold shows up in your fabric filter, this is the best way to remove those.