15 Tips For Baking The Absolute Best Macarons
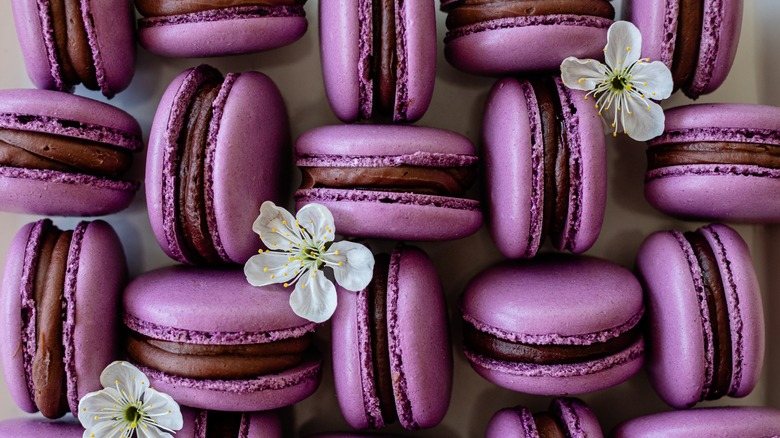
Macarons, that delicate French pastry, is often confused with macaroons, an equally delightful but slightly less fussy coconut confection. French macarons consist of two meringue cookies with a thin, crispy shell, a chewy exterior, and a delicious filling. Some pastry chefs use a simple ganache or buttercream filling, while others pipe a dot of jelly or a bit of caramel into the center.
Regardless of how they are flavored, the path to perfecting these tiny cookies is fraught. With just four basic ingredients — almond flour, egg whites, sugar, and powdered sugar — these petit fours are susceptible to any deviation from proper technique, temperature, and even humidity levels. Rush the process, and you'll face tray after tray of sad, flat, crunchy disappointments.
The odds you'll make some common macaron mistakes when starting out are high, but don't let that put you off. With patience and practice, you too can master this deceptively difficult cookie. When you do, friends and family will be amazed by your ability to turn out the prettiest pastry.
1. Bake on a dry day
It is no secret that pastry prefers dry conditions. The chemistry of flour and egg requires a delicate balance of moisture introduced at the proper time. Ambient humidity caused by a hazy summer day or a Sunday afternoon downpour can torpedo your success before you even start.
How do you know your macarons are doomed? It starts with the eggs and ends in the oven. Excessive humidity means your egg whites will take longer to whip than usual. If you don't often whip egg whites, you might not notice, but wait until you get to making the batter. The batter will be runny and spread quickly as you pipe it, and resting times will double or triple. When that happens, don't bother baking the cookies. No "feet" will form (more on that below), and the cookies will crack in the oven.
But it is possible to make macarons in humid conditions. Turn up the air conditioner or add a dehumidifier to your kitchen for the duration of the bake. You can also add stabilizers to the egg whites (egg white powder, cream of tartar, or lemon juice) to counteract the excess moisture.
2. Measure precisely
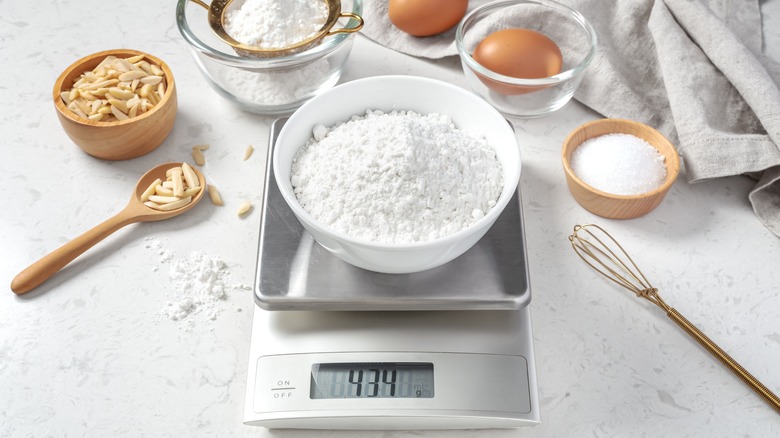
Baking is a science and an art, but science matters most when it comes to making macarons. The basic ingredients need to be combined in the proper ratios, and the only way to measure that precisely is to throw out the measuring cups and use a digital scale.
Digital scales eliminate any guesswork or imprecision by giving you the exact weight (in grams or ounces) every time. Yes, you'll need to make sure your scale is accurately tared (see the directions for doing that on your specific model), and you'll also need to place your scale on a flat surface. But for everyone who has wondered if a cup of almond flour is the same as a cup of chopped almonds, wonder no more. Some macaron recipes call for grinding your blanched almonds, and those that give weights will ensure you have exactly the amount you need.
Plus, a digital scale eliminates the issues that can arise when measuring by volume. A pound of feathers and a pound of gold weigh the same but have a different volume, and the same is true with the building blocks of macarons: almond flour, powdered sugar, and white sugar. Use a digital scale to set yourself up for success.
3. Sift dry ingredients

Because the only raising agent is egg white, every dry ingredient added must be as light as possible. Almond flour is notoriously coarse and mealy, and the problem is exacerbated if you grind your own. Larger pieces of almond flour can weigh down the batter, preventing a good rise and the formation of feet (the ruffled edges at the base of the macaron).
Sifting your almond flour and powdered sugar combines and aerates both ingredients, making for a lighter cookie with a delicate structure. This consistent size means your piping nozzle won't clog, either.
If you have ground your own almond flour, start with a medium-mesh sieve to get rid of the largest almond particles. You may be able to move to a fine-mesh sieve for a final sift, but almond flour particles may be too large to pass through. If you have a regular flour sifter, one pass is usually enough to combine your dry ingredients and ensure consistency.
4. Age your egg whites
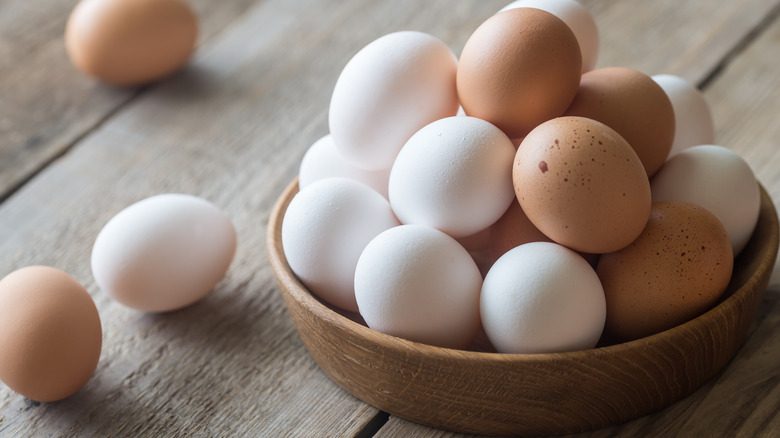
In many types of cooking and baking, fresh ages are preferable, but macarons flip this notion on its head and require an aging process. This is an area of some controversy, with some pastry chefs using any old egg straight out of the carton, but some of the most respected chefs in the world age their egg whites for a drier consistency and maximum volume.
So, what does it mean to age egg whites? Separate your eggs at least one day before macaron making (and up to five days). Put the separated whites into the refrigerator, covering them with a paper towel or dishcloth to allow them to breathe. Before you bake, remove the egg whites and bring them to room temperature. This last step is critical. Cold egg whites take longer to whip to the proper consistency and will not be as voluminous as those that have come to room temperature.
Aging egg whites will reduce their water content, leaving behind only the proteins in the egg. The drier the egg white, the more stable the meringue (and the faster they reach appropriate consistency).
5. Make a stable meringue
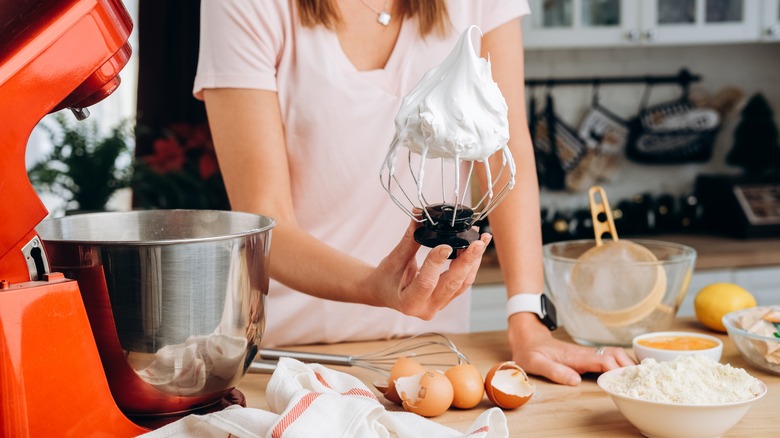
A stable meringue is the building block upon which the rest of this pastry is formed. It starts with a clean, grease-free mixing bowl and wire whip. Grease can hinder egg whites' ability to reach full volume.
Beat egg whites until they form stiff peaks. This means the egg white should stand straight up from the beater in a peak that does not droop to one side. Overbeaten egg whites have clumps along the edges of the beater, so check your consistency frequently when it starts to get close.
Once your egg whites are beaten, you'll make your meringue. Ironically, the best French macarons are made using an Italian meringue. French meringues incorporate granulated sugar into the whipped egg whites, but Italian meringue utilizes sugar syrup at 240 F, gradually added to the egg whites as they whip. The Italian method makes for a sturdier meringue — necessary for a macaron to develop its feet (also called pieds in French).
If you prefer not to mess with boiled sugar syrup, there are other ways to stabilize your French meringue. Some pastry chefs add a pinch of cream of tartar or powdered egg whites, while others use a drop or two of lemon juice. This choice may also depend on your macaron recipe — some macarons require a specific process.
6. Macronage properly
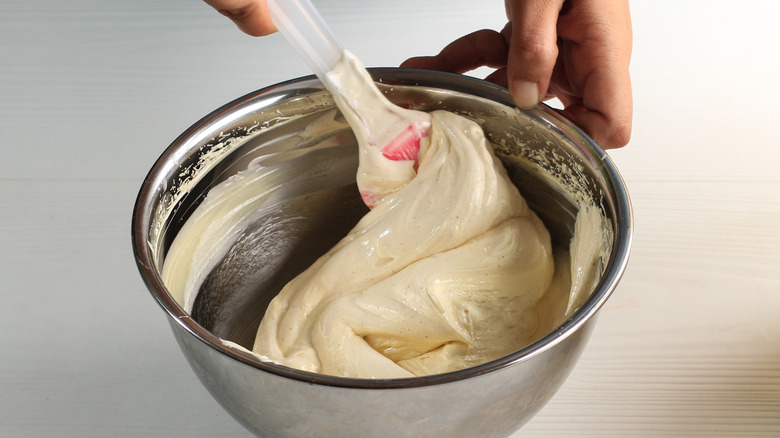
Your dry ingredients are perfectly weighed, and your meringue is beautifully glossy and pillowy — it's time to macaronage. Macaronage is the fancy French term for the technique in which you combine the dry ingredients with your luscious meringue, and the technique (and timing) matter.
You'll start by adding half of your dry ingredients to your egg whites and folding them carefully. Instead of chopping down with a spatula, scoop up from the bottom of the bowl and swirl around the edges. Think of mixing the meringue up instead of pushing the dry ingredients down. This keeps the air in the meringue.
Add the second half of the dry ingredients and continue to mix gently until properly combined. There are several ways to check this. You should not see any dry ingredients remaining, but texture matters here. It's ready when your batter is glossy and falls off the spatula in triangle sheets. You can also check if it forms ribbons as you let it fall back into the bowl or if you can draw the number eight with the batter.
The danger here is overmixing or undermixing. Overmixing creates a runny batter that will not properly set, rise, or form feet, and undermixing means lumpy or hollow macarons that don't have feet. You're looking for that Goldilocks consistency, so stop and check after a couple of minutes of macaronage.
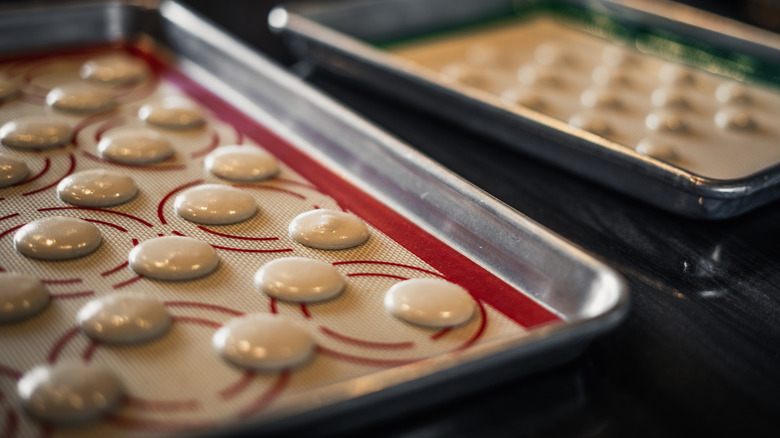
7. Use silicone mats
As with almost everything about baking macarons, opinions are divided on whether silicone mats or parchment paper is better for perfect macaron shells. Both are nonstick and work, but there are many reasons why silicone is superior for baking macarons.
Because of their design, silicone mats disperse heat more evenly. This means that a tray of macarons bakes at the same rate — no more nearly raw macarons on one side and desperately overbaked shells on the other. Silicone mats also prevent burning (although anything can burn if left too long in the oven, regardless of what you use on your baking sheet).
Silicone mats can also be purchased with perfectly sized macaron circles already printed on them. This helps bakers create the uniform sizes needed for sandwich cookies. These sheets are available in the most common baking sheet sizes, which means no overhang to burn on the oven walls.
Finally, silicone mats are an ecologically friendly choice. Yes, there is the extra step of cleaning the silicone sheet, but that is a small price to pay. Some parchment paper is also bleached, which is another downside.
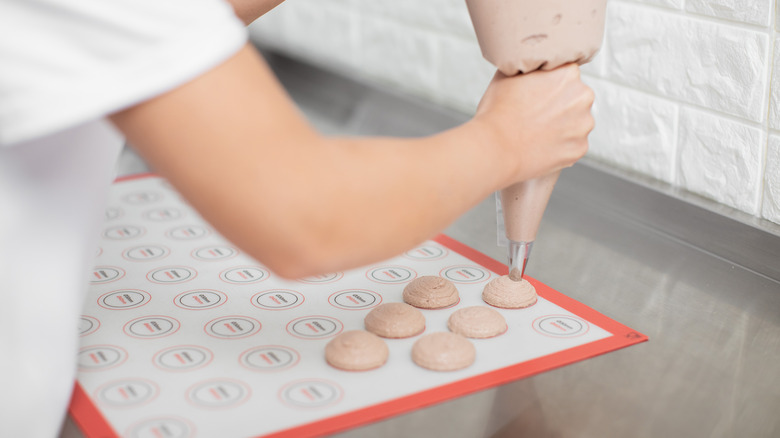
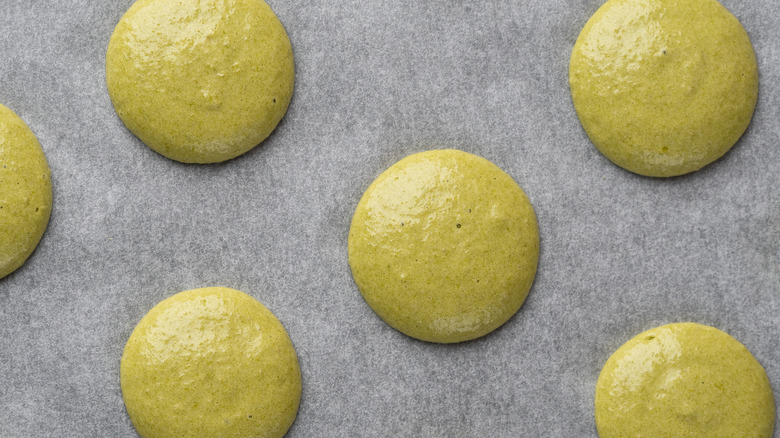
8. Pipe consistently
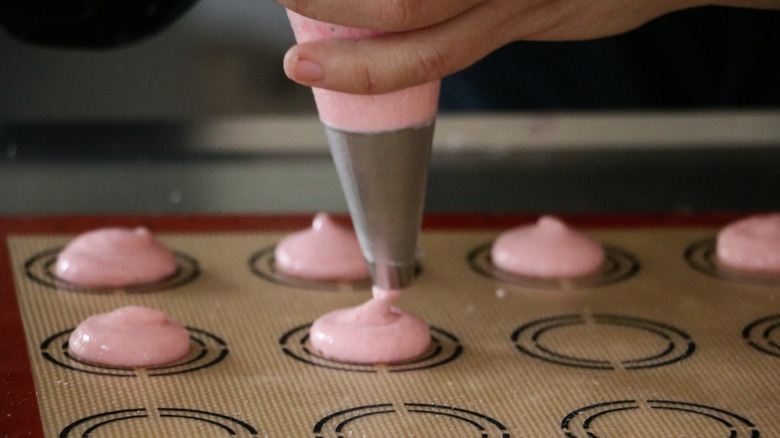
The only way to get consistently sized macarons is to use a piping bag and a silicone mat with pre-printed circles. If you prefer to use parchment paper, take the time to draw one-and-a-half to two-inch circles spaced an inch or more apart.
Your macaron batter will be drippy (not runny), so it may be challenging to fill a piping bag. Place the piping tip in the bag — use a piping tip with a ¼ or ½ inch hole — and put the bag in a tall glass, folding the excess bag material over the rim. This makes it easier to scoop the batter into the piping bag. If you don't have a piping bag, you can use a Ziploc bag with one corner cut off.
Once you have the batter in the bag, make sure all of the air is out of it by gently squeezing the bag. Twist the top of the bag so the batter does not leak out, then pipe circles onto your silicone mat at a 90-degree angle (straight up and down, not angled sideways). If you are concerned about your ability to pipe properly, practice a few circles on a plate before you begin.
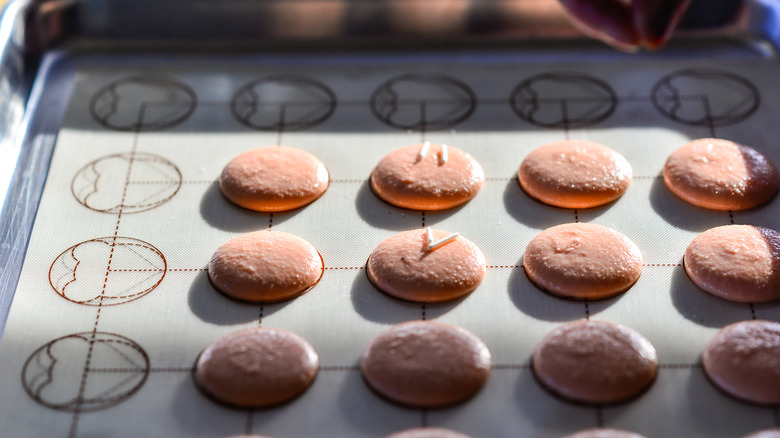
9. Master the tap
Once your tray is piped, it's time to release some latent aggression. You spent much time adding air to your egg whites to create volume, but this same air can create havoc during baking. Trapped air can cause bubbles in the baking, which then become cracks during cooling.
To prevent this, you'll need to master the tap. The key is a firm bang on the counter that does the job but doesn't move the perfectly piped circles. Hold both sides and bang down on the counter evenly if your baking sheet is rimmed. No rimmed handles? That's okay. You can hold on to the edge of the sheet and bang down. Be careful not to slant the sheet as you tap it on the counter.
Tap the baking sheet on the counter five or so times for both methods, then look at your shells. You may see small divots where bubbles popped, or you may still see bubbles. If there are only one or two bubbles, use a toothpick to pop them gently. If every shell has bubbles, give the sheet a couple more whacks, then follow up with a toothpick.
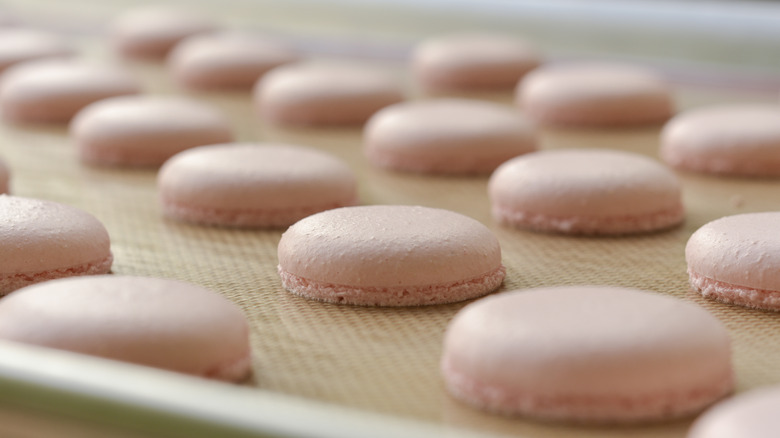
10. Let them rest
Time for everyone to gather their thoughts — baker and macarons included. Since moisture is the enemy of this pastry, they need some time to rest before baking. Resting for 30 to 60 minutes dries out the top of the macaron. This dry top provides something for the egg white meringue to push against as it bakes. The result is beautiful ruffled feet and a crispy, domed shell that is chewy and tender inside. You're looking for a top that is dry to the touch, not tacky.
If you don't rest your macarons, chances are good they will spread out on your baking sheet. Some bakers complain that silicone mats allow their macarons to spread (a feature of silicone mats in general), but it's more likely that their shells were not properly rested before baking.
Remember that shells take longer to dry when there is excess humidity in the air. If this is the case, do not try to speed up the process by adding a fan. This just pushes the humidity around. Turn on the AC or crank up the dehumidifier if you need to. But fair warning: The longer macarons sit out without drying, the more likely they are to deflate. So take whatever steps you need to set those tops in good time.
11. Bake at the correct temperature
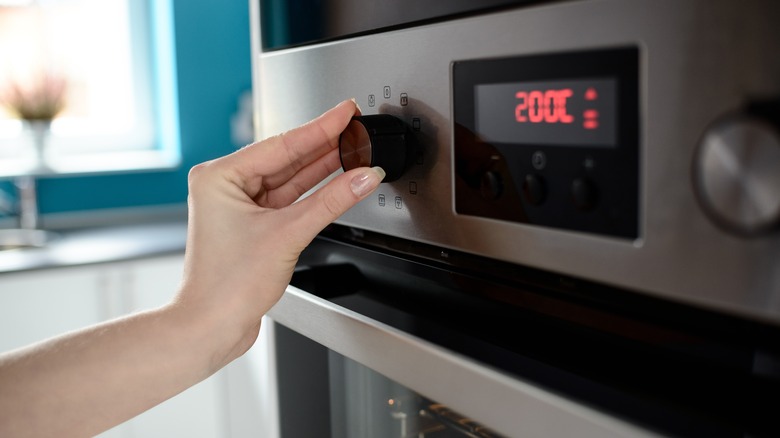
Macarons can be notoriously finicky in the oven (are we surprised?), but bakers disagree on the proper temperature to bake macarons. Recommended temperatures can range from 300 F to 350 F, but one thing is certain: To properly bake at any temperature, you'll need an oven thermometer.
Most cooks and bakers rely on their built-in oven thermometer, but this is a risky proposition. Hot and cold spots can occur because the oven temperature is most accurate exactly where the thermometer is located in the oven. Additionally, ovens have periods of hotter or colder temperatures as they heat up and cool down to maintain an average temperature. The result of this wild fluctuation is imprecise temperatures and uneven cooking.
Use a separate thermometer to gauge the actual temperature of your oven better. Place it in the center of your oven for the most accurate reading, and adjust the temperature as needed. And a word of caution: Even though convection ovens are considered more accurate when it comes to temperature, the continual blowing of air can cause macarons to crack. Convection ovens also run hotter and can overbake your shells in an instant. Stick with a conventional oven and add a thermometer.
12. Bake one tray at a time
Yes, we're all busy, and baking takes time. Press pause if you're new to making macarons and are tempted to load up the oven with multiple baking sheets. Baking one sheet at a time is the better move here. Professional bakers with perfectly calibrated ovens (or the experience to know how to deal with one that isn't) can definitely bake more than one tray at a time, but this can lead to disaster for amateurs.
The temperature of what's in the oven affects the oven, and one tray blocking the flow of heat also affects how each tray cooks. Baking one tray of macarons at a time ensures even baking of that entire tray. However, adding a couple of trays at a time affects heat distribution and can lead to overbaked shells. If you don't have time to bake one tray at a time, you probably don't have time to bake macarons. Save this baking project for a more relaxed day.
13. Cool the macarons completely
Macaron shells are done when the top of each is set and not wobbly. They should also have feet and a lovely shiny top. They need a few more minutes if you touch the top and any part of the macaron moves.
It's easy to get impatient as you near the end of your macaron baking journey, but don't rush the process at this final critical stage. Macaron shells are delicate until they are fully cool, and removing them from the baking tray too quickly can result in cracks and breakage that is not fixable.
When the shells come out of the oven, let them cool on the baking sheet for at least 15 minutes. You will know they are ready to be removed when they do not stick to the silicone mat or parchment paper. At that point, move the shells to a cooling rack. They need to cool completely before filling. If you rush this step, your filling will melt, oozing out and making the inside of your macarons soggy.
14. Concoct a tasty filling
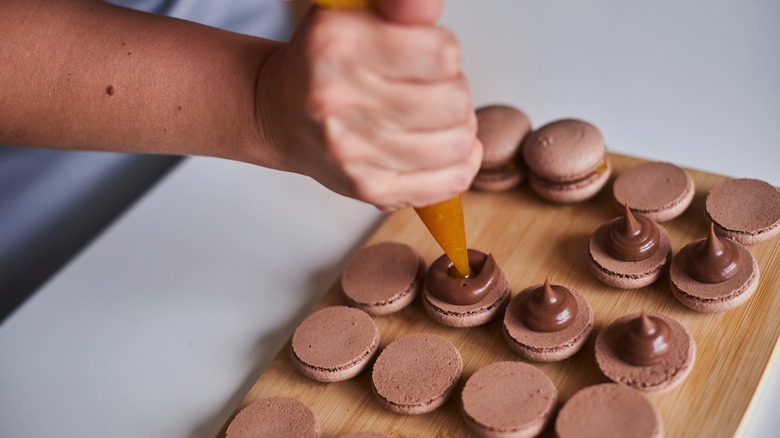
While your shells cool completely, it's time to move on to a delicious filling. If you choose to have a plainly flavored macaron shell, your filling can add a big punch of flavor that is carried nicely by the faint almond of the shell.
Fillings can be a simple buttercream or ganache, or you can get playful and creative with fruit jellies and crunchy elements. Consider the combination of flavors as you create them. Tart fruit jelly and white chocolate balance beautifully. Pistachio macarons are a classic, but add a spin with rose and Champagne flavors.
The filling shouldn't be too runny or stiff, regardless of your flavor combinations. It should be fluid enough to pipe but not so fluid that it drips out. Some recipes may also require chilling, so read carefully and prepare the filling ahead of time if needed. Many bakers start their filling while their macarons are resting.
15. Pause before serving
It's tempting to dive into your beautiful macarons right after filling, and no one would blame you for taking a sample to check for texture and flavors. But be warned: No matter what they taste like right off the tray, the flavor's not complete until they pause in the fridge for at least 24 hours. This is called maturing, another essential part of proper macaron making.
Maturing macarons in the fridge for 24 hours (longer in dry climates or if your meringue was a little dry) allows the shells to absorb the moisture in the filling. The shells will also relax and become chewier in the center as they sit. Both of these actions affect (and improve) the final flavor and texture of the macarons. So yes, definitely taste a freshly filled macaron, but only so you can compare it to the actual finished cookie. You may be surprised at the difference.