How To Roll, Bake And Decorate Holiday Sugar Cookies
6 tips and techniques for becoming a cookie-decorating pro
It's Baking Month: Switch your oven on and get warm, cozy and festive with us this December.
Every holiday season we guiltlessly look forward to overindulging in anything sweet—especially sugar cookies (check out our sugar cookie matrix). They're easy, hold up well to time and travel, and make a fun edible arts-and-crafts session. At the base of every one of these beauties is a solid recipe and technique—nothing fancy, but a few tips and tricks to make sure your holiday sugar cookies are worth every bite.
Let that dough chill. You want your gluten like you want your ideal holiday to be: relaxed. Refrigeration helps with this, and you don't risk the butter being too soft and consequently sticky. Roll small amounts of chilled dough on a lightly floured surface or in between two layers of wax or parchment paper for easier cleanup and smoother rolling. Dust any excess flour off the dough and pastry cutters with a pastry brush before baking. Reroll scraps up to two times for perfect cookies and a third time for slightly less-than-perfect but still delicious cookies. Anything more risks the dough being cracked and too hard. The dough can be made and refrigerated up to one week ahead or frozen for several weeks. Baked and decorated cookies can be stored in an airtight container for up to one week and frozen for up to one month.
Cut, bake, eat, repeat. Cut out shapes with a clean cookie cutter and, with the help of a small offset spatula, transfer them to a parchment paper-lined baking sheet, spacing them evenly apart. The cookies puff a little but don't expand much. Bake the cookies until the edges barely turn golden brown (the bottoms should be slightly golden as well), rotating the sheet halfway through baking. If you're topping the cookies with anything before baking, lightly brush their tops with milk, helping those tiny sugar and glitter granules stick. Be aware that some colorful toppings like large confetti sprinkles burst or melt. It's worth baking a test cookie first—for "science."
Treat your cookies like royalty. Royal icing was made for roll-out sugar cookies. The combination of powdered sugar, egg whites and a touch of liquid (usually water) is the perfect spreadable consistency—not too thin or thick—and holds up well with a solid shelf life (like when stacking them in a container for holiday travel). We like using regular egg whites, but you can also use egg white powder. Though it's worth noting that the consistency won't be as smooth, and the frosting will lack sheen.
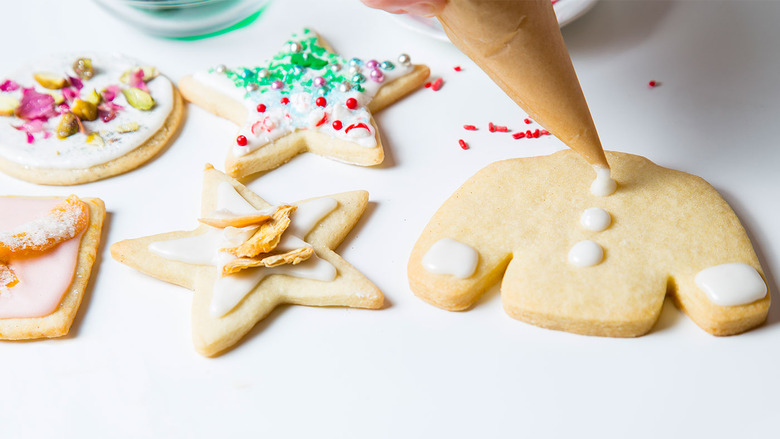
Pipe it and ice it. Use pastry bags to pipe icing for precise and smooth decorating. If, however, you are a normal human being who doesn't keep them on hand (totally acceptable), use a small Ziploc bag or follow these five steps to make a homemade mini parchment paper pastry bag:
① Cut a square from a piece of parchment paper. Cut it in half from one corner to the opposite corner, creating two triangles.
② Lay one triangle flat on a kitchen surface with the long side facing away and the bottom right-angle side in front of you.
③ Turn the right (or left) corner down and inward to the right-angle corner to make a half cone with a tip at the center of the long side of the triangle. The right (or left) corner and corner facing you should be closely aligned.
④ Guide the other half of the triangle around the half cone and rotate the cone so that the corners of the triangle face you. Grab onto all three corners to keep the now fully formed cone from unraveling. Pull down on the corners to close the tip.
⑤ Fill the cone halfway to three quarters to the top with icing and fold the ends down and over the cone to seal. Cut the tip as small or as large as you wish.
Pipe the icing over your cookies, starting with a border about one-sixteenth inch from the edge and then filling in the middle. Use a toothpick to help evenly spread the icing.
Stay in top shape. Sprinkles, glitter dust, edible pearls or anything else pretty and nontoxic should be added immediately after icing, since it dries fast. Keep any unused icing completely covered with a piece of plastic wrap directly touching the icing, because air is the enemy and will dry it almost immediately.
Channel your inner Picasso. Use food coloring to make a watercolor-like medium to decorate your royal icing-frosted cookies. Make sure the icing is completely dry, which should take a minimum of two hours, but preferably overnight. The painting process dissolves the top layer of icing, and if it's not dry all the way through, you risk ugly (and disappointing) cracks and dents. Thin out food coloring or gel with water, lemon juice or even vodka. Dip your brush in and start spreading over the dried icing surface. Overlap or mix colors, but make sure to let one color dry completely before painting on another. Let the painted cookies dry for one hour, and they should be ready to go.